Search the Omeda Knowledge Base
Lead Scoring
Lead Scoring is located in the Omeda MENU under Manage -> Campaigns

Overview
Lead Scoring is a tool that will allow you to create Lead Score Events, where you can define rule sets and place values against those rules to calculate a score based on a variety of items. Once the event is active, the calculations will run nightly against the customers in the database. You will have the ability to set up multiple Lead Score Events.
- Define a Lead Scoring Model
- Assign points for actions taken by a Customer
- Run calculations to create Customer Scores
Use Cases
- Determine a MQL (Marketing Qualified Lead) for a campaign based on a variety of behaviors or customer attributes.
- Define the value of a customer by creating ranges such as Bronze, Silver, Gold to group them based on various behaviors or attributes.
Setup
To get started, click “Setup New Lead Scoring Event” and define your “Lead Scoring Name”. You can set up multiple Lead Scoring Events and each event needs to have a unique name.
Rules
A Customer can only qualify for single condition within a Rule. If a Customer meets more than one condition at the time the score is calculated, they will be given credit for the one with the Highest Score. Several of the same Rule Types can exist for a single Lead Scoring Event but there cannot be duplicates for same exact qualifying condition (deployment type, demographic, etc.)
Rules include:
- Email Opened
- Email Clicked
- Demographic Rule
- Web Page Visit
- Form Submit
- Product Membership
- Behavior/Behavior Attribute
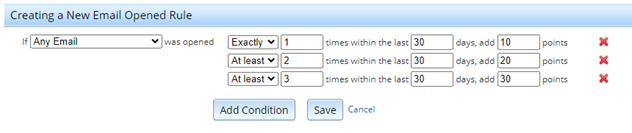
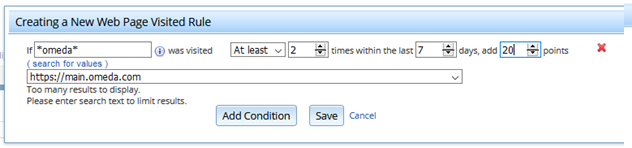
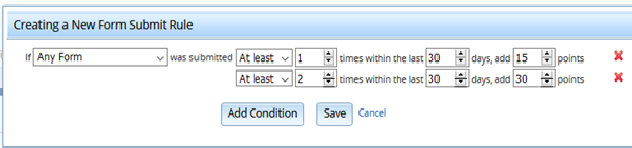
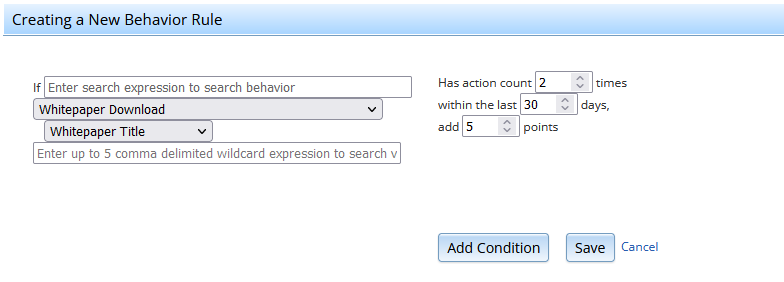
Email Opened / Email Clicked / Form Submit Rule:
This rule is used to give points to a Customer for either opening or clicking an Email, visiting a web page or submitting a Form.
- Choose either the “Any” option or the specific Deployment Type/Webpage/Form.
- Choose between “Exactly” or “At Least” when counting the number of times the action was taken by the Customer.
- Choose the number of times the action was taken by the Customer.
- Choose the timeframe for counting the number of actions taken by the Customer.
- Choose the number of points to give the Customer who meets the specific Condition.
- Click SAVE to add this single rule.

If you would like to add additional conditions to this rule, click ADD CONDITION. Several conditions can be added for the same Rule based on the number of times the Customer did the specified action within the timeframe. Clicking Add Condition will allow you to define additional criteria and point values.
Additional Examples:
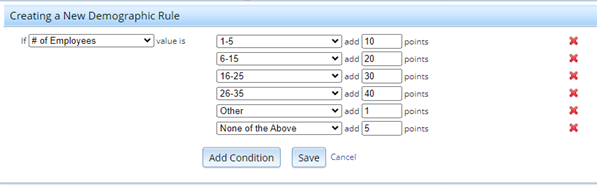
Demographic Rule:
This rule is used to give points to a Customer based on the customer’s demographics.
- Choose the Demographic for the Rule.
- Based on the Demographic Type you will be given either a dropdown of choices, an open text box, or a date picker.
- Choose the number of points to give the Customer based on the demographic response.
Product Membership Rule:
This rule is used to give points to a Customer based on the customer’s subscriptions and subscription classes.
- Choose the Product Type. (Magazine, Newsletter, Website, Event, Sales, Newsstand)
- Based on the Product Type the available Products will be shown in the dropdown.
- Choose if you are scoring for “Active Classes” or “All Classes” (All Classes includes both Active and Inactive Product Classes).
- Choose the number of points to give the Customer who meets the specific Condition.

Behavior Rule:
This rule is used to give points to a Customer based on the customer’s behavior or behavior attribute(s).
- Choose the Behavior from the drop down list of Behaviors for the Rule.
- Based on the Behavior you select, you can optionally select a Behavior Attribute and define a list of behavior attribute responses.
- Choose the number of times the Behavior action was taken by the Customer.
- Choose the time frame for counting the number of Behavior actions taken by the Customer.
- Choose the number of points to give the Customer who meets the specific Condition.
- Click SAVE to add this single rule.
Scores
The purpose of the Lead Score event is to allow you to add points to each rule and calculate those values on an on-going (nightly) basis, giving you various scores to your customers.
- Highest Score
- This will display the Highest Score possible for the Lead Score event if a Customer were to meet all the conditions and the highest possible conditions of each rule.
- Score Descriptions
- This is an optional section that allows the creation of “Friendly Names” for either specific scores or ranges of Scores. This is how you could set up a Low, Medium, High range or Bronze, Silver, Gold, Platinum range.
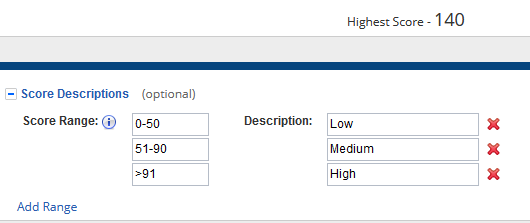
The Scores or Ranges cannot overlap and can only range from 0 to the Highest Score value.
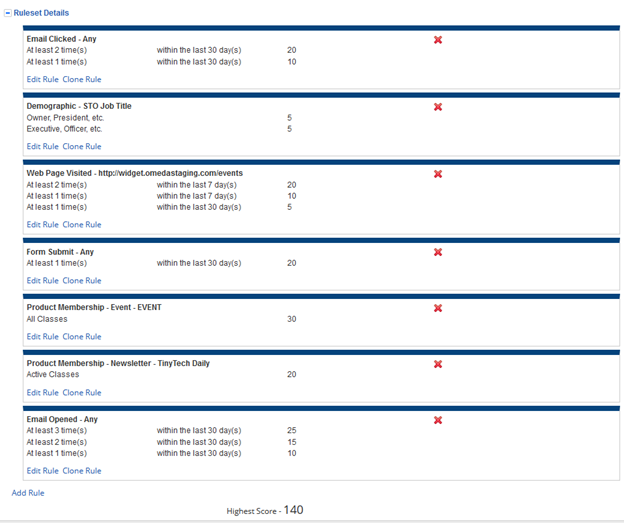
Lead Score Event – Rule Set Example
Activating a Lead Score Event
Once a Lead Score Event is setup and it is ready for the calculations to begin, click in the “Save and Activate” button.
The Lead Scoring Event will run nightly and calculate the customer’s updated score while the job is “active”.
If you want to stop a Lead Scoring Event from running, you can go into the Lead Score Event and click “deactivate”. This will stop the nightly calculation from running.
Editing a Lead Score Event
If you need to edit a current Lead Scoring Event, you can go back into the Lead Score job and make your changes. If the event is already active, you will need to make the event inactive by clicking “deactivate”, make your changes, then Save / Save and Activate.
As a reminder, the calculations are run nightly, so any edits you made to your scores or rules, will recalculate overnight.
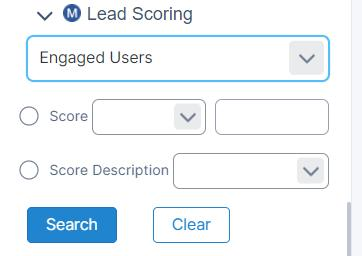
Querying your Lead Score Customers (Audience Builder)
You will be able to query customers that meet your various Lead Score Event rules.
When in Audience Builder, select the Lead Score Name and then query by either selecting the score or the Score Descriptions and hit “Search”.
If you do not see Lead Scoring in your Left-Hand Side Query Menu, it may need to be configured into view for you. You can submit a Support Request to have this added.
Lead Score Search Screen
When you enter the Lead Score tool, you will be able to see a list of all Lead Score Events. Details include:
- Event Name
- This is the name the Owner gave to the Lead Score Event.
- Status
- Active Lead Scores are calculating nightly.
- Inactive Lead Scores are either no longer running calculations or have never been activated.
- Owner
- This is the UserId of the person who originally created the Lead Score Event.
- Last Ran Date
- This is the date the Lead Score was last calculated.
- “Has not run” indicates that the Lead Score event was created but either has not run yet because it was newly activated or it is currently inactive.
- Changed Date
- This is the date the Lead Score Event was last changed.
Future Releases include:
- Audience Builder – Output Lead Score
- Audience Search – View Lead Scores on a Customer record
- Web Services – API access to Lead Scores