Search the Omeda Knowledge Base
Client Empowerment: Demographics

In the Demographics section of Database Settings, all demographics except Consolidated and Calculated demographics are available to search in the Demographics dashboard.
In the table on the dashboard you’ll see information about each demographic including:
- The Demographic Name and ID
- A description of the demographic
- The Question Type
- The username of the user who created the demographic
- The date the demographic was last modified
- and the Status of the demographic (Active or Inactive)
On this screen users can also:
- Select Sync Environments to sync their demographics to their Staging environment. This is likely only necessary when testing API or integration changes.
- Edit or view the settings of a demographic, you can click the name or ID in the first column or the edit icon in the Actions column.
Create a new demographic
Creating a Demographic
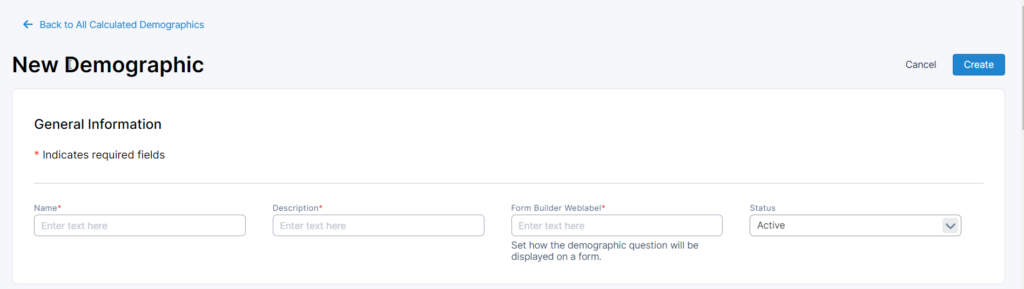
When a user clicks Create + they will be navigated to the New Demographic page. Here there are several sections where they will need to provide information about the demographic.
General Information
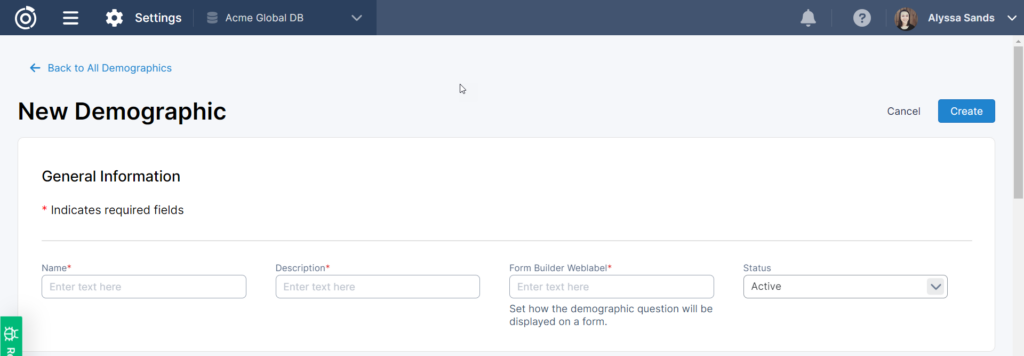
This contains the basic fields required to set up your demographic.
- Name – this will be how you will find the demographic in other applications like Audience Builder, Data Loader, Reporting, etc
- Description – this can be a simple description of the demographic. It can be helpful to use this field to communicate with others how where this field will be used to collect information.
- Form Builder Weblabel – this fields allows you to set a default for how the demographic will be displayed on a Form Builder form making your form set up easier. For example, you might have a demographic named “Primary Business” but the question should be displayed as “What is your primary business?”.
- Status – here you can set whether the demographic should be Active or Inactive. Active demographics can be used across other applications while Inactive cannot. You may want to set your demographic to Inactive if you’re not finished setting it up but need to step away and would like to prevent others from using it.
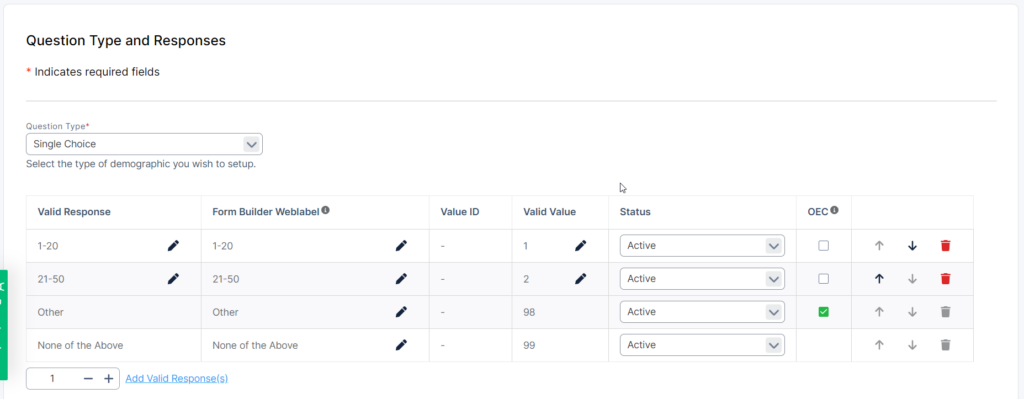
Question Type and Responses
In this section you will select the Question Type for your demographic. There are seven options available:
Yes/No
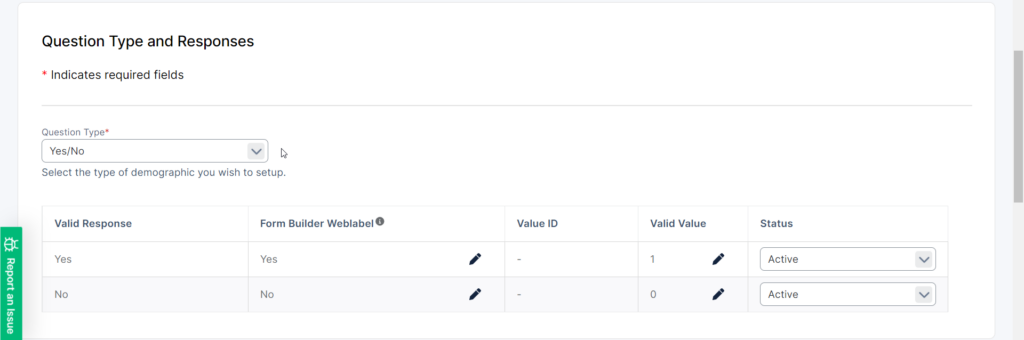
The Yes/No Question Type is to be used for demographics that allow for only a Yes or a No response. No additional responses can be added. When selected a table will appear with the following columns:
- Valid Response – Only Yes and No are available here.
- Form Builder Weblabel – Like it’s counterpart in the General Information Section, you can set the default text that displays for these responses. Click the pencil icon to edit the values.
- Value ID – This will be empty until the demographic is created. This ID will be how the value will be set via Omeda’s APIs.
- Valid Value – By default . the Valid Value for Yes will be 1 and for No will be 0.
- Status – Here you can set the status for individual responses.
Single Choice
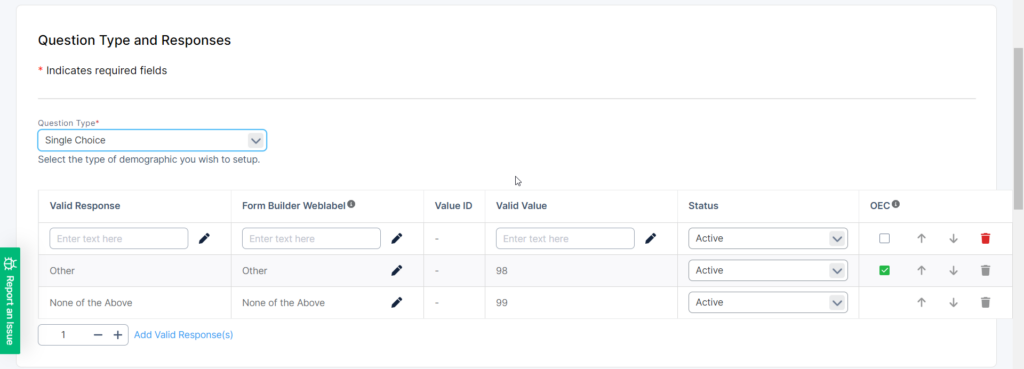
The Single Choice Question Type is to be used for demographics where the respondent must select only one value, usually from a group of values. When selected a table will appear with the following columns:
- Valid Response – Here you can populate the available responses for your demographic. This is how each response will appear in other applications like Audience Builder, Data Loader, Reporting, etc. By default, two responses will already be created for your convenience, “Other” and “None of the Above”.
- Form Builder Weblabel – Like it’s counterpart in the General Information Section, you can set the default text that displays for these responses. Click the pencil icon to edit the values.
- Value ID – This will be empty until the demographic is created. This ID will be how the value will be set via Omeda’s APIs.
- Valid Value – In this column you can set the Value for each response. This should correspond with how you expect the data to be populated when your data is loaded. The valid values for “Other” and “None of the Above” cannot be changed.
- Status – Here you can set the status for individual responses.
- OEC – The checkbox in this column should be selected if, when the respondent selects this response, a text box will be available to them to provide more information which can then be mapped to a more appropriate response using our Open Ended Coding tool. This is set by default for the Other response.
- Actions – In the final column, you can use the up or down arrows to change the sequence for the responses or delete responses.
Below the table, you can click the link ‘Add Valid Response(s)’ to add a new empty row or set a number greater than one to add multiple empty rows.
Multiple Choice

The Multiple Choice Question Type is to be used for demographics where the respondent may select one or more value, from a group of values.
For Multiple Choice questions, you must set how Omeda should handle new responses when previous responses exist in the database. If “Replace existing values” is selected all values will be removed when a new response is provided. For example if an audience member has A populated in the database and answers the question a second time with B, the A will be removed and only B will exist. If “Merge with existing values” is selected, all responses will be intermingled in the database. Instead of like in the example above, with this selection, both A and B will exist in the database.
A table will also appear with the following columns:
- Valid Response – Here you can populate the available responses for your demographic. This is how each response will appear in other applications like Audience Builder, Data Loader, Reporting, etc. By default, two responses will already be created for your convenience, “Other” and “None of the Above”.
- Form Builder Weblabel – Like it’s counterpart in the General Information Section, you can set the default text that displays for these responses. Click the pencil icon to edit the values.
- Value ID – This will be empty until the demographic is created. This ID will be how the value will be set via Omeda’s APIs.
- Valid Value – In this column you can set the Value for each response. This should correspond with how you expect the data to be populated when your data is loaded. The valid values for “Other” and “None of the Above” cannot be changed.
- Status – Here you can set the status for individual responses.
- OEC – The checkbox in this column should be selected if, when the respondent selects this response, a text box will be available to them to provide more information which can then be mapped to a more appropriate response using our Open Ended Coding tool. This is set by default for the Other response.
- Actions – In the final column, you can use the up or down arrows to change the sequence for the responses or delete responses.
Below the table, you can click the link ‘Add Valid Response(s)’ to add a new empty row or set a number greater than one to add multiple empty rows.
Text, Whole Number, Decimal, and Dates
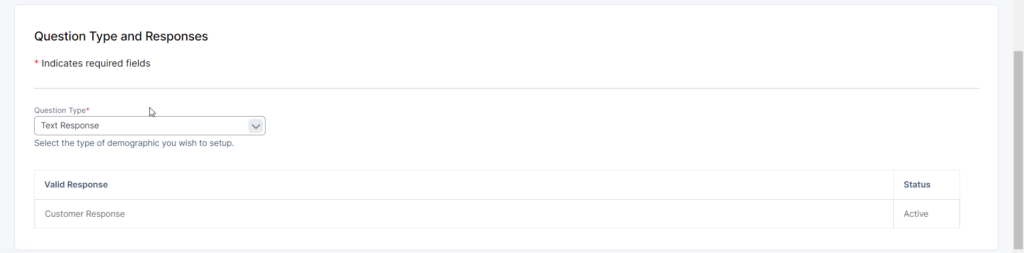
Text, Whole Number, Decimal, and Date Question Types will all look the same when created or edited. The only difference is in the type of data expected from the respondent.
When any of these Question Types are selected, the Valid Response is what is provided by the audience member.
Note: if you are passing demographic data via our APIs (such as the Save Customer and Order), you will want to use the Value ID and not the Valid Value when passing demographic response data.
Advanced Settings
In this last section you will need to select the profiles, in addition to the primary profile, where the demographic should be available. This will enable the demographic to be configured into Audience Builder using Admin > Configure Audience Builder and make the demographic available for mapping in the applications like Data Loader.
Below the Profiles selector, you can also opt to Store Demographic’s History. Audited demographics will already have this value set by default.
What’s Next?
When your set up is complete for a demographic, click Create at the top right corner of the page. Depending on how this demographic will be used there may be some additional steps necessary to use the demographic as desired. Below are some examples:
- In order to query, output, or include in Field Count or Crosshatch reports, the demographic must be configured into Audience Builder using the Admin tool “Configure Audience Builder”. If you don’t have access to this tool or need assistance doing so, you will need to submit a request.
- Add your demographic to a Form Builder form if necessary or submit a support request to Omeda.
- For data processing, add your demographic to your Data Loader mapping/template or to your Input(s) for any existing or new data feeds that need to include this new demo (a support request would be needed for any Input changes).
- If the demographic should be used in the Issue Close process for a Magazine product, you will need to submit a request to the Omeda team to ensure that the demographic will be available in Modeling and the reports related to the issue close.
- If the demographic should be included in a Custom Report, you may need to submit a request to add it your report(s).
- If the demographic responses should be included in a Consolidated Demographic, you will need to update your Consolidated Demographic Mapping or submit a support request to update the mapping.
Editing a Demographic
Users with access to edit a demographic can do so by clicking the name of the demographic or the edit icon on the demographic dashboard.

When editing a demographic, in the General Information section, a user can change the name, description, or weblabel. The status for a demographic can be changed only if the demographic is not used on Form Builder form. If attempted, a message will display listing the Form Builder forms where the demographic will need to be removed in order to be made inactive.
In the Question Type and Responses section, the Question Type cannot be modified, but the valid responses, weblabels, valid values, status, OEC setting and sequence can. Users with access can delete responses if necessary. New responses can be added.
In the Advanced Settings section, the Profiles can be changed as well as the Store Demographic History setting.
Creating a Calculated Demographic
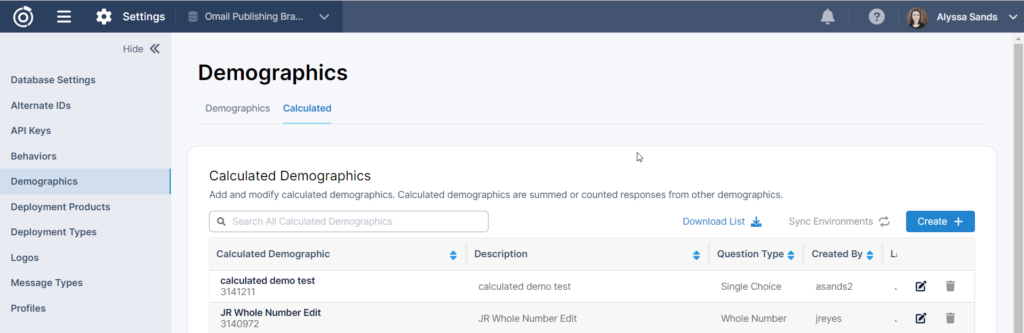
In the Demographics Dashboard, you can review the calculated demographics for a database by clicking the Calculated Demographics tab. A calculated demographic is a demographic where the values for each audience member are derived from the values of other demographics, either by summing the values or counting the number of responses.
On the Calculated Demographics dashboard, like on the dashboard for regular demographics, users can do the following:
- Select Sync Environments to sync their demographics to their Staging environment. This is likely only necessary when testing API or integration changes.
- Edit or view the settings of a demographic, you can click the name or ID in the first column or the edit icon in the Actions column.
Create a new demographic
When a user clicks Create + they will be navigated to the New Demographic page. Here there are several sections where they will need to provide information about the demographic.
General Information
This contains the basic fields required to set up your demographic.
- Name – this will be how you will find the demographic in other applications like Audience Builder and Reporting, etc
- Description – this can be a simple description of the demographic. It can be helpful to use this field to communicate with others how where this field will be used to collect information.
- Form Builder Weblabel – this fields allows you to set a default for how the demographic will be displayed on a Form Builder form making your form set up easier.
- Status – here you can set whether the demographic should be Active or Inactive. Active demographics can be used across other applications while Inactive cannot. You may want to set your demographic to Inactive if you’re not finished setting it up but need to step away and would like to prevent others from using it.
Question Type and Responses
In this section you will select the Question Type for your demographic. There are two options available:
Single Choice
In a Single Choice calculated demographic, responses for whole number demographics will be sorted into the responses you create in this section. For example, if you have asked your audience how many employees work at their location using a whole number demographic, you can use a single choice calculated demographic to sort those responses into ranged single choices i.e. “1-50”, “51-150”, “151-200”, etc.
When Single Choice is selected a table will appear with the following columns:
- Valid Response – Only ranges formatted like “1 – 10” or “10+” are valid. Ranges should not overlap.
- Form Builder Weblabel – Like it’s counterpart in the General Information Section, you can set the default text that displays for these responses. Click the pencil icon to edit the values.
- Value ID – This will be empty until the demographic is created. This ID will be how the value will be provided via Omeda’s APIs.
- Valid Value
- Status – Here you can set the status for individual responses.
Once you’ve created your responses, you can select the Whole Number Demographic you’d like to use to feed into the Single Choice ranged values.
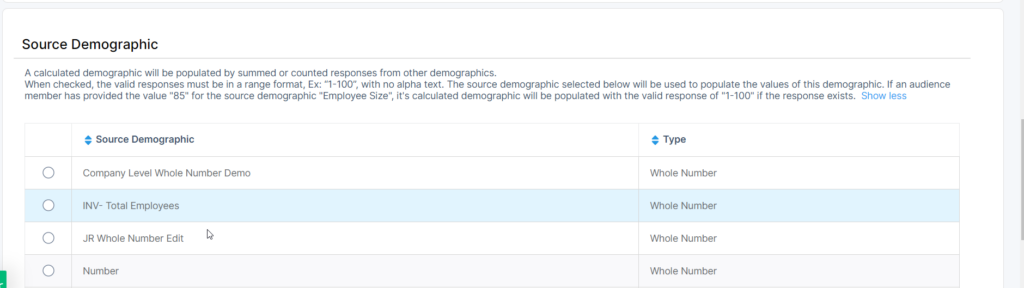
Whole Number
In a Whole Number calculated demographic, responses will be populated for each audience member using whole number demographics and/or multi-response demographics. Depending on the Source Demographics selected, responses will be summed or counted.
If only whole number demographics are selected, the value for the calculated demographic will be the summed total of all the responses.
If only multi-response demographics are selected, the value for the calculated demographic will be the total number of responses.
If both whole number and multi-response demographics are selected, the value for the calculated demographic will be the number of selected of multi-response values + the summed total of whole number response values.
Advanced Settings
In this last section you will need to select the profiles, in addition to the primary profile, where the demographic should be available. This will enable the demographic to be configured into Audience Builder using Admin > Configure Audience Builder.
Below the Profiles selector, you can also opt to Store Demographic’s History. Audited demographics will already have this value set by default.