Search the Omeda Knowledge Base
-
The Omeda Experience
-
Documentation
-
-
- Brand Comprehensive Lookup Service
- Brand Promotions Quantity
- Brand Group Lookup
- Brand Promotions Content By Promo Code
- Brand Promotions By Promo Code
- Behavior Categories Lookup
- Behavior Actions Lookup
- Behavior Lookup Grouped By Product
- Behavior Lookup By Id
- Behavior Lookup
- Demographic Lookup by Brand API
- Deployment Type Lookup by Brand API
- Product Lookup by Brand API
-
- Customer Lookup By Email Address
- Subscription Lookup By Customer Id
- Order History Lookup by Customer Id
- Customer Lookup by Hashed Email Address
- Email Address Lookup By Customer Id
- Gift Lookup by Donor ID
- Behavior Lookup By Customer Id
- Subscription Lookup By Email
- Customer Merge History Lookup
- Customer Lookup By Name and Country
- External ID Lookup By Customer Id
- Demographic Lookup By Customer Id
- Phone Lookup By Customer Id
- Postal Address Lookup By Customer Id
- Customer Change Lookup
- Customer Comprehensive Lookup By Customer Id
- Customer Lookup By EncryptedCustomerId
- Customer Lookup By External ID
- Customer Lookup By PostalAddressId
- Customer Lookup By Customer Id
- Email Validity Lookup API
- Behavior Attribute Lookup by Customer Id
- Order Issue History Lookup by Customer Id
- Show all articles8 Collapse Articles
-
- Email On Demand Send
- Email Deployment
- Email Deployment Clone
- Email Deployment Remove Audience
- Email Audience Assignment Status
- Email Deployment Content
- Email Deployment Approval Lookup
- Email Deployment Schedule
- Email Deployment Cancel
- Email Deployment Search
- Email Flag Email As Invalid
- Email Clicks
- Email - Checklist for Sends Created via API Calls
- Email Deployment Content Lookup
- Email Deployment Unschedule
- Email Deployment Lookup
- Email Deployment Test
- Email Deployment Add Audience
- Email Opt In/Out Lookup
- Email Optout Queue
- Email Optin Queue
- Email Deployment Audience List FTP
- Show all articles7 Collapse Articles
-
-
- Release Notes for Feb. 2 | V24.2
- Release Notes for Feb. 23 | V24.3
- Release Notes for Mar. 15 | V24.4
- Release Notes for Apr. 5 | V24.5
- Release Notes for Apr. 26 | V24.6
- Release Notes for May 24 | V24.7
- Release Notes for June 7 | V24.8
- Release Notes for June 28 | V24.9
- Release Notes for July 19 | V24.10
-
- Release Notes for Jan 27 | V23.2
- Release Notes for Feb 17 | V23.3
- Release Notes for Mar 10 | V23.4
- Release Notes for Mar 31 | V23.5
- Release Notes for Apr 21 | V23.6
- Release Notes for May 19 | V23.7
- Release Notes for June 2 | V23.8
- Release Notes for June 23 | V23.9
- Release Notes for July 14 | V23.10
- Release Notes for Aug 4 | V23.11
- Release Notes for Aug 25 | V23.12
- Release Notes for Sep 15 | V23.13
- Release Notes for Oct 6 | V23.14
- Release Notes for Oct 27 | V23.15
- Release Notes for Nov 16 | V23.16
- Release Notes for V23.17
- Show all articles1 Collapse Articles
-
- Release Notes for Jan 14 | V22.1
- Release Notes for Feb 4 | V22.2
- Release Notes for Feb 25 | V22.3
- Release Notes for Mar 18 | V22.4
- Release Notes for Apr 8 | V22.5
- Release Notes for Apr 29 | V22.6
- Release Notes for May 20 | V22.7
- Release Notes for June 10 | V22.8
- Release Notes for July 1 | V22.9
- Release Notes for July 22 | V22.10
- Release notes for Aug 12 | V22.11
- Release Notes for Sep 2 | V22.12
- Release Notes for Sep 23 | V22.13
- Release Notes for Oct 14 | V22.14
- Release Notes for Nov 4 | V22.15
- Release Notes for Dec 2 | V22.16
- Show all articles1 Collapse Articles
-
- Release Notes for V21.1
- Release Notes for V21.2
- Release Notes for V21.3
- Release Notes for V21.4
- Release Notes for V21.5
- Release Notes for V21.6
- Release Notes for V21.7
- Release Notes for V21.8
- Release Notes for V21.9
- Release Notes for V21.10
- Release Notes for V21.11
- Release Notes for V21.12
- Release Notes for V21.13
- Release Notes for V21.14
- Release Notes for V21.15
- Release Notes for V21.16
- Release Notes for V21.17
- Show all articles2 Collapse Articles
-
- Release Notes for V20.1
- Release Notes for V20.2
- Release Notes for V20.3
- Release Notes for V20.4
- Release Notes for V20.5
- Release Notes for V20.6
- Release Notes for V20.7
- Release Notes for V20.8
- Release Notes for V20.9
- Release Notes for V20.10
- Release Notes for V20.11
- Release Notes for V20.12
- Release Notes for V20.13
- Release Notes for V20.14
- Release Notes for V20.15
- Release Notes for V20.16
- Release Notes for V20.17
- Show all articles2 Collapse Articles
-
- Release Notes for V19.1
- Release Notes for V19.2
- Release Notes for V19.3
- Release Notes for V19.4
- Release Notes for V19.5
- Release Notes for V19.6
- Release Notes for V19.7
- Release Notes for V19.8
- Release Notes for V19.9
- Release Notes for V19.10
- Release Notes for V19.11
- Release Notes for V19.12
- Release Notes for V19.13
- Release Notes for V19.14
- Release Notes for V19.15
- Release Notes for V19.16
- Release Notes for V19.17
- Show all articles2 Collapse Articles
-
-
-
CDP – Customer Data Platform
-
-
- Personalization Overview
- Personalization - FAQs
- Personalization - Reporting
- Personalization - Archiving & Restoring
- Personalization - HTML Templates
- Personalization - Scroll Trigger and Infinite Scroll Pages
- Personalization - Merge Variables
- Personalization - 'Generate Personalization' Option
- Personalization & Metering - Click Tracking
- GDPR Consent Management
- Personalization - A/B Testing
-
-
Integrations
-
-
- Integration with Zapier
- Bring Customer Data in via Webhooks by Zapier Action - POST Event
- Bring Customer Data in using Zapier
- Omeda's Add Customer Action in Zapier
- Send Form Submission Data via Zapier
- Bring Customer Data in via Webhooks by Zapier Action – Custom Request Event
- Formatter by Zapier Action
-
-
-
Analytics & Reporting
-
- Odyssey - Reporting
- Personalization - Reporting
- Reports - Email Device and Client Type Reporting
- Email - Clickbot Reporting
- Reports - Email Reporting
- Metering - Reporting
- Reports - Audience Overlap Report
- Reports - Engaged Companies Report
- Reports-AutoRenewals Analysis Report
- Reports - Audience Report
- Reports - Issue Activity Reporting
- Reports - Overview
- Reports - Web Behavior Reporting
- Reports- FAQs
- Reports - Data Tracker Reporting
- Reports - Audience Builder Reporting
- Form Submit Report
- Behavior Promo Code Report
- Reporting Library
- Show all articles4 Collapse Articles
-
Marketing Automation & Email Builder
-
-
- Email On Demand Send
- Email Deployment
- Email Deployment Clone
- Email Deployment Remove Audience
- Email Audience Assignment Status
- Email Deployment Content
- Email Deployment Approval Lookup
- Email Deployment Schedule
- Email Deployment Cancel
- Email Deployment Search
- Email Flag Email As Invalid
- Email Clicks
- Email - Checklist for Sends Created via API Calls
- Email Deployment Lookup
- Email Deployment Test
- Email Deployment Add Audience
- Email Opt In/Out Lookup
- Email Optout Queue
- Email Optin Queue
- Email Deployment Audience List FTP
- Show all articles5 Collapse Articles
- Email Builder - User Guide
- Email - Clickbot Reporting
- Reports - Email Reporting
- Email - Link Tracking Errors
- Email - Deployment Defaults
- Omeda - Getting Support
- Email - Checklist for Sends Created via API Calls
- Email - Assigning Link Tracking Categories
- Email - Deliverability
- Email - Opt-Out Footer Merge Variable
- Email - Stealth Link
- Email - Behavioral Data
- Email - Automation for Email Sending
- Email - Deployment Type Creation
- Email – Training Schedules for New Clients
- Email - Request a New Deployment Type
- Email - Adding Domains to Safe Sender List
- Email - Deployment Checklist & Best Practices
- Email Deployment Unschedule
- Email Builder - Getting Started
- Campaign Tool - Overview
- Email - Automated ACS Notifications
- Email - Dynamic Content
- Email - Recurring Deployments
- Email - FAQs
- Email - Web Tracking
- Email - Validation Services
- Email Services - Overview & Capabilities
- Email - Web Tracking String Parameter Definitions
- Email - Appending Lists On Triggered Deployments
- Email - Preference Page
- Email - A/B Testing
- Email - Triggered Deployments
- Email - Merge Variables
- Email - User Set-up
- Email - Advanced Features
- Email - Glossary
- Email – Checklist for New Clients
- Show all articles23 Collapse Articles
-
-
-
- Odyssey - Audience Element
- Odyssey - Timing Elements
- Odyssey - Adroll Elements
- Odyssey - Facebook Elements
- Odyssey - Filter Element
- Odyssey - Form Submit Element
- Odyssey - Pathfinder Element
- Odyssey - Export Element
- Odyssey - Split Element
- Odyssey - Personalization Element
- Odyssey - Metering Element
- Odyssey - Email Element
- Odyssey - Goal Element
- Odyssey - A/B Test Element
- Odyssey - Google Ad Manager Element
- Odyssey Fatigue Filter Element
- Show all articles1 Collapse Articles
- Odyssey Overview
- Odyssey - FAQs
- Odyssey - Editing an In Progress Voyage
- Odyssey - Reporting
- Odyssey - Querying Element Visitors in Audience Builder
- Odyssey - Using Profiles
- Odyssey - Creating Custom Templates
- Odyssey - Global Settings
- Odyssey - Email Conditions
- Odyssey - Omeda's Email Designer
- Odyssey - Email Designer Templates
- Odyssey - Voyage Templates
- Odyssey - Merging Paths
- Odyssey - Email Merge Variables
- Odyssey - Error Troubleshooting
- Odyssey - Dynamic Content
- Show all articles1 Collapse Articles
-
-
-
Data Management & Governance
-
- Odyssey - Querying Element Visitors in Audience Builder
- Audience Builder - Product Field Library
- Examples of Audience Builder Queries Using Paid Fields
- Querying Your Olytics Data
- Data Loader - Querying in Audience Builder
- Email - Behavioral Data
- Audience Builder (OnQ) - Date Field Definitions
- Audience Builder - How To Query Customers
- Audience Builder (OnQ) - Query Result Outputs
- Audience Builder - Overview
- Reports - Audience Builder Reporting
- Audience Builder - Admin User Guide
- Audience Builder (OnQ) - Advanced Features
- Audience Builder (OnQ) - Match Evaluation
-
- Client Empowerment: Message Types
- Client Empowerment: Profiles
- Client Empowerment: API Keys
- Client Empowerment: Alternate IDs
- Client Empowerment: Logos
- Client Empowerment: Demographics
- Client Empowerment: Database Settings
- Client Empowerment: Behaviors
- Client Empowerment: Deployment Products
- Client Empowerment: Deployment Types
- Client Empowerment : Managing Your Database
-
-
Subscription & Fulfillment Management
-
Forms & Landing Pages
-
- Form Builder Overview
- Form Builder - Form Dashboard
- Form Builder - Content
- Form Builder - Integrations
- Form Builder - Expressions
- Form Builder - Create a Form
- Form Builder - Settings
- Form Builder - Form Categories and Form Types
- Form Builder - Builder
- Form Builder - Error Log
- Form Builder - Payment Gateways
- Form Builder ADA Compliance
-
- How to send a user back to your website after form submission (redirect to a return URL)
- Form Builder - Adding a This Is Not Me Widget
- Form Builder - Embedding Webforms via iFrame or Javascript
- How To Use Progressive Profiling
- Form Builder - Using the PayPal Payment Method
- Form Builder - Using Campaign Promo Codes
- Using Form Builder to capture a Behavior Subscription Attribute
- Form Builder - reCAPTCHA v3 Implementation
- How To Use A/B Testing on your Form Builder Webform (video)
- Styling Your Form Builder Forms
- Best Practices for Testing Forms
- Form Builder Forms URL Structure and Appending Parameters
- Using a Custom Domain for your Form Builder Webform
-
-
Success Use Cases
-
Professional Services
-
Video Library
-
FAQs
Audience Builder – Admin User Guide
Overview
There are many setup and configurations that an Audience Builder Administrator can perform. For example,
- Configure the Audience Builder Library look and field
- Define which fields are available for output, match evaluation and reports
- Define the contact rules that drive your query counts
Configuring OnQ
Once a profile has been created, you can
- Configure which fields to display and in what order in the Audience Builder Library (displayed on the Left Hand Side of the Audience Builder query screen)
- Decide the fields applicable for Audience Builder output, Match Eval and Audience Builder reports (Cross Hatch, Field Count and Demo Report)
- Define the default Contact Rules for queries
Configuring the OnQ Library
- In the Audience Builder application for your brand, ensure you have selected the profile you want to configure.

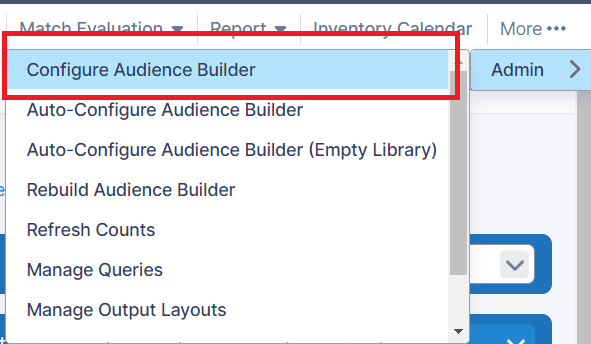
- Click Admin and then Configure Audience Builder.
- In the overlay, the Edit Library tab allows you to configure your Audience Builder menu.
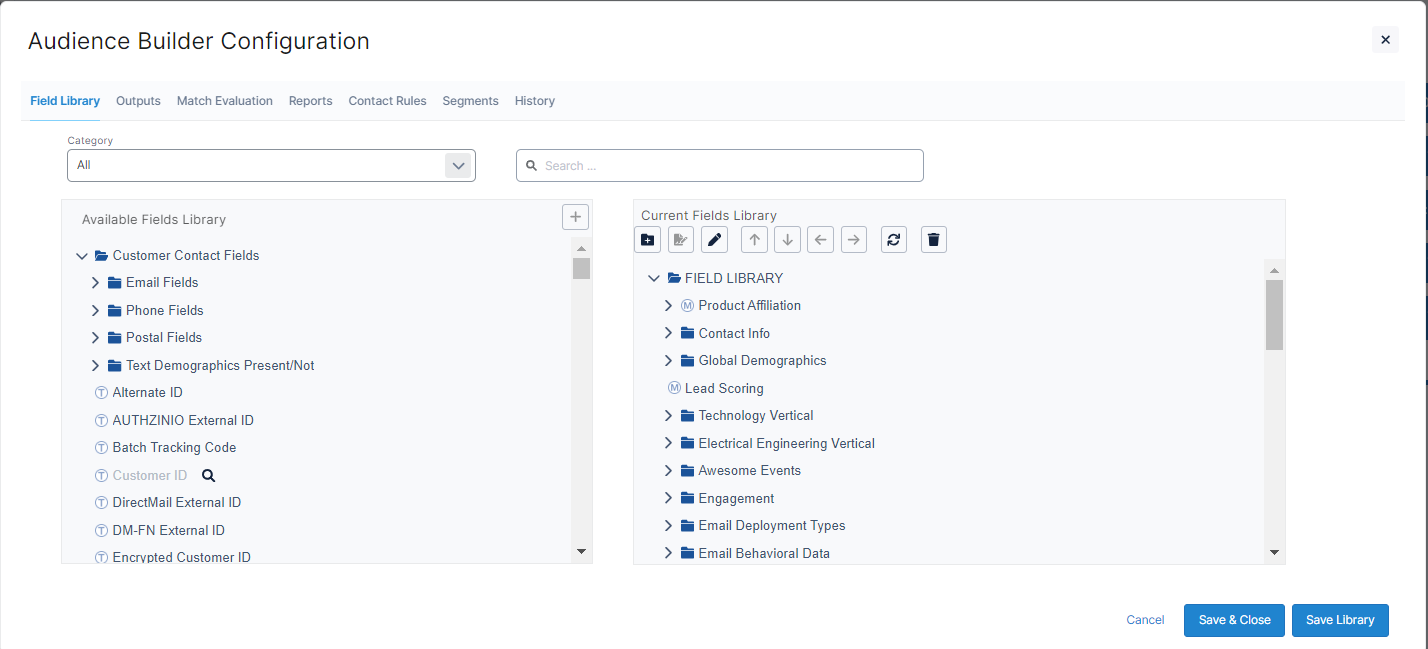
- The overlay displays Your Current Audience Builder Library fields on the right side and Available Fields on the left. There are seven basic categories of Audience Builder fields available:
- Customer Contact such as email, phone and address fields
- Email such as opens, clicks, Fatigue Calendar
- Customer Demographics, Product and Behaviors will display only the ones you had selected in the Profile Settings
- Modeling Demographics are the customer demographics counts as of the date you start the current issue close. Only the demographics and products you have selected in Profile Settings would appear here.
- Query Fields are the queries you had saved previously as query fields within this profile.
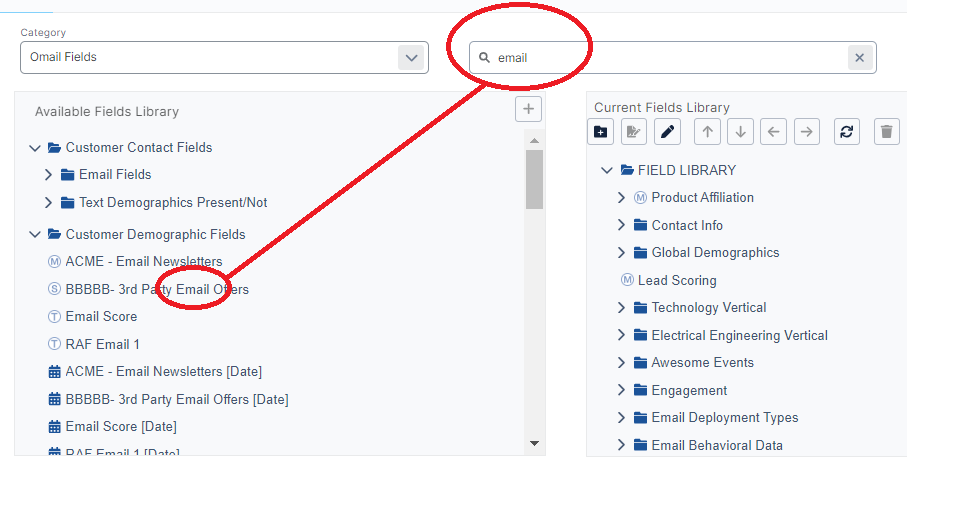
- To search for fields within the Available Fields section, select a category in the dropdown, enter the search term in the search box and click the magnifying glass icon. If the search matches a field name, the fields that include the search term will be segmented out with a plus symbol to the left of the category within which it resides. Click the “+” to find your matching fields.
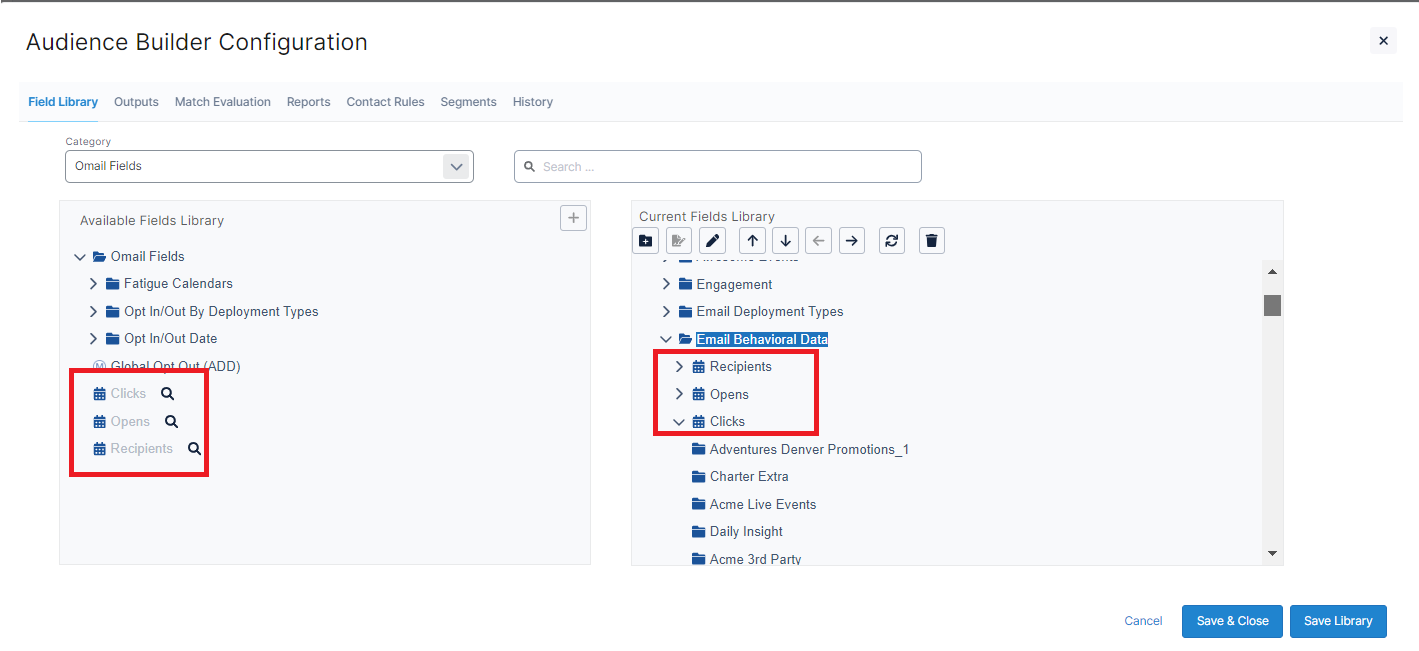
- If a field within Available Fields is greyed out, it means it has already been added into your OnQ Library. To see where it resides in the OnQ Library, just click the magnifying glass icon – even when greyed out – and its position in the Audience Builder Library will be highlighted.
Similar to Excel, you can select multiple fields to be added, removed or rearranged by using the Ctrl key.
- To add fields into your Audience Builder Library, you can drag and drop the fields or use the Add > button. (This issue should be resolved, even when you use drag and drop the content will load automatically)
- To remove fields from your Audience Builder Library, you can drag and drop the fields, use the < Remove button or use the “X” icon. Be very cautious when removing fields as any existing queries with removed fields will no longer work. Do not remove any Email fields without receiving prior Elist team’s approval.
- To create new folders within your Audience Builder Library, click the New Folder icon, enter the folder name and hit Enter.
- To rearrange any folders or fields, you can drag and drop them or use the up/down/left/right icons.
- To rename any folders or fields, click the Rename Item icon or double-click the field, type in the new name and hit Enter. Be very cautious as this will change the name in both the Available Fields and the Audience Builder Library.
- Explanation of the buttons

- New Folder
- Rename Item
- Add demo codes. For your demographics, if you want to automatically prepend to or remove the codes from (e.g. 01, 02) the demographics, click this button.
- Move Up
- Move Down
- Move Right
- Move Left
- Remove Item
- To cancel your changes, click the Cancel link at the lower left of the overlay.
- To save your changes, click the Save Library button in the lower left corner of the overlay.
Configuring the Outputs, Match Eval and Reports
- In the Audience Builder Configuration menu, click the Outputs tab. Select the fields you want available for Audience Builder Email and Text outputs.
- To cancel your changes, click the Cancel link at the lower left of the overlay.
- To save your changes, click the Save Outputs button in the lower left corner of the overlay.
- In the Audience Builder Configuration menu, click the Match Evaluation tab. Select the fields you want available for Audience Builder Email and Text outputs.
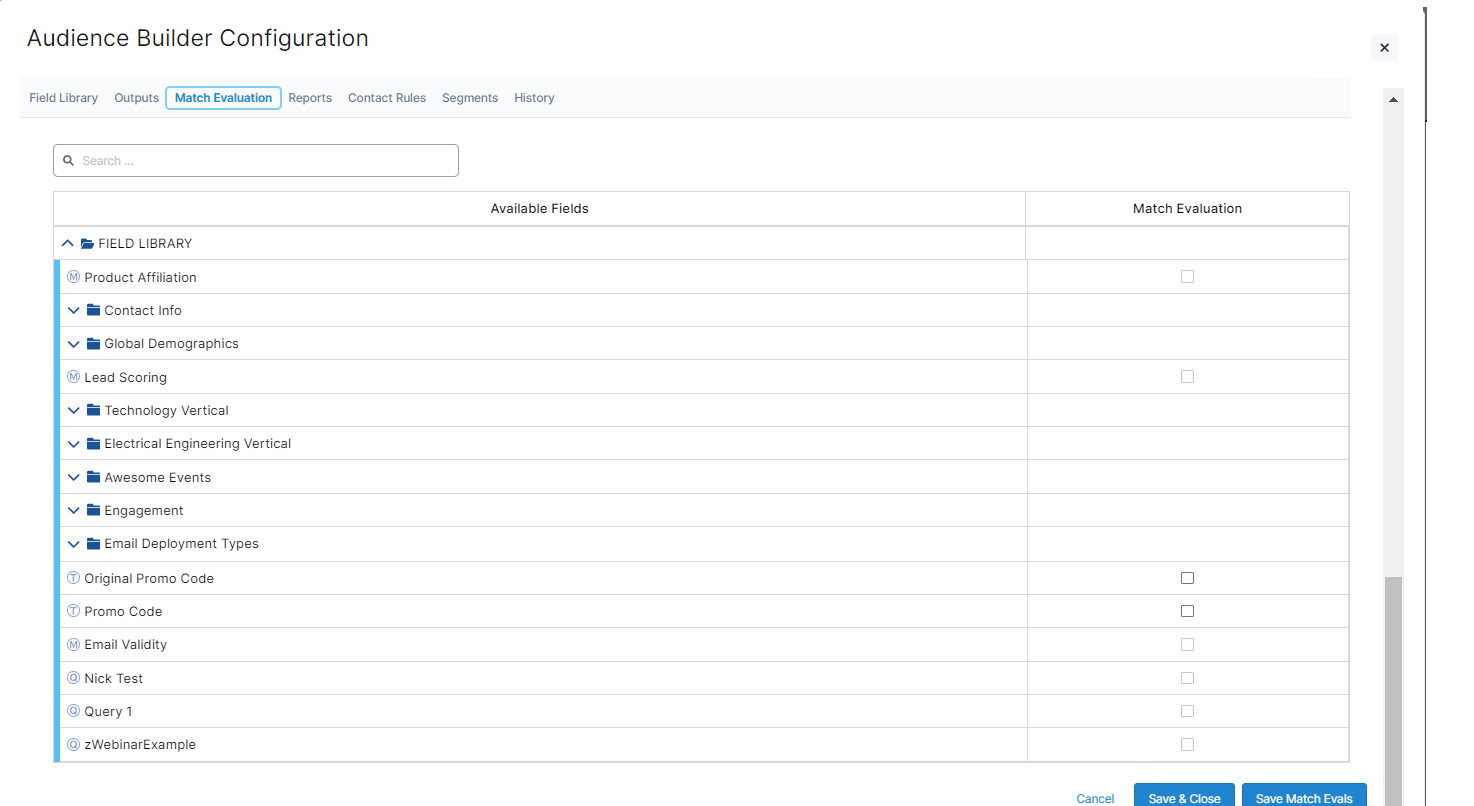
- To cancel your changes, click the Cancel link at the lower left of the overlay.
- To save your changes, click the Save Match Evals button in the lower left corner of the overlay.
- In the Audience Builder Configuration menu, click the Reports tab. Select the fields you want available for your Cross Hatch, Field Count and Demo Reports.
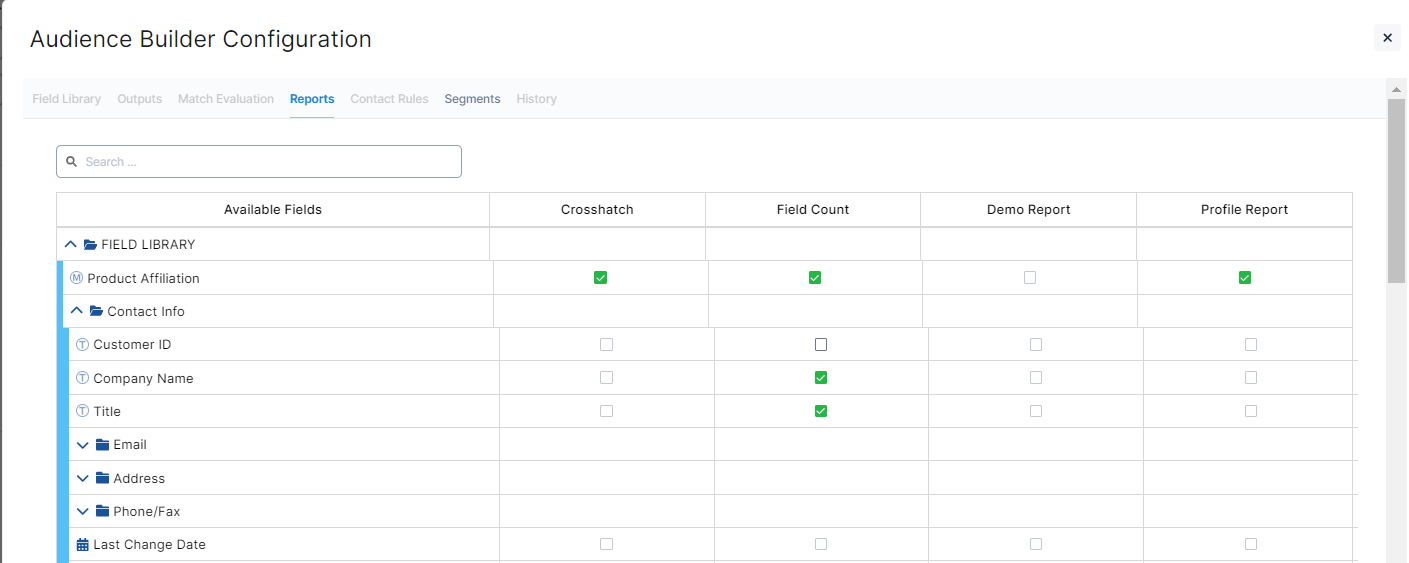
- To cancel your changes, click the Cancel link at the lower left of the overlay.
- To save your changes, click the Save Reports button in the lower left corner of the overlay.
Configuring the Contact Rules
Select the default contact rules when querying or outputting postal addresses, email, phones and faxes. Learn more about Contact Rules with this user guide.
- In the Audience Builder Configuration menu, click the Contact Rules tab. Select the Contact Rules you’d like to use as a default. Only the ones selected in the Profile Settings page will be available.
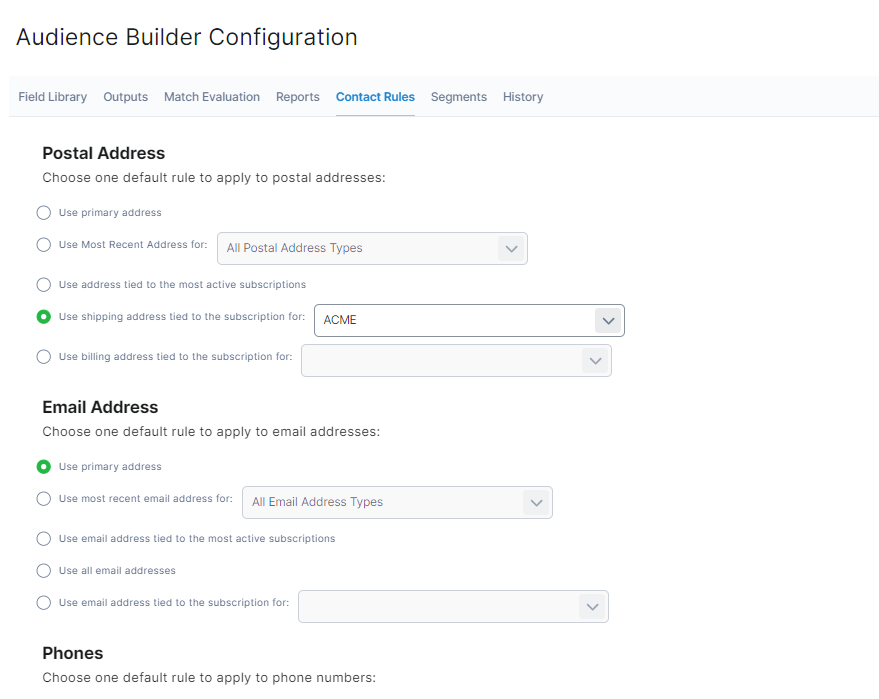
- To cancel your changes, click the Cancel link at the lower left of the overlay.
- To save your changes, click the Save Contact Rules button in the lower left corner of the overlay.
Rebuild Audience Builder and Refresh Counts
You will notice the Rebuild Audience Builder and Refresh Counts options in the Audience Builder Admin menu. Rebuild Audience Builder after you’ve created or updated a profile and if a large amount of data was processed and you’d like to see it updated in Audience Builder . Refresh Counts re-runs all the selections in your current query. For instance if you queried the Fatigue Calendar 2 hours ago and you want to update your counts to pull in any new deployments, then refresh your counts.
Delete Queries
Your team may have created many queries in the past that you no longer use. To remove these queries,
- Go to Admin > Manage Queries.
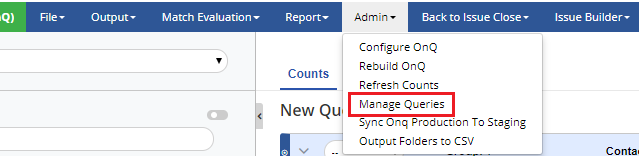
- Search for the queries you want to delete. Check the Select checkbox and click the Delete Selected Queries button.
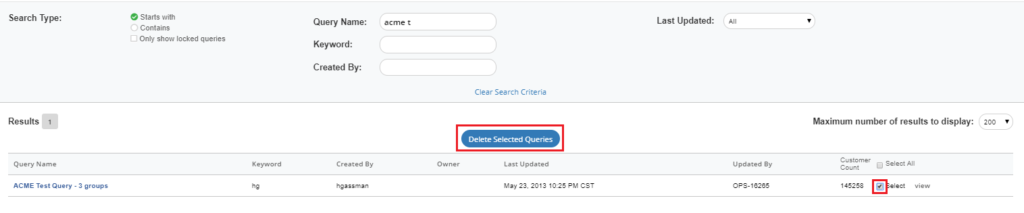
- Click Ok in the confirmation overlay.
- This process is NOT reversible. Also, queries cannot be deleted if they are used by any process outside of Audience Builder, like Issue Close.