Search the Omeda Knowledge Base
Email – Triggered Deployments
General Information
Triggered functionality allows users to enter “triggered” deployments. A triggered deployment allows users to create subsequent or child(ren) deployments based on responses from the master deployment. Note: Only the first triggered deployment is based on the responses received from the Master deployment. All subsequent triggered deployments, trigger 2, trigger 3, etc., is based on responses received from the previous triggered deployment. Various response criterions can be chosen in order to deploy the child(ren).
The application screens used for Triggered Deployments, for the most part, use the same screens as a normal deployment. There have been some modifications to the deployment pleats in order to allow for Triggered deployments.
Master Deployment
In order to activate the Triggered functionality, please click on the “Turn on Triggered Deployments” box in the Deployment Summary pleat
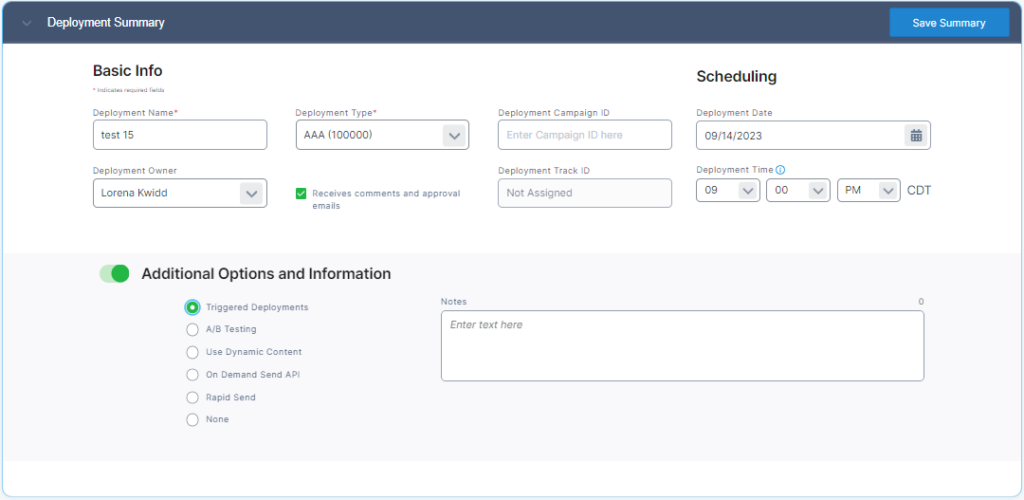
Once the Deployment Summary is saved, a new pleat will appear on the Screen. The Triggered Deployment Summary pleat allows users to create the number of deployments that will be triggered from response information from the master deployment.
One trigger deployment will automatically be available to users. Update the name and campaign ID (optional) and verify/update the deployment date and time. Click the ‘save’ link to create the actual trigger send. You can then create additional triggered deployments if desired.
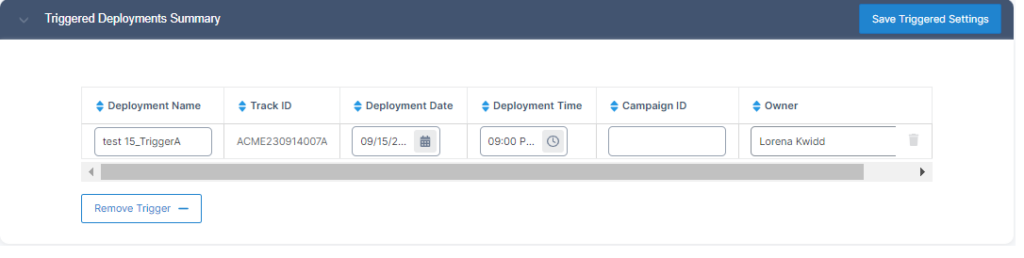
In order to add additional triggered deployments, click on the link. Only one triggered deployment can be added at a time. You must use the ‘save’ link for each one.
The earliest any triggered deployment can deploy is 24 hours after the previous deployment. This will allow the minimal amount of time for response data to be captured in order to be used for the next deployment. We recommend that each consecutive deployment not deploy until 72 hours after the previous deployment in order to allow all deferred mail to be sent and to maximize the audience
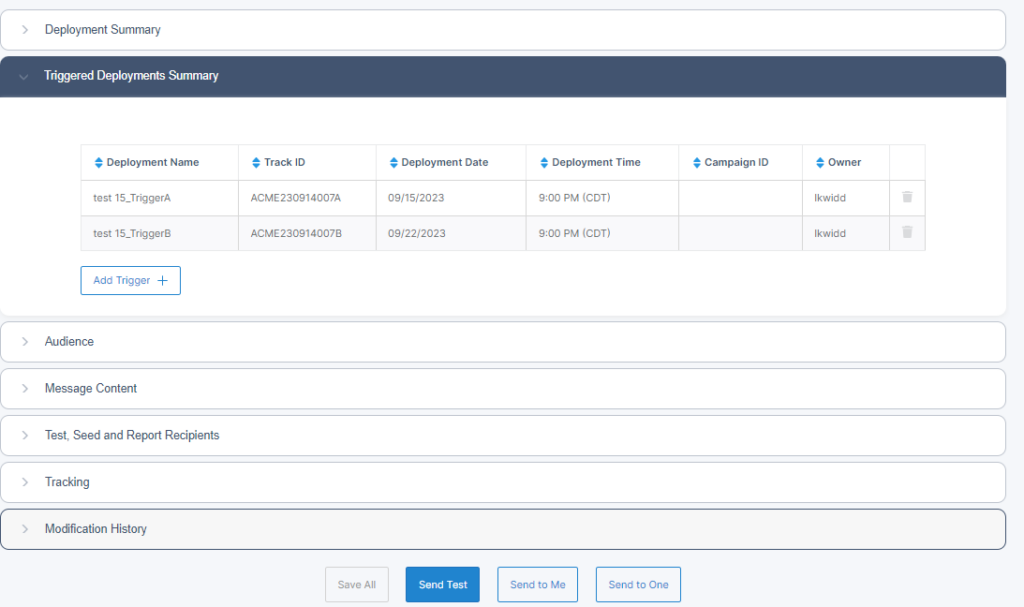
Once the Triggered deployments have been saved, tabs will be added above the Deployment Summary pleat. These tabs will allow users to enter, test, and modify the group of deployments at one time.
The tabs work in the same manner as the current Split tabs in the message content. In order to switch from one tab to another, a user should click on that tab.
The deployment pleats also work in the same manner as a regular deployment.
- The Audience pleat has the same functionality as a normal deployment, with one exception. We currently do not allow splits on the triggers, you can still have splits on the master deployment.
- Uploading or appending additional lists or files is allowed in the master deployment, but all files/lists have to share the exact same headers in the same order. Click the following link to see more detailed instructions on appending lists on triggered deployments.
- The Message Content Pleat has the same functionality as a normal deployment. Users can copy the Message Content settings to the Triggered deployments.
- The Test, Seed, and Approval Recipients pleat has the same functionality as a standard deployment.
- The Tracking pleat has the same functionality as a standard deployment. Tracking of Opens and Links will automatically be turned “on” when the “Turn on Triggered Deployments” box is checked and the Deployment Summary is saved.
- Tracking must be turned on in order to deploy any of the Trigger deployments as they are based on responses (clicks and opens) from the master deployment.
- The Billing pleat (only applicable to certain customers) has the same functionality as a normal deployment. Any billing categories chosen on the Master Deployment will automatically be copied to the Triggered Deployment.
Triggered Deployment(s)
There are only two differences between a Master Deployment and a Triggered Deployment. The first is the addition of the “Criterion for Receiving the Triggered Deployment” pleat and the “Audience” pleat.
All other functionality within the remainder of the pleats is the same as entering a single deployment.
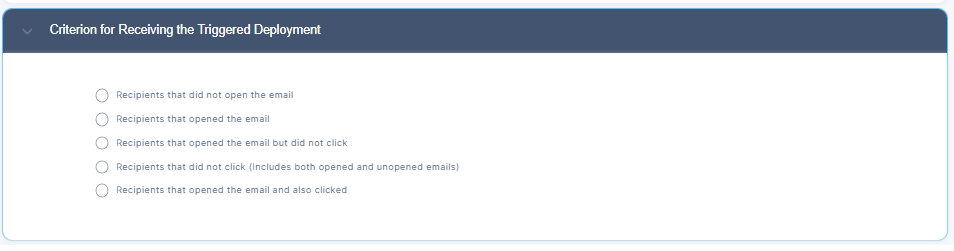
The “Criterion for Receiving the Triggered Deployment” allows users to pick the criteria for the sending of the Triggered deployment. These criterions are based on the responses received from the Master or previous deployment.
The only information available within the Audience pleat on a Triggered deployment is the name of the list that was used in the corresponding Master deployment. Recipients from the Master deployment are the only eligible recipients for the Triggered deployment.
The initial quantity for the audience list when a Triggered deployment is originally created will be the same as the quantity in the Master deployment. This quantity will not change until the audience list is processed during the deployment preparation process. At that time, the list quantity will change based on the criteria chosen by the user.
Sending Tests
Users have the ability to send tests for the Master and Trigger deployments at the same time from within the Master or the Triggered deployment(s). When the Send Test button is clicked, users will be prompted to choose which deployments they would like to send tests for.
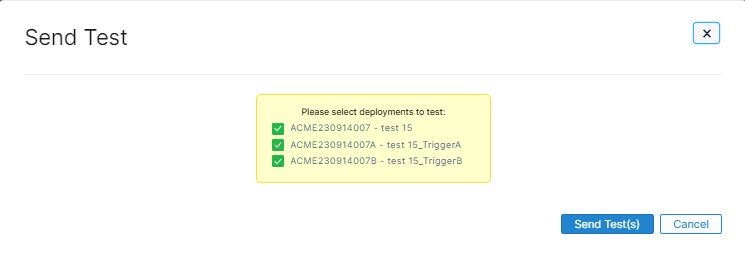
Once a user chooses the tests to send, they should click Send Test(s) on the pop up window. The application will then validate each deployment and proceed with sending tests. If the application finds missing information on any of the deployments, the user will be prompted to fix the deployment and will have to send the test again for that deployment.
Submitting Deployments
Users have the ability to submit the Master and Trigger deployments at the same time from within the Master or the Trigger deployment(s). The application will then validate each deployment and proceed with the submit. If the application finds missing information on any of the deployments, the user will be prompted to fix the deployment and will have to submit the deployment again.
Searching for Triggered Deployments
When searching for Master/Triggered Deployments in Search, each deployment, Master and Trigger(s), will appear individually in the Search results. The reason for this is that each deployment will still stand alone.
When a user clicks Edit on a single deployment, they will be immediately brought to that deployment, but they would still be able to edit any of the deployments associated with that set of Master/Trigger Deployment by clicking on the various tabs above the Deployment Summary
Scheduling Triggered Deployments
Each deployment, Master and Trigger(s), will appear individually on the Approval Queue page. Each deployment must be scheduled individually. A user will not be able to schedule a deployment if the previous deployment is not already scheduled. For example, if the Master has not been scheduled, Trigger A will not be able to be scheduled.
Removing Triggered Deployments
If a deployment has a status of New, a triggered deployment can be removed from the grouping by clicking the Delete box next to the triggered deployment in question and saving the Triggered Deployment Summary. If removing all triggered deployments, the user would need to follow the steps above and then uncheck the “Turn on Triggered Deployments” and save the Deployment Summary.
If a deployment has a status of Submitted or Waiting Review, then the only way to remove a triggered deployment is by canceling that particular deployment.
If a deployment has been Approved, the deployment status will need to be changed, by using the Change icon on the Approval Queue screen. This will change the status of the order to Waiting Review. Please follow the steps listed above to remove the triggered deployment.
If a deployment has been Scheduled, the deployment will need to be unscheduled by clicking the Unschedule link on the Search or Calendar pages. Users will then need to go to the Approval Queue to change the status from Approved by clicking on the change icon. This will change the status of the order to Waiting Review. Please follow the steps listed above to remove the triggered deployment.