Search the Omeda Knowledge Base
Email – Deployment Defaults
Deployment Defaults can be accessed via Email Builder > Tools > Deployment Defaults.
Data entered in the Default settings will apply to both Email Builder and Odyssey email sends.
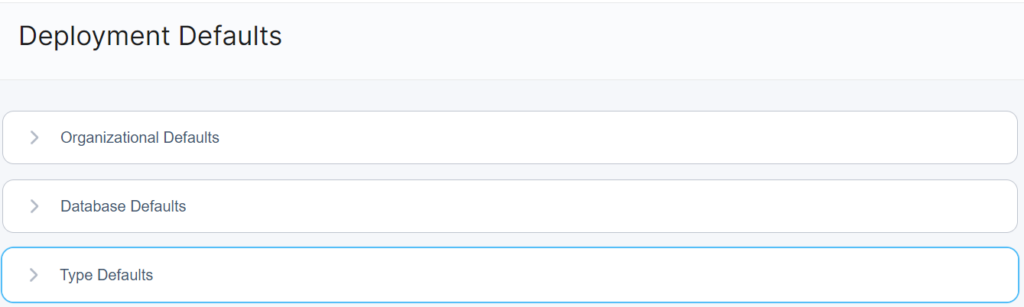
There are 3 distinct sections within the Default Settings:
- Organization
- Database
- Type
You can envision these settings as a waterfall – information entered at the Organization level will waterfall down to the Database level and then to every Deployment Type unless it is changed at each level.
For the Omeda clients that have multiple databases, you may need to enter data at all three levels. The majority of Omeda clients only have one database – in that case, data can be entered at the Database level. Due to the waterfall, duplicate information does not need to be entered in each section.
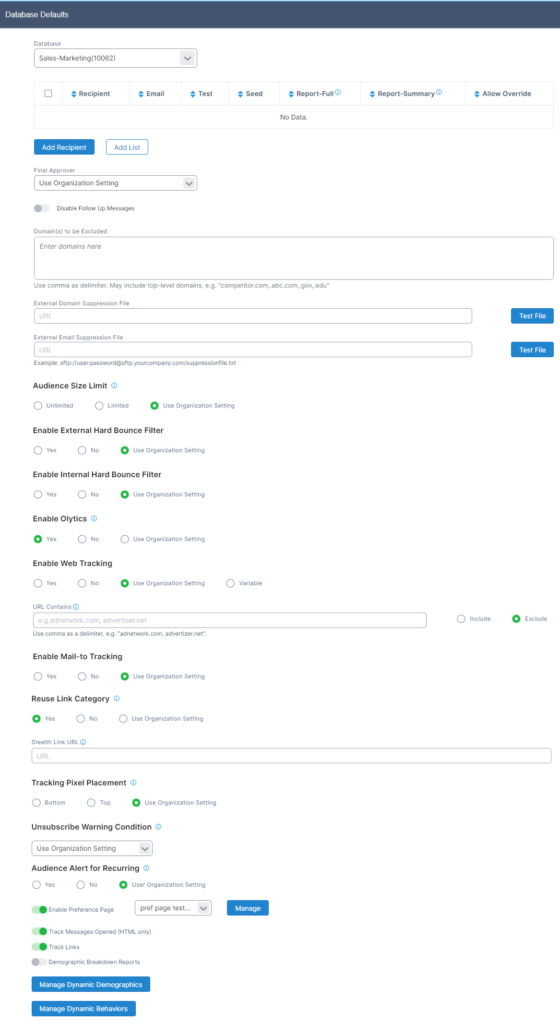
Organization Defaults
Information entered here applies to all databases and all deployments. Note: You must click the Save Changes option in the header row to save all changes.
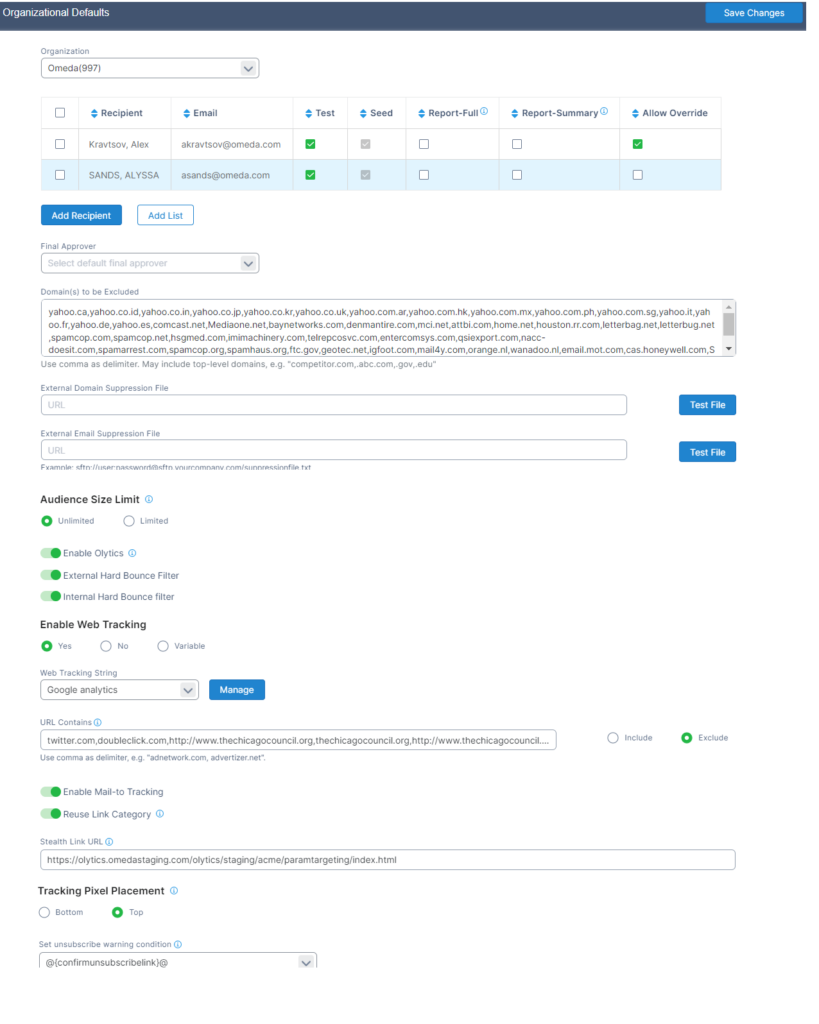
Test and Seed recipients:
Add Recipient — enter the email address (required) plus name (optional)
Add File–upload a .csv file with header of first name, last name, email
Please note: All names entered will be Seeds (receive the final send)
Test — Check the box if also a Test record
Reports–Check the boxes to auto-send the deployment and/or summary reports at 7 days post send
Allow Override–this will allow the user to remove the test/seed from individual deployments
Final Approver: (Optional) Select the one person that will be the final authority in approving and scheduling. This field is required at the deployment type level only if the recurring functionality is used for that deployment type. Users can override the assignment of the Final Approver within individual deployments if it is contained in the Defaults. If not contained in the Defaults, the user would select themselves within the deployment they are working on.
Enable Owner Override: If checked yes and a Final Approver is assigned, the Owner can approve and schedule
Please note that when you Clone a deployment, you will see the following pop-up:
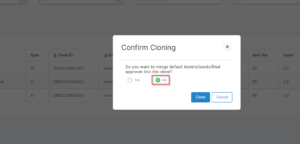
If you select ‘No’ you will not see the additional test recipients from the original in the clone–only those listed as “Defaults” in deployment defaults for that specific deployment type will be listed.
Domains to be Excluded–Enter any domains that should be globally suppressed
External Domain and/or Email Suppression–Your file needs to be hosted on a client maintained sftp site. The file must contain only one column of data – the domain or the email accordingly. Do not include a header row.
Audience Size Limit--Unlimited is the default value. If Limited is checked, a numeric value can be provided. This limit will then be used to cap audience files as they are added to a Deployment.
External Hard Bounce Filter–‘Yes’ is the recommended option. Omeda maintains a filter file of all email addresses from external files that have hard bounced in deployments. Those hard bounces will be suppressed in future sends when the email address appears in an external file. Note: there is no sync between this hard bounce flag to a matching email address on your database.
Internal Hard Bounce Filter–‘Yes’ is the recommended option. When an Audience Builder file or Internal file is added to an Email Builder deployment, email addresses that are marked as Invalid will be suppressed. The Invalid Email Address field is available for query in Audience Builder.
Enable Olytics–‘Yes’ is the default value for clients using Olytics. Otherwise, the correct value is ‘No.’ Please contact your Client Success Manager for any questions regarding this functionality.
Enable Web Tracking–Omeda can automatically append this string to enable your Google Analytics tracking. The default option is ‘no’. To enable this, please follow the instructions here. If variable is selected, the web tracking has to be hardcoded after the merge variable.
URL Contains–If Web Tracking is enabled, you can use this section to indicate any domains to which the tracking string should never be appended
Enable Mail-to Tracking–‘Yes’ is the default value. An option to turn off the Mail-To Links is provided at the Organization, Database and Type levels. Tracking for the Mail-to link can also be turned off via the Tracking pleat within the deployment by locating the appropriate link and unchecking the ‘Link Track’ box for that specific link and saving the Tracking pleat.
Reuse Link Category–‘Yes’ is the default value; if links are categorized within your deployments, when Omeda recognizes a URL that has been previously coded, those values will be auto-populated. Reference here for complete instructions on enabling this functionality: assigning link tracking categories page.
Please note that if Reuse Link Category is only turned off at the Organization level, it will be overridden at the Deployment Type level if it is still turned on there. Please also note that when a new deployment type is created, Reuse Link Category is automatically turned on.
Stealth Link URL–Enter the URL here; this is a generic web page hosted by the client that is used to collect click activity from security products enabled at the receiving server. Please reference this article for complete information
Tracking Pixel Placement–Omeda will insert a 1×1 tracking pixel in order to track opens on html emails. The default position for the placement of this pixel is the bottom of the email. The placement can be changed to the top by clicking that box.
Set Unsubscribe Warning Condition–In this option, you can specify the merge variable or link that is used as your Unsubscribe Link so that Email creators can be warned if the link is missing. By default, the confirmunsubscribelink merge variable is used but the preferencepagelink merge variable, or a specific url, can also be used here.
Audience Alert for Recurring–‘No’ is the default value, if ‘yes’ is selected, the Deployment Owner and the Final Approver of a Recurring Series will receive an email notification if a deployment in the Recurring Series has an audience count of zero.
Database Defaults:
Please note the new options below of ‘Use Client Setting.’ This indicates that the values set at the Organization level will be the default values/values applied for all deployments.
If you have multiple Databases, use the dropdown in the header row to toggle between them.
Note: You must click the Save Changes option in the header row to save all changes.
Please reference the common sections under Organization Defaults above.
The following options will appear at the Database level and not the Organization level.
Domain--If there is one and only one domain assigned for all of your sending, it will appear here. If you use multiple domains across your databases or deployments, this field will be blank.
Disable follow up messages–As part of the testing process, Omeda will send the content plus the Approval Request email which will detail the specifics of the send and then also provide one common URL to a webpage for all testers to indicate if they approve or do not approve. Each tester can then also enter any comments, such as ‘incorrect ad was used’ or ‘the subject line needs to have an emoji.’ If you do not want to use this functionality, check the box for ‘Yes.’
Enable Preference Page–Omeda allows you to create custom preference pages that can be applied to all deployments or to specified deployment types. Complete information about this functionality and how the default values should be set can be found here.
Track Messages opened (html only) and Track Links–Both tracking options will default to ‘Yes.’ This can be turned off within each deployment. The 1×1 tracking pixel to determine opens can only be applied to html messages. Please note that we will infer and count as an open any click that occurs in a text version.
Demographics Breakdown Reports–This will default to ‘No.’ It is recommended to only enable this reporting at the database level if you have rollup/homogenized demos. Otherwise, you can set it at the deployment type level. For details, please reference the email reporting page.
Dynamic Demographics–Omeda allows dynamic content within an email based on either a demographic value or a geographic value that is read directly from the customer record. Please reference here for complete details.
Type Defaults:
Each of your predefined deployment types will appear in the dropdown box which allows you to enter unique default information for each. Once again, all values from the Organization or Database level will waterfall down. Please note the new options below of ‘Use Brand Setting.’ This indicates that the values set at the Database level will be the default value/values applied for all deployments.
Note: You must click the Save Changes option in the header row to save all changes.
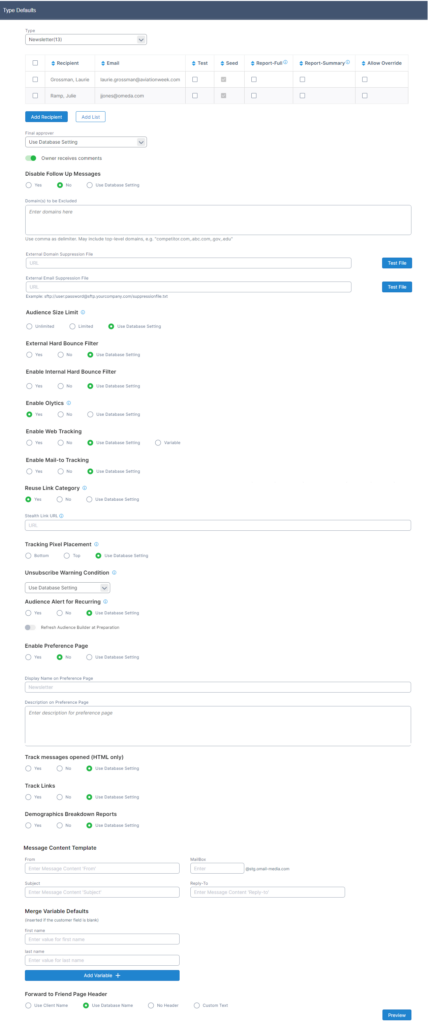
Please reference the common sections above in Database and Organizational Defaults.
The following options will appear at the Deployment Type level and not the Database level.
Owner receives comment/approver email–This will default to ‘Yes.’ This indicates that within each deployment, the checkbox under the Owner’s name will be pre-popped, indicating that the owner will receive an email with each comment logged by the testers on the Approval Page, as referenced above. It can be turned off within each deployment.

Refresh Audience Builder at Preparation–The ‘preparation’ process of the email begins 5 hours prior to the send time if the email is in a scheduled status. If the email is scheduled for either ‘send now’ or for a time less than 5 hours, the preparation process will begin immediately. This process will construct the actual email for each recipient, incorporating all merge variables, to facilitate the email sending at the scheduled time. The option to refresh the audience query from Audience Builder is best used when you are scheduling the deployment 24 hours or more in advance. This will then give you the most updated list based on the criteria in the query. By checking this option in the Defaults, the box will be pre-popped within each deployment. It can always be unchecked or checked as needed if you do not want to auto-populate it from the defaults.
Please note that any deployments created before the change was made here would need to have Refresh AB audience manually selected in the actual deployment–once a deployment is created it can’t be updated automatically.
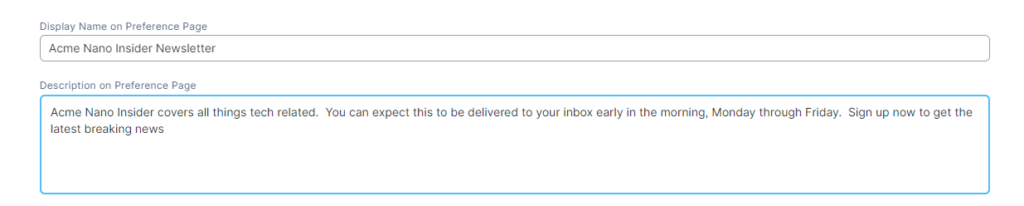
Display Name on Preference Page and Description on Preference Page–Both sections should be completed for each deployment type if you are using the Email Builder preference page option. The display name allows you to use a more friendly name that your recipients might recognize. The Description allows you to enter sales pitch type of information to encourage recipients to sign up. Reference here for complete information.
Message Content Template–If you have standard data for your different email deployment types, enter the information here. It will then pre-pop and save you all those extra keystrokes. If the data is pre-popped into a deployment, the user can always override/change each individual field.

Please note that the option to include an Attachment is no longer functional due to the myriad of deliverability issues that it may create since receiving servers will most likely reject the email, believing that it could be spam/malware.
Merge Variable Defaults–If you use standard merge variables, it can be more efficient to enter a default value which will be used if the audience list is missing data for that cell. This section will display First Name and Last Name. Use the (add new) option if there are other commonly used fields where you would like to store the default value. Within each deployment, the user can override this or default it.

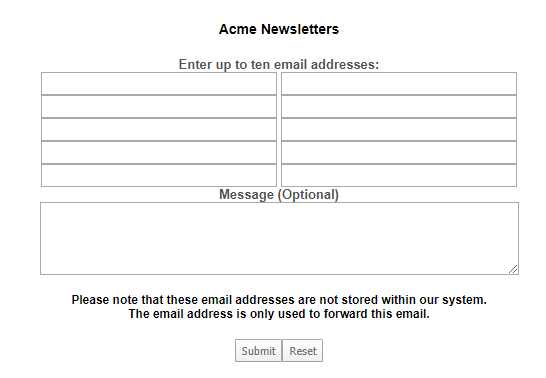
Forward to a Friend Page Header–Use this merge variable in your content @{forwardtoafriendlink}@ to enable a link for your recipients to forward the email to a list of emails that they enter. Please reference here.

This section in the Defaults will allow you to customize the header that appears on the page. The most commonly used option is the Custom Text which allows you to enter the following:
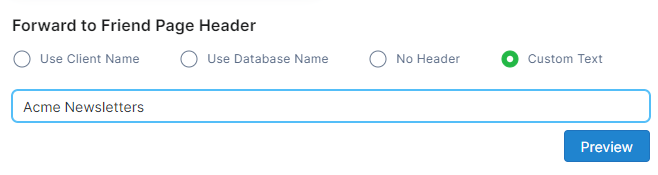
It will then appear as this when your recipient clicks through: