Search the Omeda Knowledge Base
Audience Builder – How To Query Customers
Creating or Opening Your Query
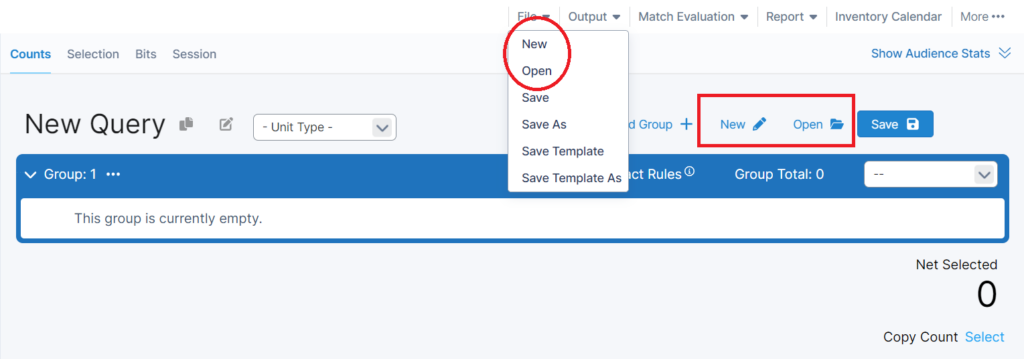
When you start Audience Builder, a new query will be automatically created. You can work on this query or open an existing query. To open a previously saved query, use the Query menu or click on the Open link in the query window. Clicking on new will start a new query.
Searching for an Existing Query
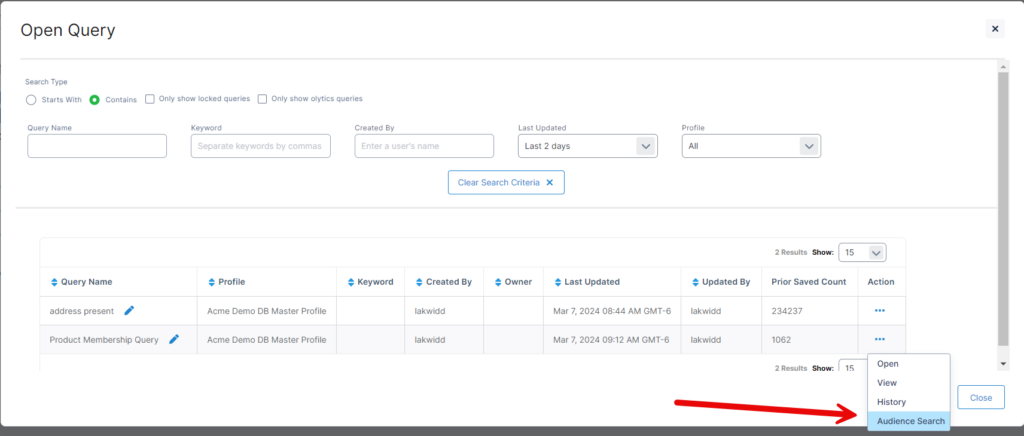
To open a previously saved query, select ‘Open’ from the File dropdown. A modal window will appear and allow you to search for existing queries based on the following fields:
- Query Name
- Keyword
- Created By
- Last Updated (dropdown)
- Profile (dropdown)
You can also set the search type based on one of the following:
- Starts with
- Contains
- Only show locked queries
How to Open Query Results in Audience Search
Once a query has been saved in Audience Builder, you can click the blue “Net Selected” number on the query canvas to open the isolated records in Audience Search.
Another way is to go to “Open” in Audience Builder and select “Audience Search” link to open a saved query results in Audience Search. Note: The results will be based on the last time the query was saved. In order to get refreshed counts, you will need to open the query in Audience Builder and initiate a new save.
These are best used to research small samples of customer records.
Setting Your Contact Rules
Many customers have multiple postal addresses, email addresses, phone numbers and fax numbers. When you are creating a query that includes any of this contact information, you want to make sure you are querying and outputting the contact information that is most relevant to your intended results. Here are some examples:
- If you are planning a conference in Chicago, you will likely want to find the customers whose most recent address is in the Chicago area.
- If you are pulling a list of customer to which you plan to email a newsletter, you would want to query and output the email address associated with that newsletter product.
- If you are doing a telemarketing campaign that will be conducted during the work day, you will want to output a list of the most recent work phone numbers
Your Account Representative will assist you in defining default contact rules. The default rules should be the rules that apply to most of your querying and output needs.
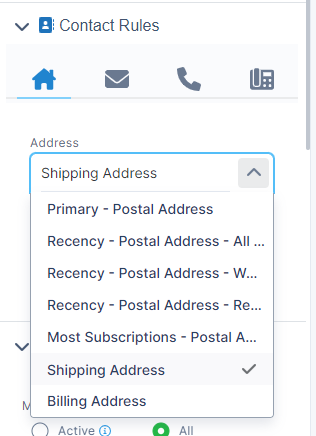
If you are creating a query in which the default rules may not apply, you can view and change your Contact Rules by opening the contact rules and then clicking on tab for postal, email , phone or fax rules. Within each tab you can use the drop down menu to view and change the rules.
For each type of contact information, you have several options for contact rules.
Postal Address:
- Primary: Address determined by your primary postal address rules. Work with your Account Rep to define this rule.
- Recency – All Address Types: The most recent postal address
- Recency – Work: The most recent postal address that is a work address
- Recency – Residential: The most recent postal address that is a residential (home) address
- Most subscriptions: Postal address that is associated with the most product subscriptions
- Shipping Address: Shipping address that is associated with a selected product
- Billing Address: Billing address associated with a selected product
Email Address:
Selecting the correct email contact rule for your query is vitally important. For email sending, using either the Primary or Product Specific are the recommended options. As Omeda is a customer-centric database, we are able to store a different email address for each newsletter and/or magazine product and also programmatically assign a ‘primary’ email address. Please also reference the notes below regarding using multiple contact rules within your query.
- Primary: This is determined by your primary email address ruleset. Please reference this page Admin User Guide or work with your Account Manager to define the ruleset. In our standard setup, the Primary email address would be the most recent email that has not been flagged as Invalid (reached it’s bounce threshold). If the most recent is Invalid, then the Primary will be defaulted to the next most recent. The assignment of the Primary email address is done by an automated job that runs across each database every night. A user cannot specify which email address they would want as the ‘primary’ on an individual record. Use cases for selecting the primary email address include:
- Promotional/3rd party/webinars/any type of send with a specific Call to Action. As the primary is the most recent, this may increase your response rate
- These types of deployments normally do not have a ‘product’ subscription. Your customers receive those types of mailings due to their subscription to one of your products – i.e. a newsletter or a magazine or a behavior attribute. Therefore, there is no product email stored for 3rd party/promotional/webinars/etc. You can only use the primary.
- Product Specific: This is the email address that is associated with a selected product. Omeda defines as ‘product’ as something that has a subscription – i.e. a magazine or a newsletter. Customers sign up for these products. In addition to storing the email address, we maintain a date, promocode, and many other subscription attributes for each product. Please reference the Product Type section here for further explanation. Use cases for selecting the Product email include:
- Newsletters -When creating the audience list for a newsletter, you would want to use the newsletter product email address since that would be the email address used by the customer when signing up. You are prompted to select the product email address when you select the Class field within a product. Simply answering ‘yes’ will change the contact rule for you. You may then want to change the postal address to the ‘primary’ since in most instances, that would have updated and complete information. Many times, the newsletter product may only contain an email address.
- Subscription invoices/renewals – Using the product email is always recommended since that would be the email address from which the customer subscribed.
- Recency – Email Address – All Address Types: The most recent email address
- Recency – Email Address – Work: The most recent email address that is a work address
- Recency – Email Address – Personal: The most recent email address that is a personal email address
- Most Subscriptions: Email address that is associated with the most product subscriptions
- All Email Addresses: All email addresses will be counted. So if customer 123 has two email addresses (123@omeda.com and 123@gmail.com) that match the query, when you output this query, we will have two records that have the same Customer ID but different email addresses in the output. This is to ensure if a customer has subscribed to the same newsletter with two different email addresses, that person will still receive the newsletter in both email accounts.
Phone:
- Primary: Phone determined by your primary Phone rules. Work with your Account Rep to define this rule.
- Recency – Phone – All Types: The most recent phone number
- Recency – Phone – Work: The most recent phone number that is a work phone
- Recency – Phone – Residential: The most recent phone number that is a residential phone
- Recency – Phone – Mobile: The most recent phone number that is a mobile phone
- Recency – Phone – Foreign: The most recent foreign phone number
Fax:
- Primary: Fax determined by your primary Fax rules. Work with your Account Rep to define this rule.
- Recency – Fax – All Types: The most recent fax number
- Recency – Fax – Domestic: The most recent fax number that is a domestic number
- Recency – Fax – Foreign: The most recent foreign fax number
Each group within your query can have its own set of contact rules, which allows you to specify different rules for each group. For example, if you were trying to find the customers that have subscriptions to Magazine A and Magazine B and receive them both at the same postal address, the group for Magazine A should have postal contact rules of Product Specific – Magazine A and the group for Magazine B should have postal contact rules of Product Specific – Magazine B.
For email sending, the usage of multiple groups, each with a different contact rule, can normally increase your audience size for an email deployment.
Newsletter example: This will first include subscribers with their signup email address. It also include subscribers where their product email bounced but you have a deliverable email address assigned as the primary due to other product subscriptions.
Group 1 -use the product subscription attributes and the product email address
Group 2 – use the same product subscription attributes as group 1 but flip to the ‘primary’ email address.
Webinar example: Using the primary and the product email may increase the total audience size due to the makeup of your audience.
Group 1 – select the demographic and behavior attributes, using the primary email address
Group 2 – select a product where the content interest matches to the webinar content, using the product email address.
Adding Fields To Your Query
To add fields to your query, click on the field in the field library and then select the values you want to include. The way you select the values depends on the field type.
| Skittle | Field Type | To Add This Field |
|---|---|---|
| Single Response | Check all values you want to include in the query | |
| Multiple Response | Check values and indicate whether they should be included or excluded from the query. | |
| Behavior | Check values and indicate whether they should be included or excluded from the query. | |
| Date | Type in a date in the format MM/DD/YYYY in the search box or click on the link for the date picker. You can search multiple dates by separating them by commas (ex. 01/02/2012, 01/13/2012) or for a date range by including a dash between dates (ex. 01/02/2012-01/13/2012). | |
| Text | Search for one or more text strings. When you want to search multiple values, wildcard symbols can be used to pull different information: asterisk (*) – 0 to many charactershash (#) – 1 character only #* or *# – 1 to many characters (all fields that have text in them and are not blank) Click on the help link in Audience Builder for further search options. | |
| Yes/No | Check the values that you want to include | |
| Query | Check the Audience Builder query that you want to include in your current query. |
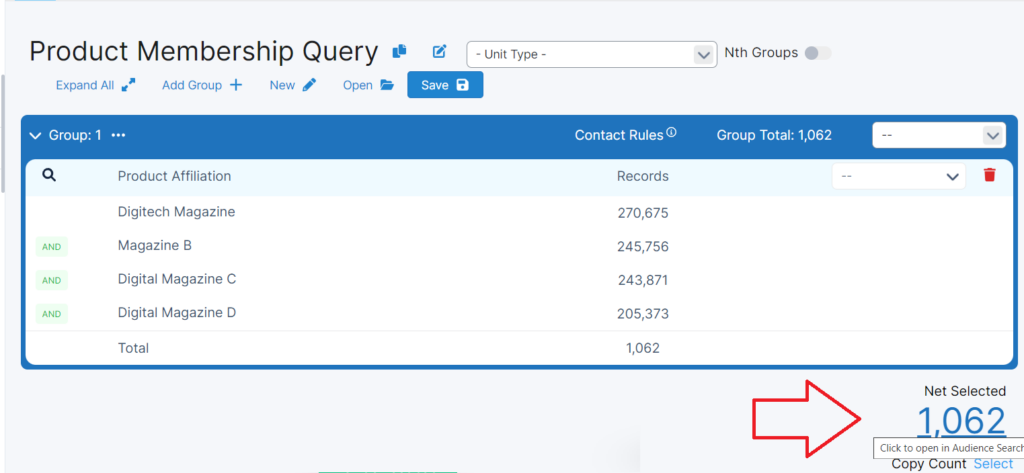
When you select the field values, they will appear in the query window.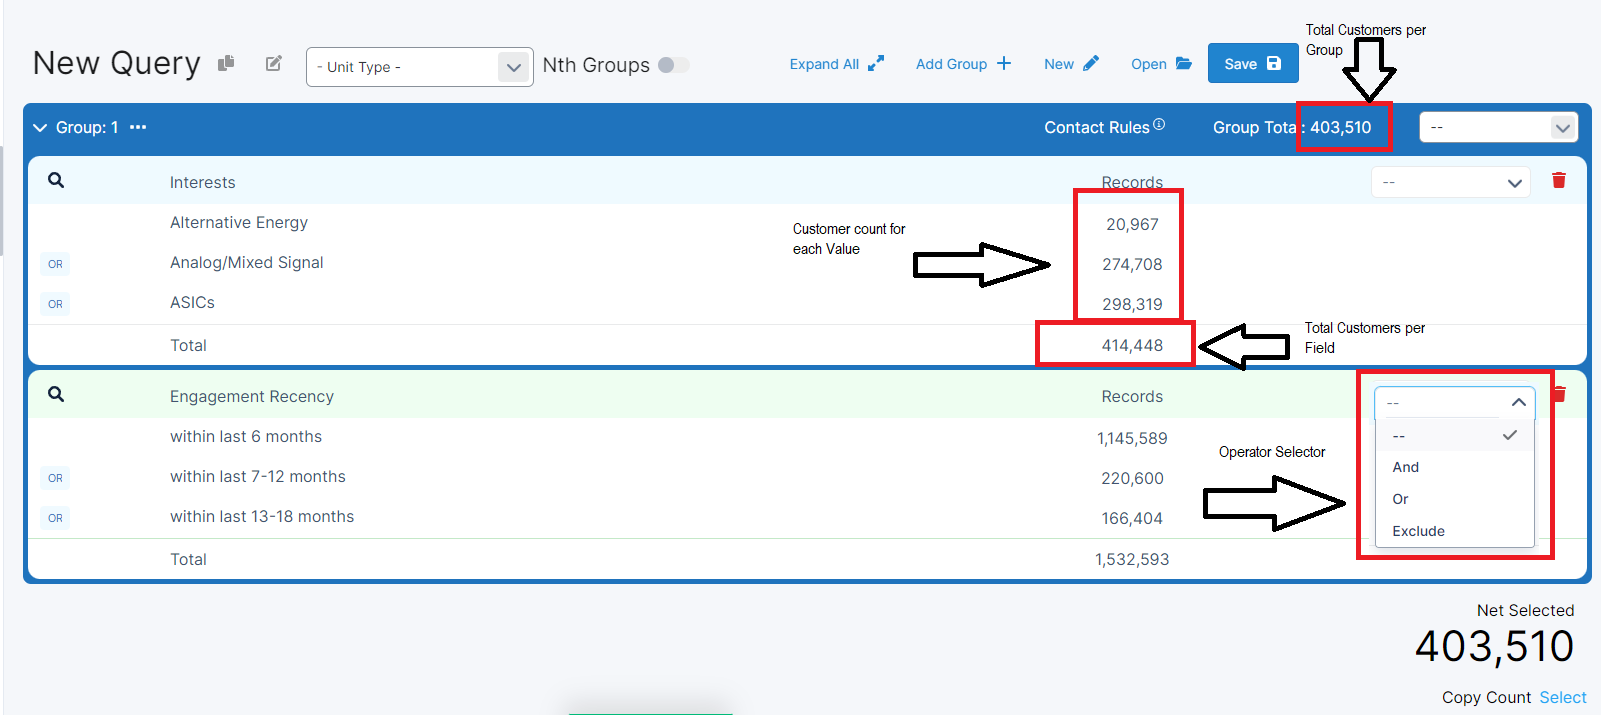 Customer counts are displayed for each value, as well as the customer count for the field. For multi-response demographics, date fields and behaviors, the sum of the counts for the individual values may be greater than the customer count for the field. This is because customers can have multiple individual values, but they are only included once in the customer count for the field. You will need to select your arithmetic operator using the drop down menu next to the field name. This determines how the field will affect the total customer count for the query, displayed as Net Customers Selected.
- Exclude – customers with these field values should not be included in the Net Customers Selected.
- And – If a customer is in the counts for all selected fields, include them in the Net Customers Selected.
- Or – If a customer is in the counts for any of the selected fields, include them in the Net Customers Selected.
For example, If you are promoting your 2016 NanoTech Expo to customers who receive Acme Nanotech magazine and are in the Semiconductor industry, you would create a query to find the customers that receive the magazine and “And” them with the customers that are in the semiconductor industry. Then you would “Exclude” the customers that have already registered to the conference. 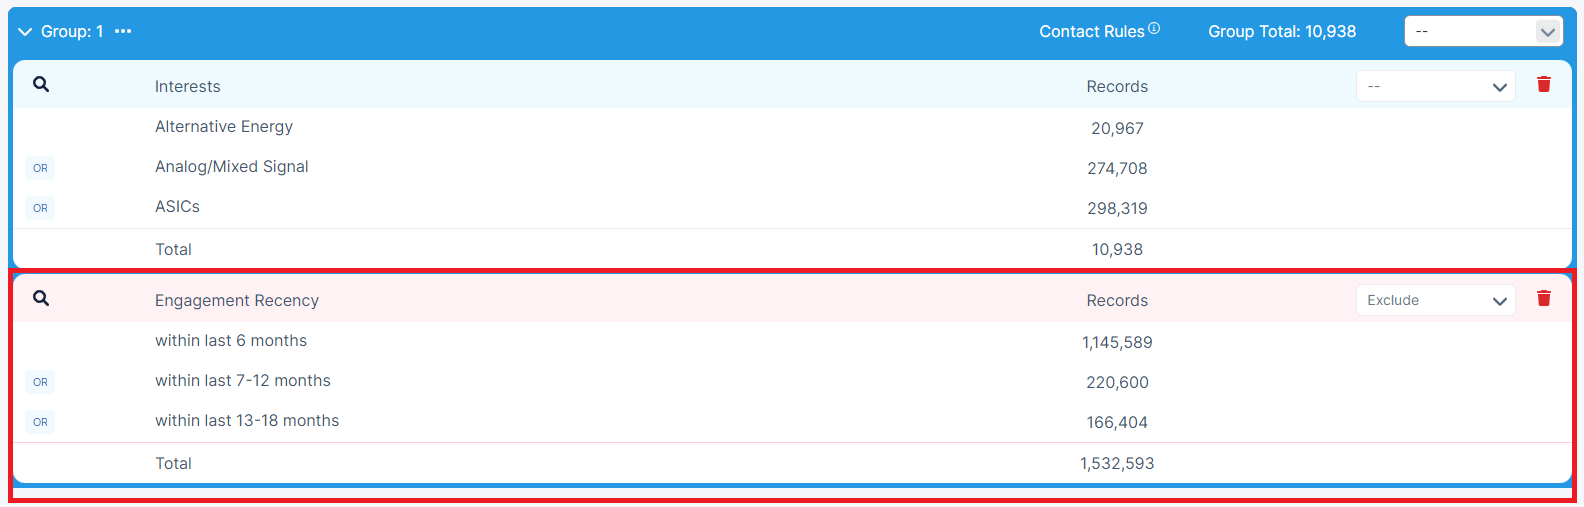 You can easily delete a field from the query by clicking on the garbage bin on the left hand side of the field name.
Groups
Groups, just like its name, allows you to have various groups of criteria within a single query. Why have multiple groups of data instead of including all criteria into one group?
- Let’s say you have two groups of data. You can easily And, Or or Exclude between the two groups.
- Also, you can apply different contact rules per group.
Example 1 – Presidents in the Manufacturing industry in the state of Illinois OR Managers in the Manufacturing industry in the state of Wisconsin. Using the group function allows you to create an output file that includes Presidents in Illinois and Managers in Wisconsin. If the group function was NOT used, the output would include Presidents and Managers in the Manufacturing industry in Wisconsin or Illinois.
| Group | Title | Business | State |
| Group 1 | President | Manufacturing | Illinois |
| Group 2 | Manager | Manufacturing | Wisconsin |
Example 2 – Qualified one year subscribers OR Qualified direct written requesters. Using the group function allows you to create an output file that includes Qualified subscribers that are one year OR direct requesters. In this example, it is possible for a subscriber to meet the criteria for both groups (a subscriber can be one year AND a direct written requester). The output file would only include these subscribers once. If the group function was NOT used, the output would only include qualified subscribers that are one year AND direct written requesters.
| Group | Class | Verification Date | Source |
| Group 1 | Qualified | One Year | No Select |
| Group 2 | Qualified | No Select | Direct Written Request |
It is possible for a subscriber to meet the criteria for multiple groups. The Net Customers Selected count only counts these subscribers once. If the customer is in multiple groups, they are assigned to the first group in which they appear in the query window (in this case group 1).
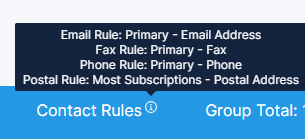
You can quickly view the contact rules assigned to a group by moving your mouse over the contact rules information icon for each group.
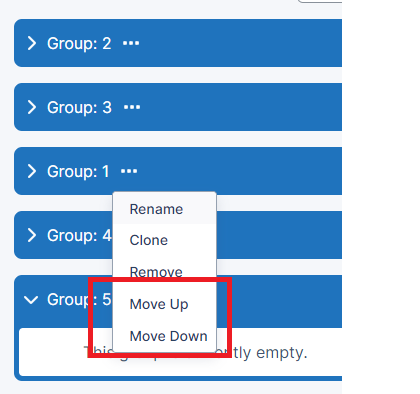
The field library is only displayed for the group you are currently working on. You can view which group is active and change the active group using the group drop down menu or by clicking the side arrow (open) or down arrow (close) sign next to the group name. 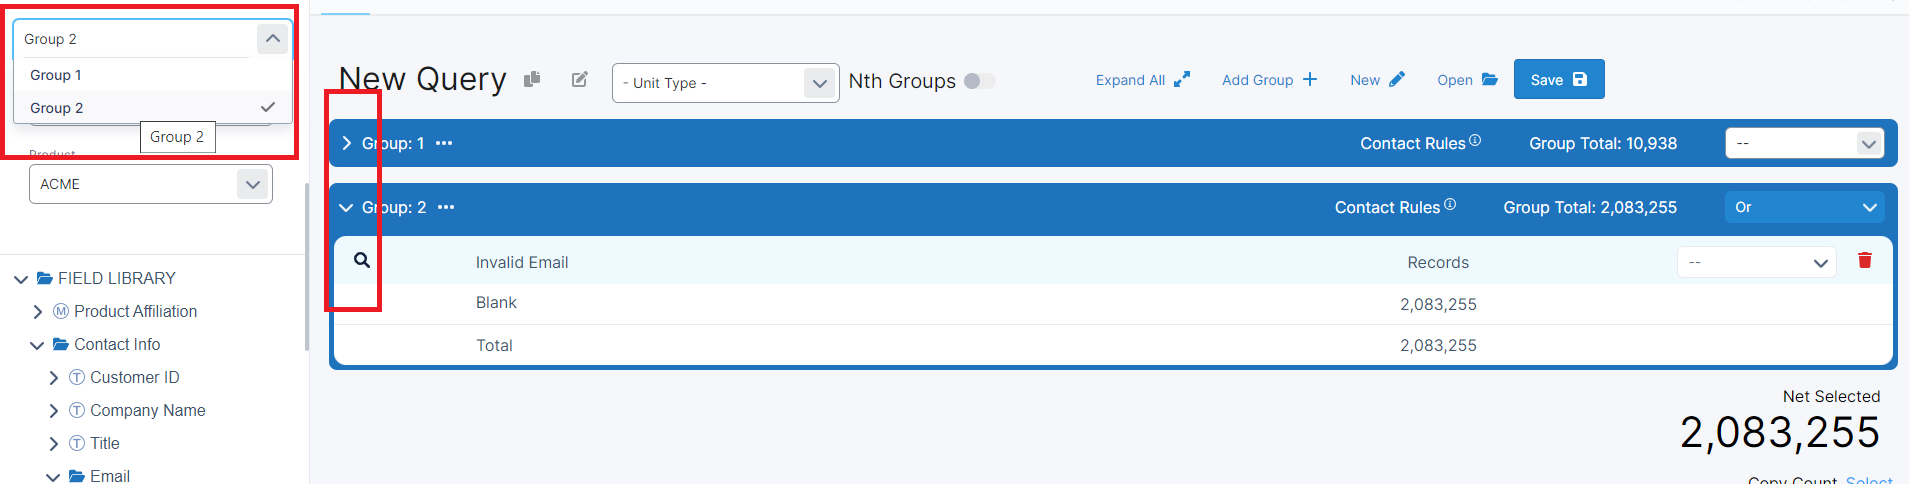 You can rename, clone (copy), remove or reorder (move up or down) any existing groups by clicking the dropdown next to your Group.
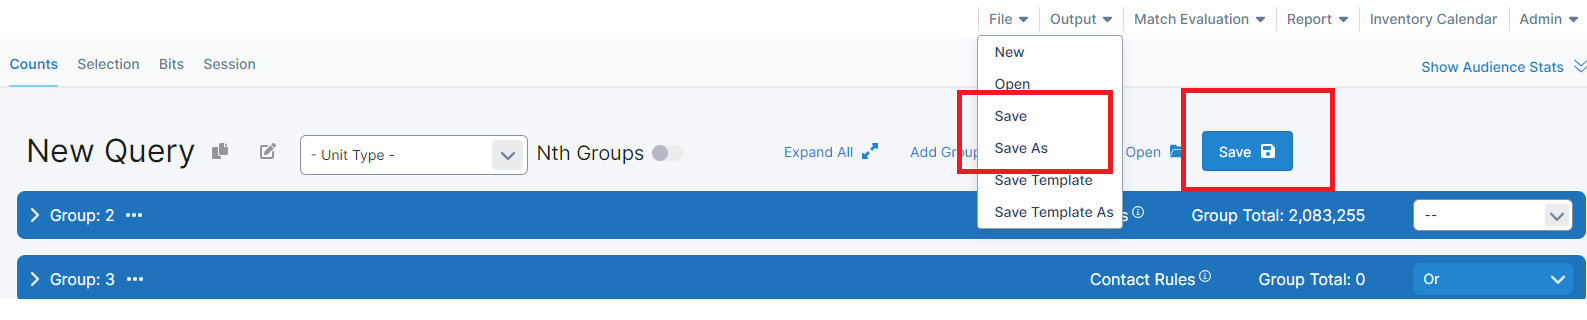
Saving Your Query
You can use the Save options in the Query menu or the Save options at the top of the Query window to save your query. Once saved, the count of the query will appear on the search screen for reference.
- Save – Save the query with the existing name. If it is a new query, you will need to enter a name.
- Save As – Save the query under a new name.