Search the Omeda Knowledge Base
-
The Omeda Experience
-
Documentation
-
-
- Brand Comprehensive Lookup Service
- Brand Promotions Quantity
- Brand Group Lookup
- Brand Promotions Content By Promo Code
- Brand Promotions By Promo Code
- Behavior Categories Lookup
- Behavior Actions Lookup
- Behavior Lookup Grouped By Product
- Behavior Lookup By Id
- Behavior Lookup
- Demographic Lookup by Brand API
- Deployment Type Lookup by Brand API
- Product Lookup by Brand API
-
- Customer Lookup By Email Address
- Subscription Lookup By Customer Id
- Order History Lookup by Customer Id
- Customer Lookup by Hashed Email Address
- Email Address Lookup By Customer Id
- Gift Lookup by Donor ID
- Behavior Lookup By Customer Id
- Subscription Lookup By Email
- Customer Merge History Lookup
- Customer Lookup By Name and Country
- External ID Lookup By Customer Id
- Demographic Lookup By Customer Id
- Phone Lookup By Customer Id
- Postal Address Lookup By Customer Id
- Customer Change Lookup
- Customer Comprehensive Lookup By Customer Id
- Customer Lookup By EncryptedCustomerId
- Customer Lookup By External ID
- Customer Lookup By PostalAddressId
- Customer Lookup By Customer Id
- Email Validity Lookup API
- Behavior Attribute Lookup by Customer Id
- Order Issue History Lookup by Customer Id
- Show all articles8 Collapse Articles
-
- Email On Demand Send
- Email Deployment
- Email Deployment Clone
- Email Deployment Remove Audience
- Email Audience Assignment Status
- Email Deployment Content
- Email Deployment Approval Lookup
- Email Deployment Schedule
- Email Deployment Cancel
- Email Deployment Search
- Email Flag Email As Invalid
- Email Clicks
- Email - Checklist for Sends Created via API Calls
- Email Deployment Content Lookup
- Email Deployment Unschedule
- Email Deployment Lookup
- Email Deployment Test
- Email Deployment Add Audience
- Email Opt In/Out Lookup
- Email Optout Queue
- Email Optin Queue
- Email Deployment Audience List FTP
- Show all articles7 Collapse Articles
-
-
- Release Notes for Feb. 2 | V24.2
- Release Notes for Feb. 23 | V24.3
- Release Notes for Mar. 15 | V24.4
- Release Notes for Apr. 5 | V24.5
- Release Notes for Apr. 26 | V24.6
- Release Notes for May 24 | V24.7
- Release Notes for June 7 | V24.8
- Release Notes for June 28 | V24.9
- Release Notes for July 19 | V24.10
-
- Release Notes for Jan 27 | V23.2
- Release Notes for Feb 17 | V23.3
- Release Notes for Mar 10 | V23.4
- Release Notes for Mar 31 | V23.5
- Release Notes for Apr 21 | V23.6
- Release Notes for May 19 | V23.7
- Release Notes for June 2 | V23.8
- Release Notes for June 23 | V23.9
- Release Notes for July 14 | V23.10
- Release Notes for Aug 4 | V23.11
- Release Notes for Aug 25 | V23.12
- Release Notes for Sep 15 | V23.13
- Release Notes for Oct 6 | V23.14
- Release Notes for Oct 27 | V23.15
- Release Notes for Nov 16 | V23.16
- Release Notes for V23.17
- Show all articles1 Collapse Articles
-
- Release Notes for Jan 14 | V22.1
- Release Notes for Feb 4 | V22.2
- Release Notes for Feb 25 | V22.3
- Release Notes for Mar 18 | V22.4
- Release Notes for Apr 8 | V22.5
- Release Notes for Apr 29 | V22.6
- Release Notes for May 20 | V22.7
- Release Notes for June 10 | V22.8
- Release Notes for July 1 | V22.9
- Release Notes for July 22 | V22.10
- Release notes for Aug 12 | V22.11
- Release Notes for Sep 2 | V22.12
- Release Notes for Sep 23 | V22.13
- Release Notes for Oct 14 | V22.14
- Release Notes for Nov 4 | V22.15
- Release Notes for Dec 2 | V22.16
- Show all articles1 Collapse Articles
-
- Release Notes for V21.1
- Release Notes for V21.2
- Release Notes for V21.3
- Release Notes for V21.4
- Release Notes for V21.5
- Release Notes for V21.6
- Release Notes for V21.7
- Release Notes for V21.8
- Release Notes for V21.9
- Release Notes for V21.10
- Release Notes for V21.11
- Release Notes for V21.12
- Release Notes for V21.13
- Release Notes for V21.14
- Release Notes for V21.15
- Release Notes for V21.16
- Release Notes for V21.17
- Show all articles2 Collapse Articles
-
- Release Notes for V20.1
- Release Notes for V20.2
- Release Notes for V20.3
- Release Notes for V20.4
- Release Notes for V20.5
- Release Notes for V20.6
- Release Notes for V20.7
- Release Notes for V20.8
- Release Notes for V20.9
- Release Notes for V20.10
- Release Notes for V20.11
- Release Notes for V20.12
- Release Notes for V20.13
- Release Notes for V20.14
- Release Notes for V20.15
- Release Notes for V20.16
- Release Notes for V20.17
- Show all articles2 Collapse Articles
-
- Release Notes for V19.1
- Release Notes for V19.2
- Release Notes for V19.3
- Release Notes for V19.4
- Release Notes for V19.5
- Release Notes for V19.6
- Release Notes for V19.7
- Release Notes for V19.8
- Release Notes for V19.9
- Release Notes for V19.10
- Release Notes for V19.11
- Release Notes for V19.12
- Release Notes for V19.13
- Release Notes for V19.14
- Release Notes for V19.15
- Release Notes for V19.16
- Release Notes for V19.17
- Show all articles2 Collapse Articles
-
-
-
CDP – Customer Data Platform
-
-
- Personalization Overview
- Personalization - FAQs
- Personalization - Reporting
- Personalization - Archiving & Restoring
- Personalization - HTML Templates
- Personalization - Scroll Trigger and Infinite Scroll Pages
- Personalization - Merge Variables
- Personalization - 'Generate Personalization' Option
- Personalization & Metering - Click Tracking
- GDPR Consent Management
- Personalization - A/B Testing
-
-
Integrations
-
-
- Integration with Zapier
- Bring Customer Data in via Webhooks by Zapier Action - POST Event
- Bring Customer Data in using Zapier
- Omeda's Add Customer Action in Zapier
- Send Form Submission Data via Zapier
- Bring Customer Data in via Webhooks by Zapier Action – Custom Request Event
- Formatter by Zapier Action
-
-
-
Analytics & Reporting
-
- Odyssey - Reporting
- Personalization - Reporting
- Reports - Email Device and Client Type Reporting
- Email - Clickbot Reporting
- Reports - Email Reporting
- Metering - Reporting
- Reports - Audience Overlap Report
- Reports - Engaged Companies Report
- Reports-AutoRenewals Analysis Report
- Reports - Audience Report
- Reports - Issue Activity Reporting
- Reports - Overview
- Reports - Web Behavior Reporting
- Reports- FAQs
- Reports - Data Tracker Reporting
- Reports - Audience Builder Reporting
- Form Submit Report
- Behavior Promo Code Report
- Reporting Library
- Show all articles4 Collapse Articles
-
Marketing Automation & Email Builder
-
-
- Email On Demand Send
- Email Deployment
- Email Deployment Clone
- Email Deployment Remove Audience
- Email Audience Assignment Status
- Email Deployment Content
- Email Deployment Approval Lookup
- Email Deployment Schedule
- Email Deployment Cancel
- Email Deployment Search
- Email Flag Email As Invalid
- Email Clicks
- Email - Checklist for Sends Created via API Calls
- Email Deployment Lookup
- Email Deployment Test
- Email Deployment Add Audience
- Email Opt In/Out Lookup
- Email Optout Queue
- Email Optin Queue
- Email Deployment Audience List FTP
- Show all articles5 Collapse Articles
- Email Builder - User Guide
- Email - Clickbot Reporting
- Reports - Email Reporting
- Email - Link Tracking Errors
- Email - Deployment Defaults
- Omeda - Getting Support
- Email - Checklist for Sends Created via API Calls
- Email - Assigning Link Tracking Categories
- Email - Deliverability
- Email - Opt-Out Footer Merge Variable
- Email - Stealth Link
- Email - Behavioral Data
- Email - Automation for Email Sending
- Email - Deployment Type Creation
- Email – Training Schedules for New Clients
- Email - Request a New Deployment Type
- Email - Adding Domains to Safe Sender List
- Email - Deployment Checklist & Best Practices
- Email Deployment Unschedule
- Email Builder - Getting Started
- Campaign Tool - Overview
- Email - Automated ACS Notifications
- Email - Dynamic Content
- Email - Recurring Deployments
- Email - FAQs
- Email - Web Tracking
- Email - Validation Services
- Email Services - Overview & Capabilities
- Email - Web Tracking String Parameter Definitions
- Email - Appending Lists On Triggered Deployments
- Email - Preference Page
- Email - A/B Testing
- Email - Triggered Deployments
- Email - Merge Variables
- Email - User Set-up
- Email - Advanced Features
- Email - Glossary
- Email – Checklist for New Clients
- Show all articles23 Collapse Articles
-
-
-
- Odyssey - Audience Element
- Odyssey - Timing Elements
- Odyssey - Adroll Elements
- Odyssey - Facebook Elements
- Odyssey - Filter Element
- Odyssey - Form Submit Element
- Odyssey - Pathfinder Element
- Odyssey - Export Element
- Odyssey - Split Element
- Odyssey - Personalization Element
- Odyssey - Metering Element
- Odyssey - Email Element
- Odyssey - Goal Element
- Odyssey - A/B Test Element
- Odyssey - Google Ad Manager Element
- Odyssey Fatigue Filter Element
- Show all articles1 Collapse Articles
- Odyssey Overview
- Odyssey - FAQs
- Odyssey - Editing an In Progress Voyage
- Odyssey - Reporting
- Odyssey - Querying Element Visitors in Audience Builder
- Odyssey - Using Profiles
- Odyssey - Creating Custom Templates
- Odyssey - Global Settings
- Odyssey - Email Conditions
- Odyssey - Omeda's Email Designer
- Odyssey - Email Designer Templates
- Odyssey - Voyage Templates
- Odyssey - Merging Paths
- Odyssey - Email Merge Variables
- Odyssey - Error Troubleshooting
- Odyssey - Dynamic Content
- Show all articles1 Collapse Articles
-
-
-
Data Management & Governance
-
- Odyssey - Querying Element Visitors in Audience Builder
- Audience Builder - Product Field Library
- Examples of Audience Builder Queries Using Paid Fields
- Querying Your Olytics Data
- Data Loader - Querying in Audience Builder
- Email - Behavioral Data
- Audience Builder (OnQ) - Date Field Definitions
- Audience Builder - How To Query Customers
- Audience Builder (OnQ) - Query Result Outputs
- Audience Builder - Overview
- Reports - Audience Builder Reporting
- Audience Builder - Admin User Guide
- Audience Builder (OnQ) - Advanced Features
- Audience Builder (OnQ) - Match Evaluation
-
- Client Empowerment: Message Types
- Client Empowerment: Profiles
- Client Empowerment: API Keys
- Client Empowerment: Alternate IDs
- Client Empowerment: Logos
- Client Empowerment: Demographics
- Client Empowerment: Database Settings
- Client Empowerment: Behaviors
- Client Empowerment: Deployment Products
- Client Empowerment: Deployment Types
- Client Empowerment : Managing Your Database
-
-
Subscription & Fulfillment Management
-
Forms & Landing Pages
-
- Form Builder Overview
- Form Builder - Form Dashboard
- Form Builder - Content
- Form Builder - Integrations
- Form Builder - Expressions
- Form Builder - Create a Form
- Form Builder - Settings
- Form Builder - Form Categories and Form Types
- Form Builder - Builder
- Form Builder - Error Log
- Form Builder - Payment Gateways
- Form Builder ADA Compliance
-
- How to send a user back to your website after form submission (redirect to a return URL)
- Form Builder - Adding a This Is Not Me Widget
- Form Builder - Embedding Webforms via iFrame or Javascript
- How To Use Progressive Profiling
- Form Builder - Using the PayPal Payment Method
- Form Builder - Using Campaign Promo Codes
- Using Form Builder to capture a Behavior Subscription Attribute
- Form Builder - reCAPTCHA v3 Implementation
- How To Use A/B Testing on your Form Builder Webform (video)
- Styling Your Form Builder Forms
- Best Practices for Testing Forms
- Form Builder Forms URL Structure and Appending Parameters
- Using a Custom Domain for your Form Builder Webform
-
-
Success Use Cases
-
Professional Services
-
Video Library
-
FAQs
Data Loader – S3 Buckets
In today’s data-driven landscape, seamless integration between platforms is essential for streamlined operations and maximizing efficiency. With the integration between AWS S3 and Omeda, businesses now have a powerful solution to effortlessly manage and leverage their data. This integration enables users to seamlessly upload and process files stored in their AWS S3 buckets directly into the Omeda platform.
The AWS S3 integration found in Data Loader automates the file ingestion process and will look for files meeting specified criteria to pull in from an S3 Bucket and process nightly into Omeda.
Note: This feature requires additional permissions to be turned on. If you do not yet have access to this feature, please submit a support ticket.
S3 Bucket Dashboard
Clicking on ‘S3 Bucket’ in the Data Loader menu will bring you to the list of S3 Buckets you have already connected to.

Create
To connect to a S3 Bucket in Data Loader, click ‘Create’ at the top right side of the site list.

This will open a popup that prompts you to name the S3 Bucket connection:
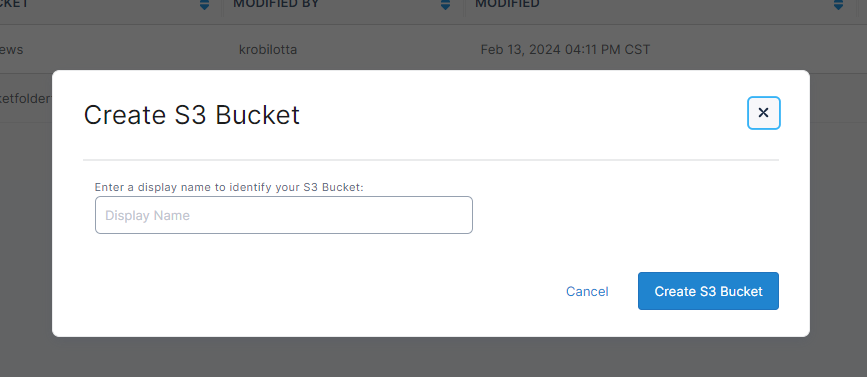
Once you’ve named your new S3 Bucket connection and clicked ‘Create S3 Bucket’ you will be taken to the settings page.
Settings
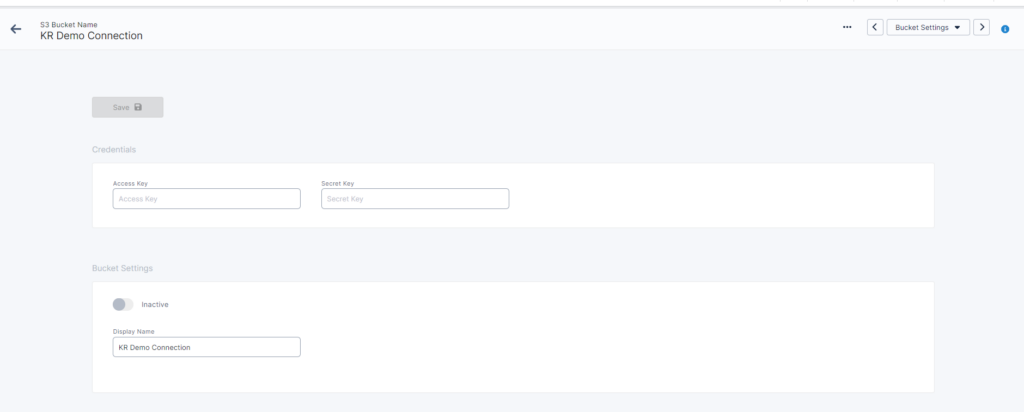
For a successful setup, you will need the following things:
- Access Key and Secret Key provided in your AWS Console.
- The Region where the bucket is located. This can also be found in your AWS Console under the bucket’s properties.
- Once the Access Key and Secret Key are provided and saved, a dropdown field will appear under Display Name that will be populated with the connected account’s S3 Buckets found within the selected Region.
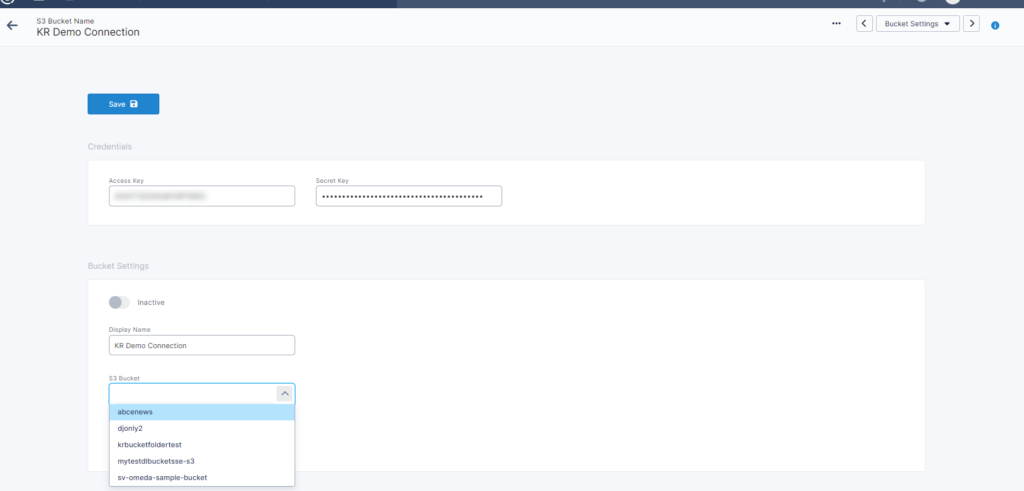
S3 Bucket Navigation
To view the Bucket’s settings, view the file list, or deactivate the S3 Bucket connection, use the action menu drop down on the desired S3 Bucket.

Email Lists
Email Lists will allow you to set up email addresses to receive relevant Data Loader S3 Bucket updates.

Clicking ‘Add Email Address’ will generate the following popup:
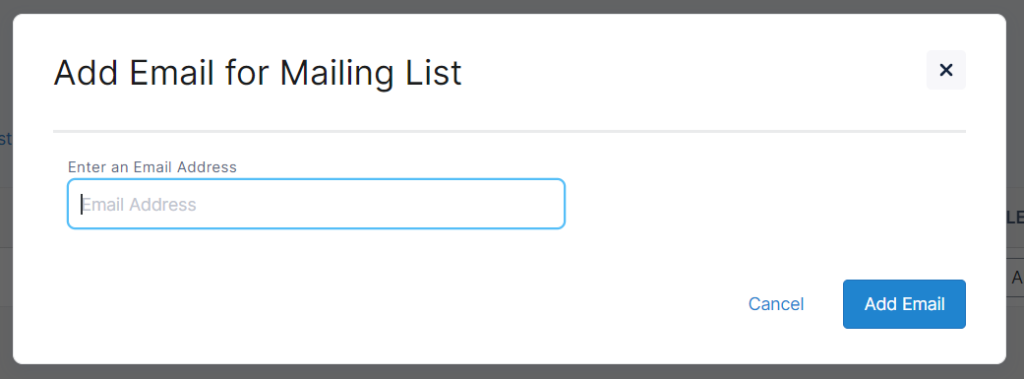
Once you have added an email address as a recipient, you can choose which type(s) of emails they will receive as well as which files they’ll receive the notifications for.

- All: Automatically checks all of the email lists and will add the email address to all of them.
- Overview (Checked by Default): This will send 1 (one) email every time the S3 Upload job runs. It will include stats on how the job ran. This is a brief overview of what happened; opt into other mailing lists for more detailed information, such as the “Needs Mapping” or “Errors” mailing lists.
- Processed: This will send 1 (one) email per File that has been successfully processed during an S3 Upload job run. The resulting file will likely be in the “Completed” or “Completed with Errors” state. This is the same email that is received when a File is processed manually. If multiple files process automatically, the email address(es) will receive one email per file.
- Needs Mapping: This will send 1 (one) email every time the S3 Upload job runs. It contains up to two different sets of information:
- File Matched Criteria, but not Template – This will list out the files that had issues matching the Template assigned to the Tracking criteria the file’s name matched on. It will then list the items that caused it not to match the Template. This can be either mismatching headers (extra or missing) or values that have not been mapped. In any case, the File will be uploaded and the user can correct the Mapping in the Files Section, as they would if it were a manually uploaded file.
- File didn’t Match Tracking Criteria – This will list files that existed on the S3 Bucket but could not be properly matched to a Tracking criteria. No actions were taken upon these files.
- Errors: If the S3 Upload job fails, 1 (one) email will be sent informing the assigned address that something has gone wrong with the upload job. This will likely be due to an issue with how the S3 Bucket connection or Tracking criteria were setup.
Additionally, this mailing list will potentially send 1 (one) email per File that fails during the Upload or Processing steps. These will be the standard emails that are sent normally when a File fails in either situation. - File Name: Select which file (from Manage Tracking) the recipient should receive notifications for. Otherwise, keep it defaulted to ‘All’ to receive notifications for all files uploaded to the S3 Bucket. If recipient should receive notifications for more than one file, but not all, add the Email Address to list again.
Manage Tracking
To set up how files are pulled from the S3 Bucket and ingested into your database, you’ll need to go into ‘Manage Tracking’. Files are identified and matched to templates based on tracking rules.

To set up a new tracking rule, click ‘Add File Name to Track’. This will open up a new popup where you will need to 1) Enter a file name 2) Note how the file is delimited, and 3) Select a saved template to apply to each of the files that fall into the track.
For more information on how to set up a template for Data Loader, see our Templates article.
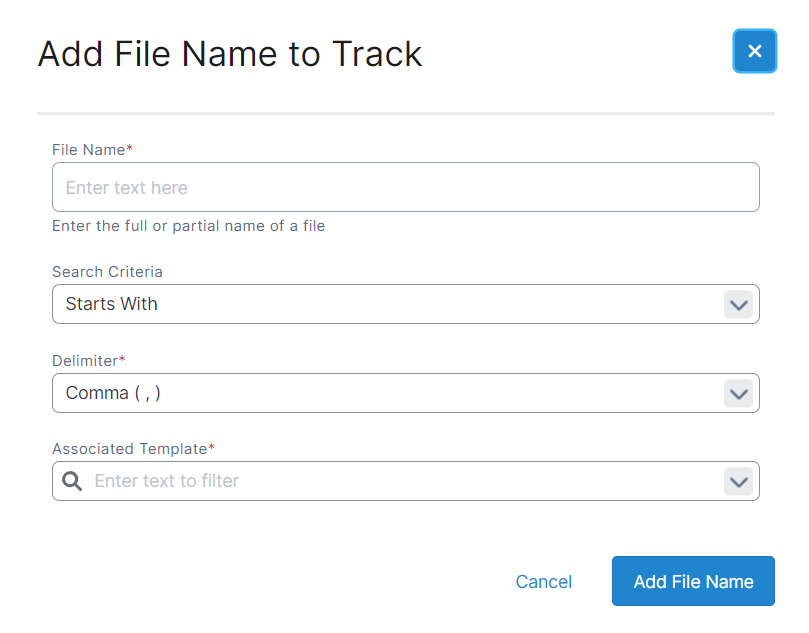
Once the track is set up, it will appear in the Manage Tracking list view. Multiple tracks can be set up and active at the same time. If multiple tracks match a file, the highest priority will be applied.

From the list view you are easily able to edit the file name, change the delimiter, adjust the match criteria, change the template and update the priority.
From the actions drop-down you can also remove and activate/deactivate tracks.
View Directory
Within the ‘View Directory’ section, you have the ability to see all of the files currently on the S3 Bucket and if they have been matched and their status.

The file statuses that you will see are:
- Available: The file can be processed if there is a matched tracking assigned. If none is assigned, you can set one up using the ‘Track File’ option under Actions.
- Uploaded: The file was pulled in from the S3 Bucket, but couldn’t be processed (usually because the template didn’t match the file 100%). You will need to review the mapping and manually process the file via the standard Data Loader process.
- Processed: The file was successfully pulled in, the template was applied, and the data was added to your database.
- Failed: The file was not processed, or uploaded.