Search the Omeda Knowledge Base
Form Builder – Content
The Form Builder Content Management System serves as a tool for efficiently managing and updating content across various forms. It acts as a centralized hub that enables users to store and organize different types of content. One of the key advantages of Content is its ability to streamline the process of content updates. Rather than manually modifying each individual form or page, users can make changes within Content, and the updates automatically propagate across all connected forms. This not only saves considerable time and effort but also ensures consistency and accuracy across the entire platform. The seamless integration and synchronization capabilities of Content contribute to a more cohesive and user-friendly experience, allowing users to maintain dynamic and up-to-date content without the hassle of individual manual adjustments.
Navigating there:
Select the Content tab then use the left panel to navigate to the type of content you’re looking for.
You can either browse or search using the search bar.
The Create button will allow you to create a new content element from scratch while Edit, found in the action menu, will allow you to edit the existing content and, in saving that content, update across any sites where that content currently exists.
Form Elements
The form elements content section will contain the following:
- Single Response
- Multiple Response
- Field
- Graphics
- Static
- Email Confirmation
- Complex Html
The first three elements will likely look familiar as these are also the first three elements of the Demographics section. You can edit these elements just like Demographic elements, but response received here do not map back to the database. You would use this type of element for questions that are not necessary on your database but may be necessary within your form. For example, you may create a Single Response Form Element if you wanted to offer your audience a choice between navigating to the new, renew or change of address site.
Another question that is commonly created in the Field Elements section is the Personal Identifier question. If a personal identifier question is required for audit, the question will be created here. Because this question functions differently than a typical demographic question, we create the question here and check the box for ‘Personal Id’. This ensures that the question will be associated with the transaction itself and is more easily accessed when sending to the audit bureau.
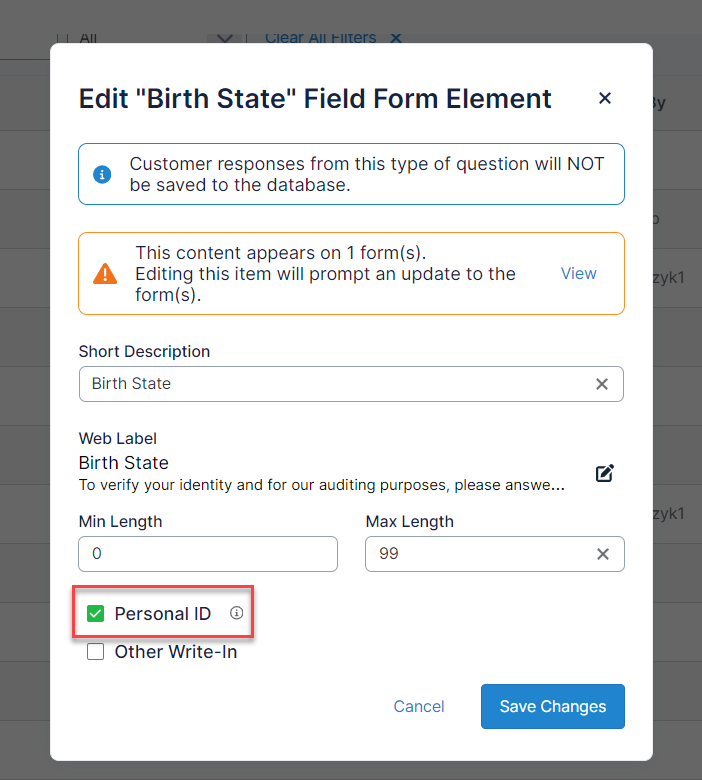
Because of the nature of this field type, you can use the same Personal ID across multiple brands. The response will always be associated with the transaction, and therefore, the subscriber, regardless of which product they are subscribing to.
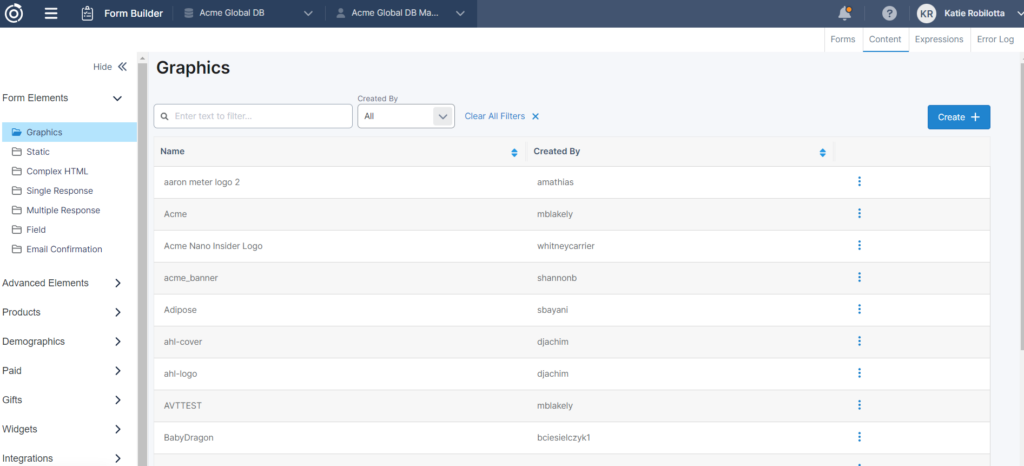
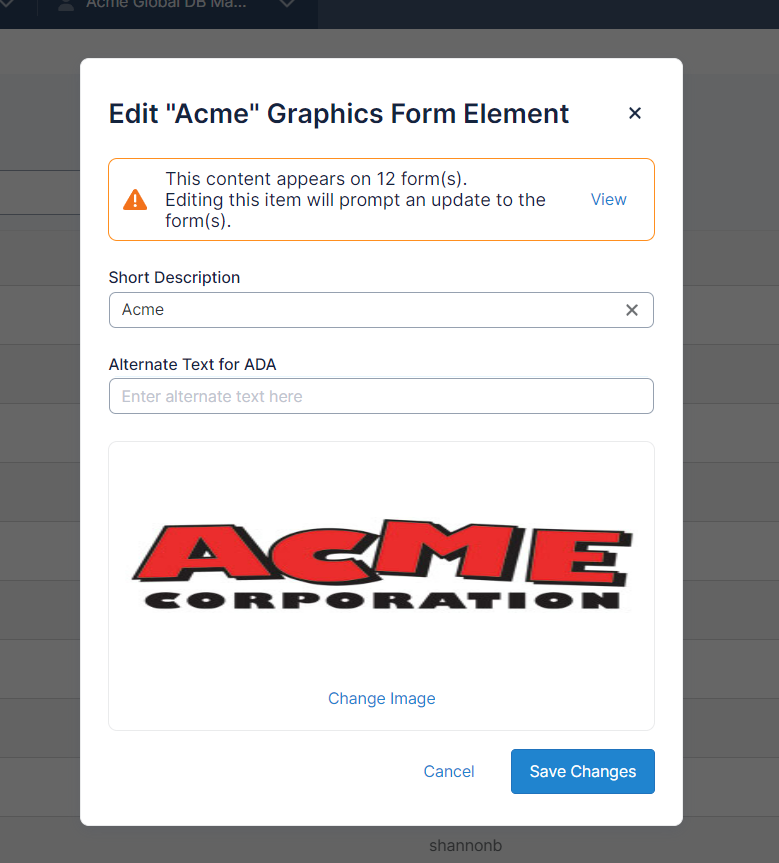
Graphics are where you will upload any images you’d like to use on your forms. The file type of your graphic must be either .jpg or .png. To upload, give your image a description and then browse for your image file. When your description is created and your file is selected, you will click Save in the upper right-hand corner.
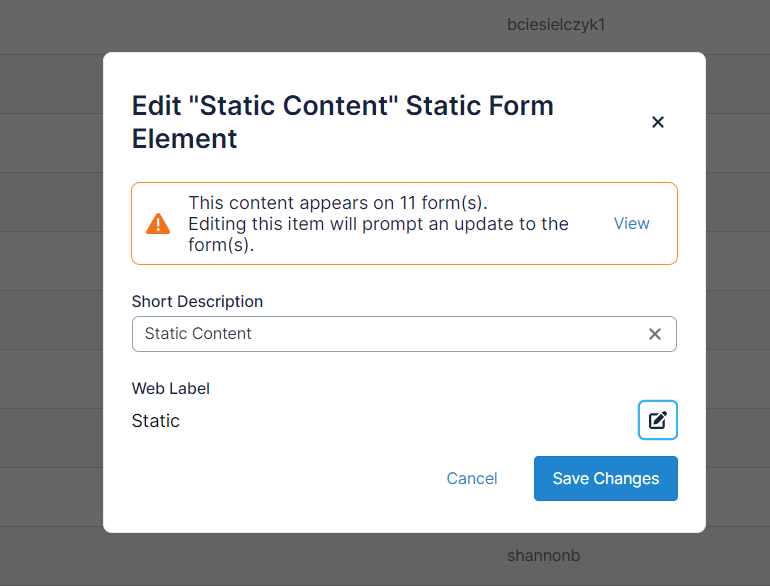
Static elements can be created to store commonly used html pieces like a blank space, <br>, or horizontal row, <hr>. You can also use these to store short amounts of text or as an editable placeholder to use on your forms when unique text must be added. We will often create a static element called ‘Blank Static’ or just ‘Static’, and edit the Web Label in the form builder.
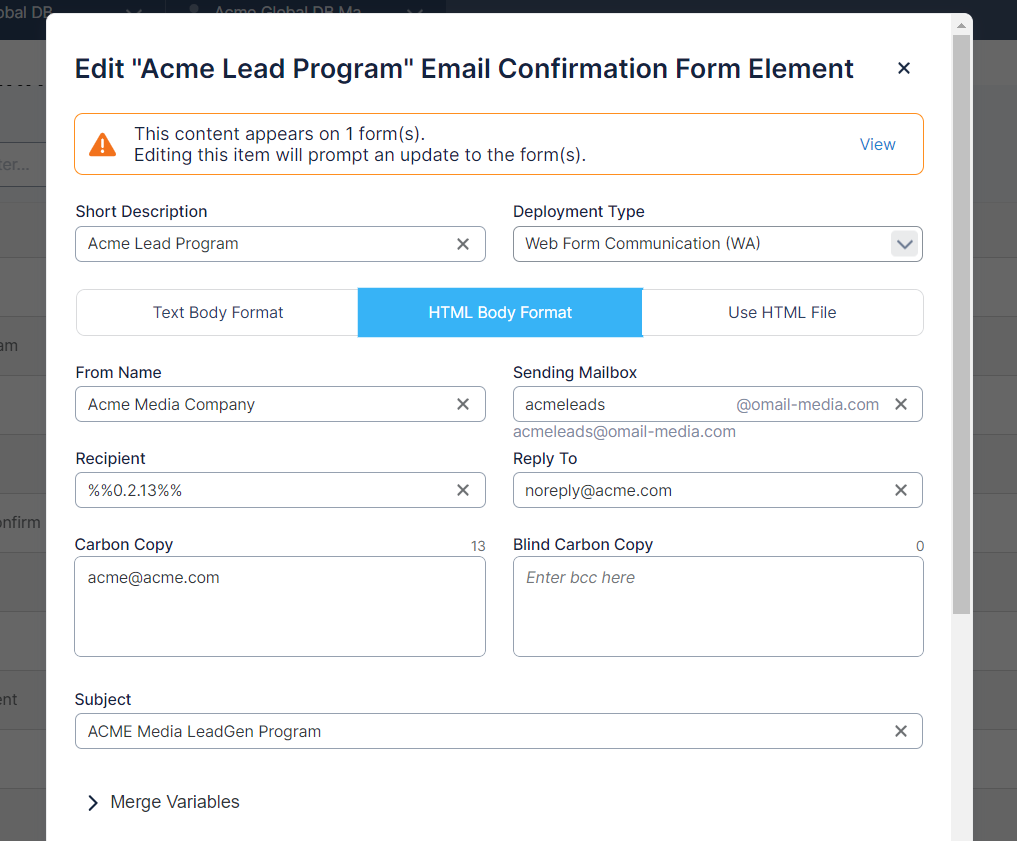
The Email Confirmation section is where you can create various emails that can be automatically sent upon completion of a transaction When creating a new email confirmation, there are several fields you must complete to create your confirmation:
- Short Description: This is how your email confirmation will appear within Content and the builder.
- Deployment Type: This is where you can select which deployment type you want the email confirmation to be sent from. In order for other Deployment Types to display here other than Web Form Communication (WA), you’ll need to enable the Deployment Type in be used in Form Builder via Settings. Reach out to your Customer Success Manager for more information.
- Format: There are three options for your email confirmation: Text, Html, or Html File. For text and html, you will type or copy/paste your email content. For Html File you can browse for your .html file and upload.
- From Name: This is the friendly name that will display in your email confirmation.
- Sending Mailbox: This is the email address that will send your email confirmation. Depending on what Deployment Type is selected will determine the domain name here.
- Recipient: This is the email address that will receive the email confirmation. It is defaulted to the merge variable, %%0.2.13%%, which corresponds with the email address the subscriber used to submit the form. You could also use any other valid email address.
- Reply To: This is the email address that will populate should the subscriber attempt to reply to your email confirmation.
- Subject: This is the subject line of your email address.
- Body: Is where you can add the text or html of the email confirmation or view the HTML file that was uploaded in.
You also have the option to either blind carbon copy or carbon copy email addresses of your choice. Multiple email addresses should be separated by a comma.
If you’d like to include populated fields specific to the user submitting the transaction, use the merge variable of the field you’d like to populate by searching for it in the Merge Variable section. You can insert it into the email bodies of your Html or Text type email content by selecting your field and clicking insert.
Complex Html elements are a way to upload an existing Html file or type in html.
Advanced Elements
In the Advanced Elements section of Content, you will be able to upload various file types that will affect your pages on a broader level.
You can upload .css files to the Style Sheets element to create custom styling for your pages and .js files to add additional JavaScript.
Omeda provides several theme templates which will provide an existing structure and style for you. Below is a link to a suite of sample sites that show how our current themes will look on your forms –
https://acmedemo.dragonforms.com/Odelay_demo
Use the navigation bar at the top of the form to see the different theme templates in effect.
Products
The Pass-along Content Group is where you will create the grouping for any passalong content you would like to have on your subscription site. When creating your group, always include the Passalong Record Indicator element. You can then add the content you would like included; this is usually name, job title and the Job Function demographic question.

Demographics
This is where all the demographics that exist in your database can be found. We suggest that users consult their Customer Success Manager if they believe they need to create a new demographic. This way we can ensure that the field is available for you to access in the database and the responses are mapped correctly. Because of this, you will most often find yourself editing previously existing demographics.
There are seven types of demographics that may exist in your database.
- Single Response Demographic
- Multi Response Demographic
- Text Response Demographic
- Whole Number Demographic
- Decimal Demographic
- Yes/No Demographic
- Date Demographic
When editing any demographic, there will always be a Question Short Description and a Question Web Label, as well as the Response Web Label and Response Short Description for each available response. The Question Web Label and Response Web Label is how your question and responses will display on the form for your audience. The Question Short Description and Response Short Descriptions will be how your question and responses will be labelled within the Builder.
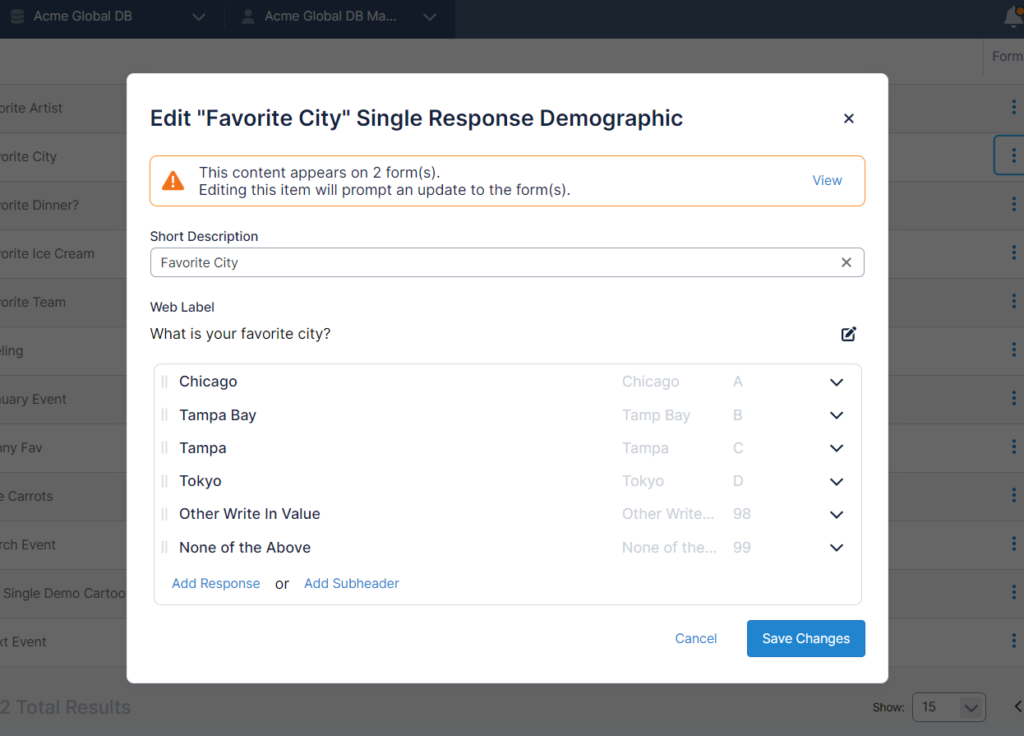
To edit a Question Web Label, you can click the pencil and paper icon.
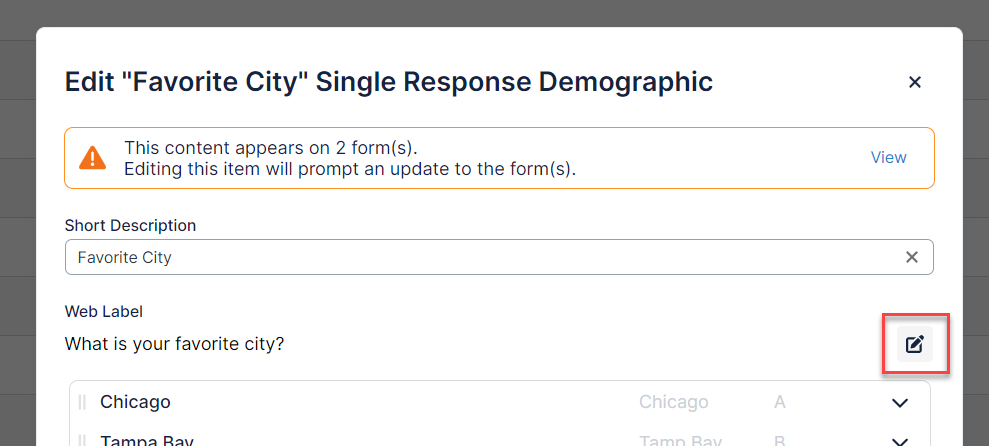
To edit a Response Web Label, click the down error next to the response you want to edit and then the pencil and paper icon.
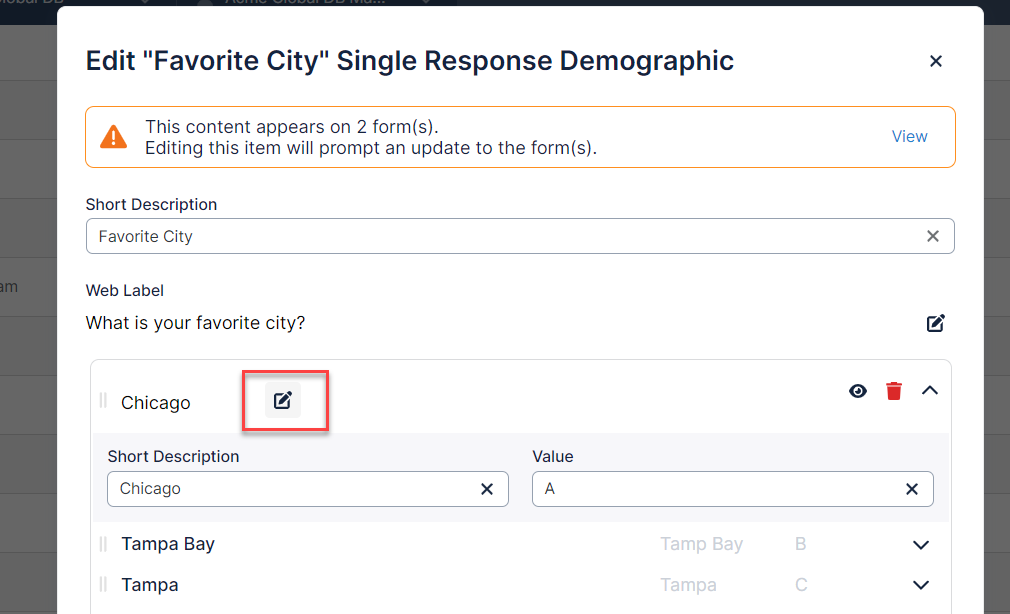
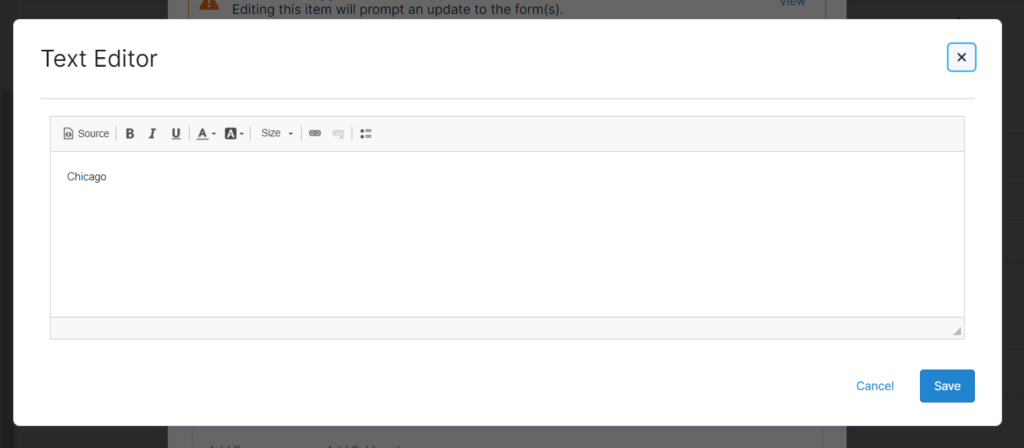
Here you can do any simple text edits, as well as edit the HTML content directly.
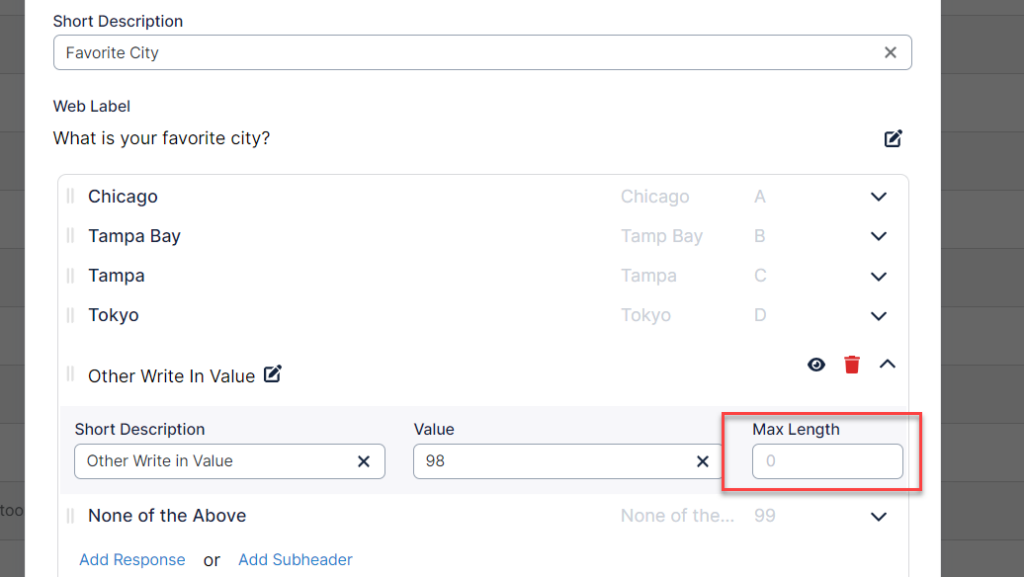
In the response section, there are two different options you can choose from to add, response or subheader. A subheader will help you to organize your responses should you need it.
The Other Write in Value response option will display a text box if the Other response is selected by the subscriber. The Max Length will determine the number of characters allowed typed in that text box. If nothing is specified, this will default to 50 characters. The data from these boxes will be available for you to code in our Open-Ended Coding application.
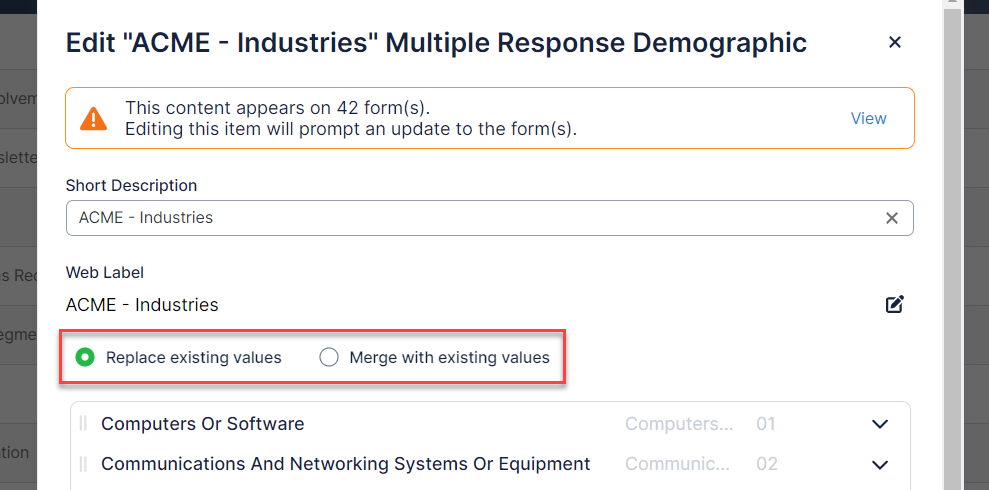
When editing a Multiple Response, you will be able to edit the web labels and the Other (specify) length, and set your multi-response to ‘Replace existing values’ or ‘Merge with existing values’. If you set this to ‘Replace’, any response we receive for this question will replace all responses existing in the database. Merging will allow new responses to exist with older responses.
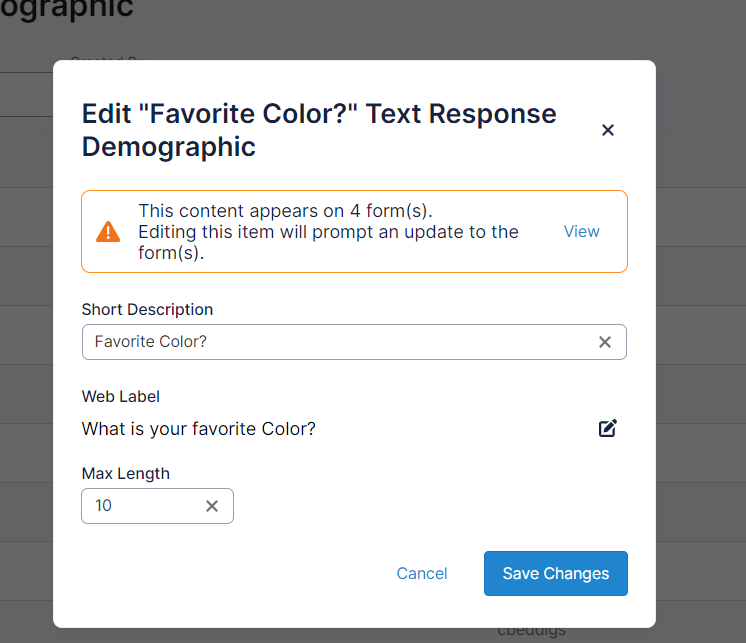
When editing a Text Response, you will be able to specify the length of your field.
A Whole Number demographic is like a text response demo, but if but a non-whole number is entered in this field, an error message will display.
Like the Whole Number demographic, Decimal demographics will only allow numeric responses but will allow a decimal.
When editing a Yes/No demographic, you will only be able to edit the question web label or short description. The responses are limited to yes or no.
The Date demographic, will be where you will store any date demographic responses.
Paid
This section of Content is where you will create and edit the paid fields for your sites.
Under Paid, you will be able to create your prices as a single response selection or a field. To create a single response paid element, you’ll fill in the question web label with what you’d like to display on the sites. In the short description fields, you’ll fill in what you’d like to show within content/builder to describe your Paid element.
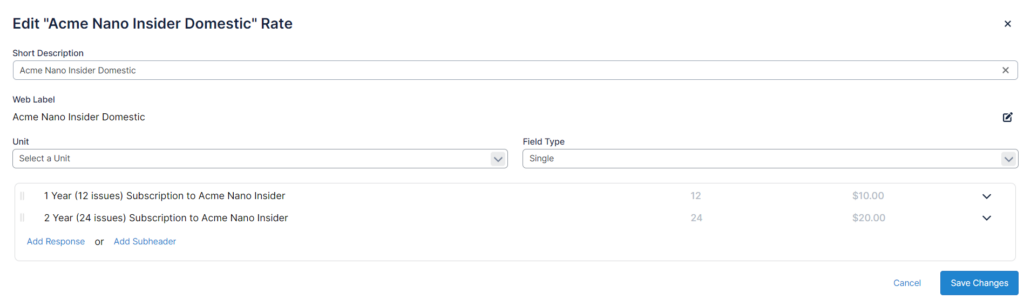
You will then add the responses a subscriber will be allowed to select, often the different amount of available terms. You are also able to add a subheader here.
Make sure you then select the correct product to map the payment and the payment amount.
Payment amount should be in the format 0.00. In the Term field, select the number of issues the subscriber will be able to receive with their payment.
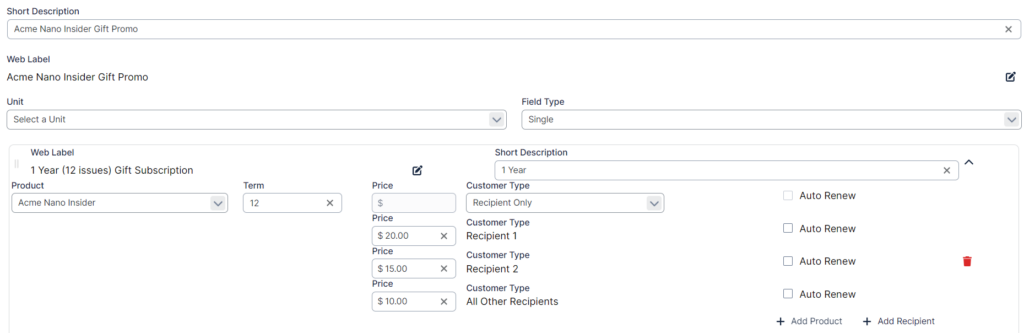
The next selection will allow you to select the customer type. Your options are ‘Primary Customer’, ‘Recipient Only’, or ‘Both Donor and Recipient’. Unless the purpose of your site is to create gift subscriptions, you should not change default selection of Primary Customer. If you would like to allow the user who is completing the form to purchase a product for someone else or someone else and themselves, you would select ‘Recipient Only’, or ‘Both Donor and Recipient’. These options will also allow you to add tiered pricing based on the amount of recipients. For example, you want to do a promotion for gifts where the customer can buy the first gift for $20.00, second gift for $15.00 and any additional gifts after that for only $10.00. You could use the +Add Recipient option in the Rate option to define that. (See image below for example)
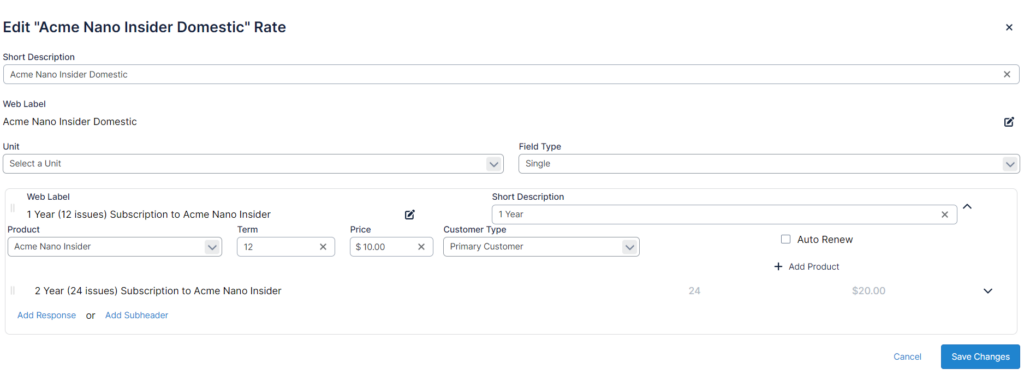
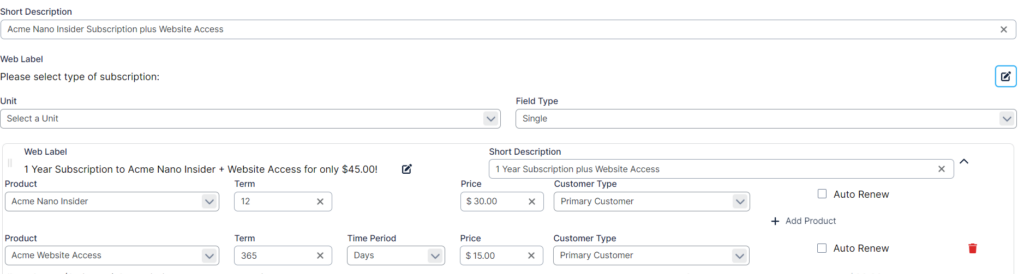
You will notice an +Add Product action when creating a rate option. This allows you to tie multiple products plus a term and price for each to a single paid option the customer can select from. Once the customer selects this option on the form, orders will be placed to the products with the defined term/pricing. This feature is ideal for forms promoting a combo offer where a customer can buy one product and get the second product for a lesser value. See image below for example.
Your final option is to have the subscription auto-renew when the term has expired. By checking this box, the credit card information will be tokenized and stored to be charged again when the term expires.
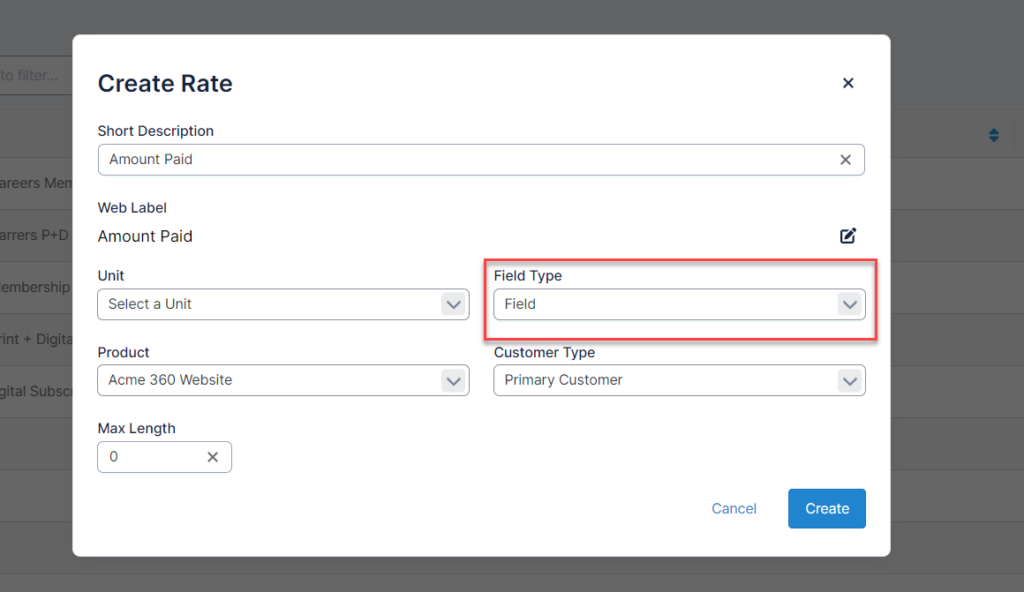
To create a paid field instead of a paid single response, you would select the ‘Field’ tab and fill in the Max Length, Product and Customer Type fields.
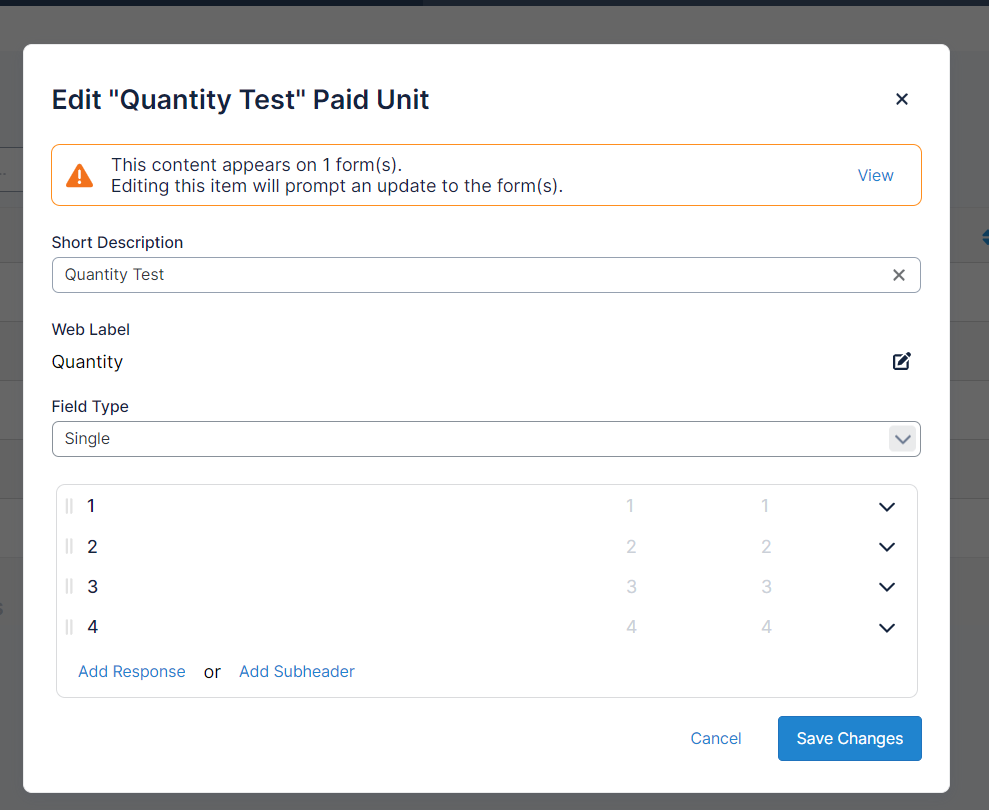
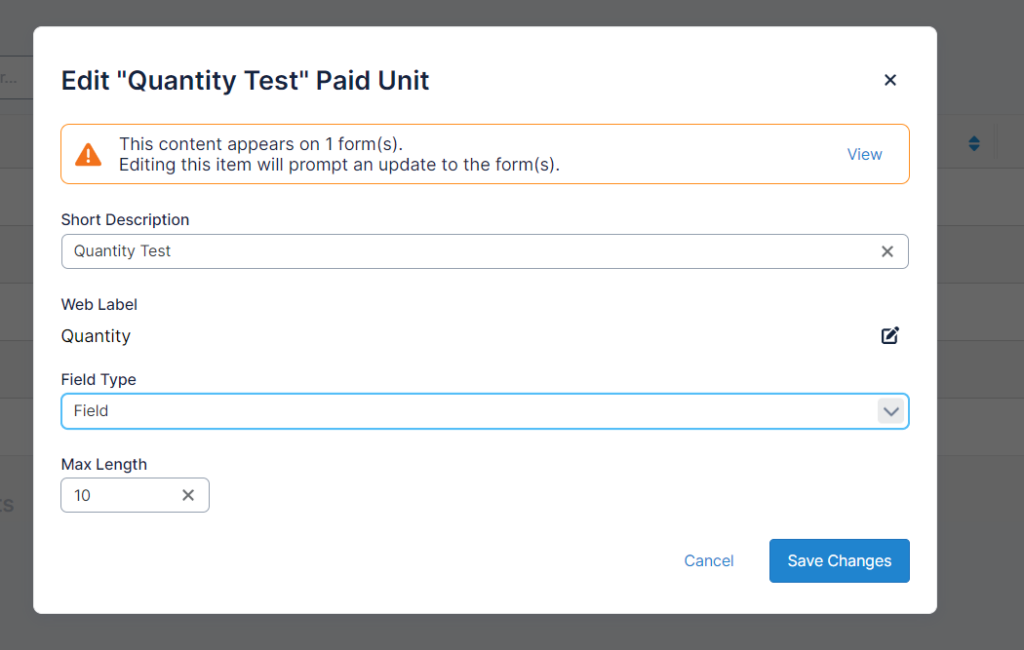
Paid Unit elements are used to provide subscribers with the opportunity to purchase multiples of the same product. If you create a single response paid unit, you can select the maximum amount of your product available or create each response manually by clicking ‘Add Response’.
A field paid unit also will let you specify the maximum amount available.
If you want to use paid unit on your sites, you will need to associate the paid unit with the paid element. After you’ve created your paid unit, select the Unit drop-down on the corresponding paid element.

Now, when quantity is selected in the paid unit element, the price will be adjusted accordingly.
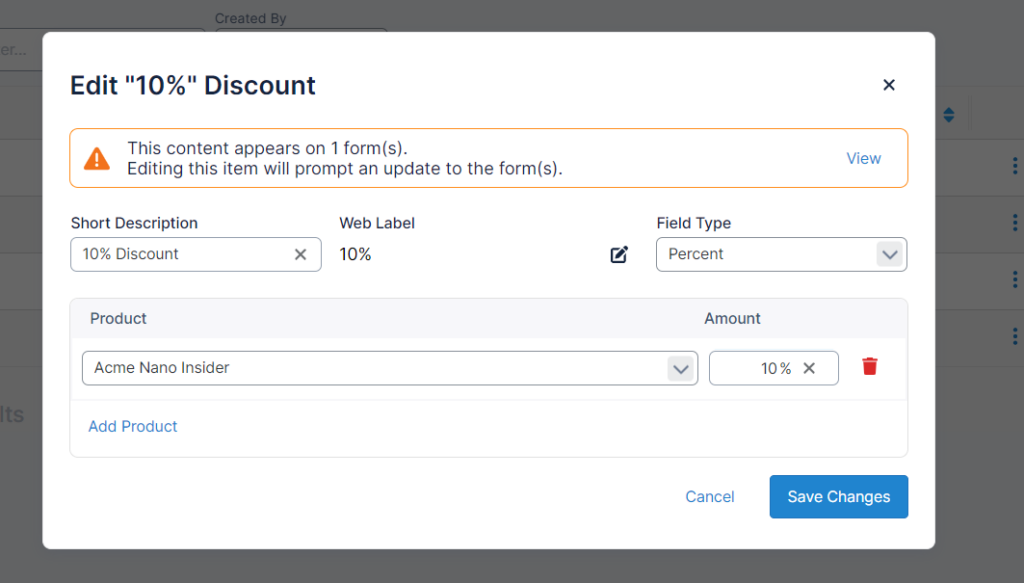
Paid Discount elements allow you to subtract either a specific amount or a percentage from the amount due on your form by dragging this element onto your payment page. You would usually conditionally display this element if a promo code of your choice is used.
Gifts
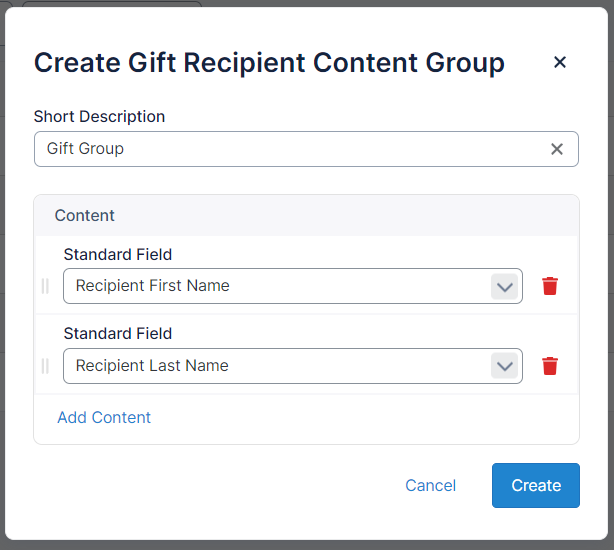
Gift Recipient Content Groups are used to group together which fields you want displayed on a form when collecting gift subscription information of recipient. This will allow you to drag a set of items onto the page instead of dragging each individual item on multiple times.
Integrations
Integrations allows you to post data to a third party. There are several options to choose from:
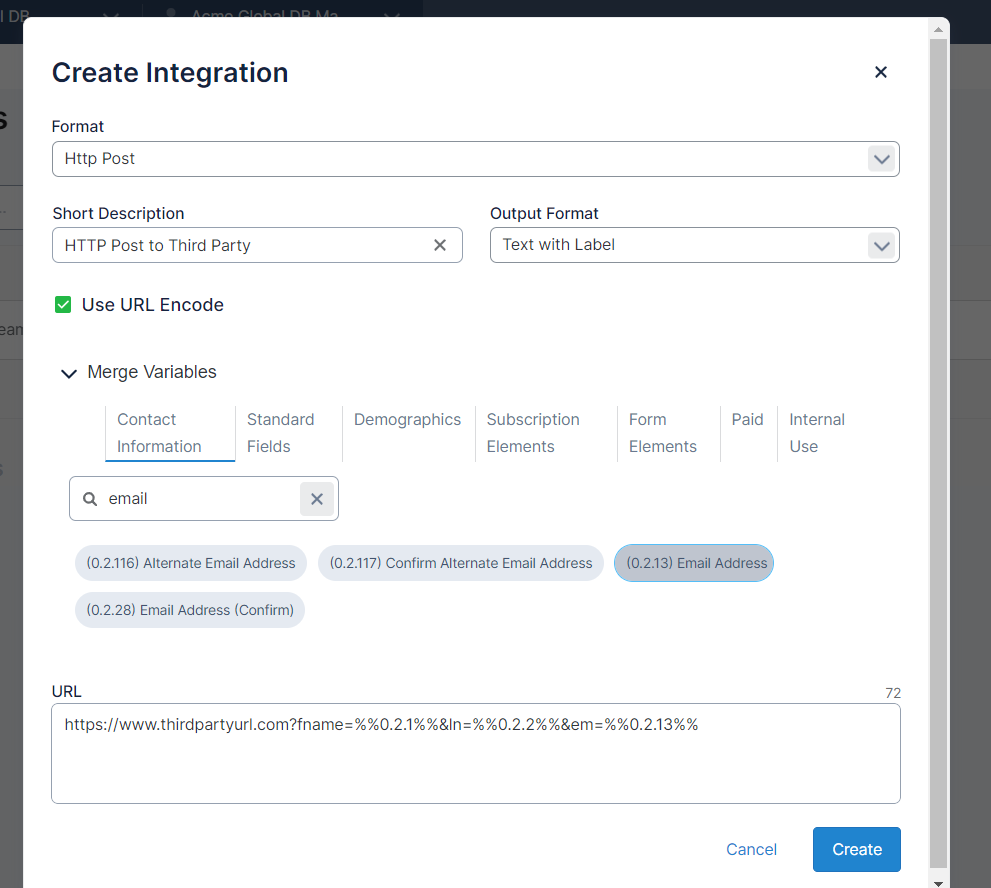
A ‘?’ is used to start the list of parameters after the URL. ‘&’ is used for every parameter following as you can see in the example above.
Posts are usually placed on the confirmation page so all the info collected on previous pages can be passed.
- HTTP Post: This function will post information from your form to another url. You can enter the http post URL in the ‘Url’ box and add any parameters necessary you would like to pass. To add parameters, you will need to type in the parameters required by the destination site and the corresponding tags found in the content box.
- Redirect: You can enter any link and redirect the subscriber there using this function. If this is on the page, the subscriber will be immediately redirected. You can also add parameters with merge variables to pass data onto the redirect destination.
- HTTP Post Redirect: This is a combination of the two functions above. The subscriber will be redirected to the url while the information is posted to the same place.
- HTTP Post with Form Data: Here you can add the URL you want to post to along with Form Data formatted in the way your third party application accepts the data (JSON for example). This is a Frontend post to a specified URL using mimeType=multipart/form-data.
- Backend Posts/UrlEncoded: This option will work very similarly to the above option but posts the data on the backend instead of the front end.
- Webhooks: This allows you to insert a webhook url and all form data will automatically be sent to that url. If you want to determine exactly what is sent instead of sending everything on the form, you can enter the fields in the Form Data box and only those fields will send.
- Custom Requests: This option provides the most flexibility on how you want to send data to the third party. You will be required to write your own javascript in order to post data.
Additional Form Options
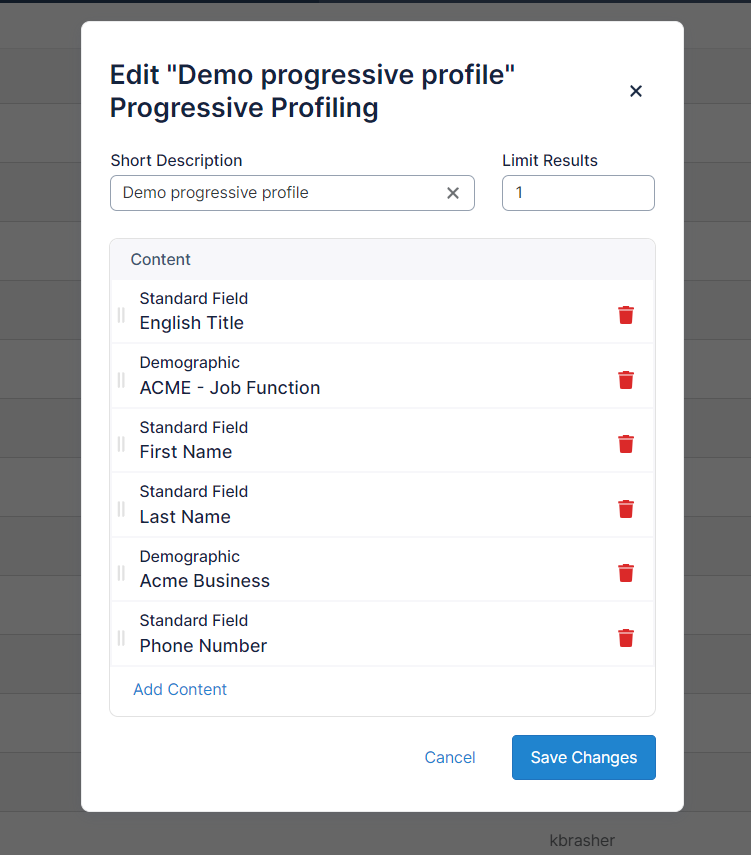
Just like Gift Recipient and Pass-along Content Group, Progressive Profiling allows you to create a ‘content group’. This content group will act a little differently on the form though. After the Progressive Profile content group is created and dragged onto the form, based on what is filled in the Limit Results field, that will be the amount of fields randomly displayed on the form at one time. If a visitor has already answered one of the fields from an earlier visit, that field will not display to that know visitor.