Search the Omeda Knowledge Base
Content Recommendations
Omeda’s Content Recommendations tool includes powerful data science algorithms that enable users to recommend pages to their site visitors. The recommender will run nightly across the audience members who have visited a page in the last 90 days and, based on the algorithm used, will create page recommendations for each audience member with scores for the strength of each recommendation. Users can choose from the Collaborative Filtering algorithm or the Tag-based algorithm. Collaborative Filtering places audience members into different cohorts based on their behavior. Users in the same cohort will be recommended similar pages with popular pages given a higher score. The Tag-Based filtering algorithm operates on the principle of semantic similarity between pages, determined by the presence and relevance of shared tags or keywords. Ideally each article is associated with a set of tags or keywords, that encapsulate its core themes, topics, or subject matter. These tags serve as the foundation for content recommendations whereby pages are analyzed for their similarity and then recommendation scores are created based on an individual’s previous interactions with those tags. These recommendations can then be displayed to users on your site within a personalization or an email so audience members can easily navigate to pages they are likely to be interested in.
Configuration
Enabling Content Recommendations
In order to configure Content Recommendations, a user must first have access to Content Recommendations and Olytics. To discuss adding this tool to your Omeda portal, reach out to your Client Success team member.
Once access is given, users can configure Content Recommendations to run on individual Olytics behaviors via the Olytics Integration screen (Menu > Acquire > CDP > Olytics).
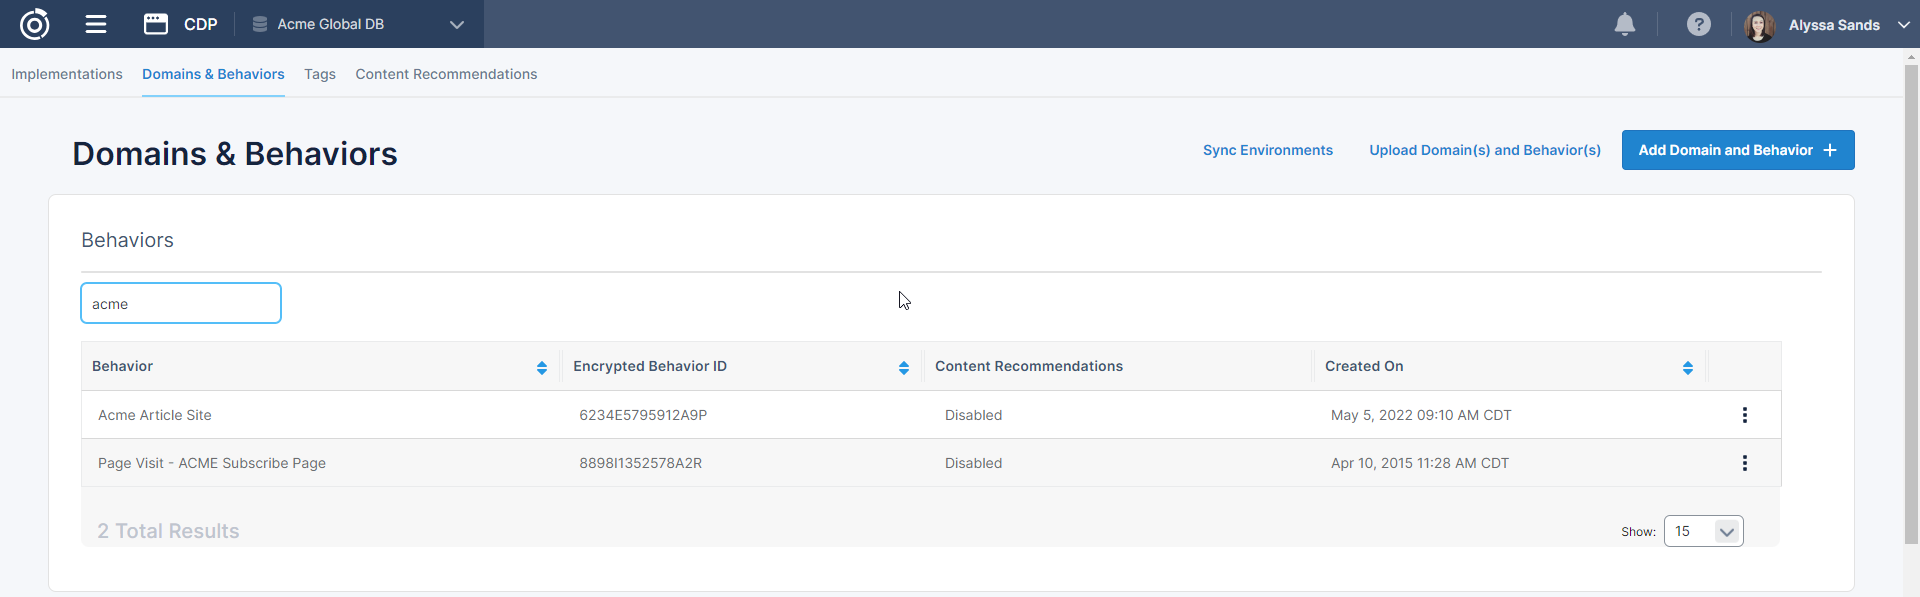
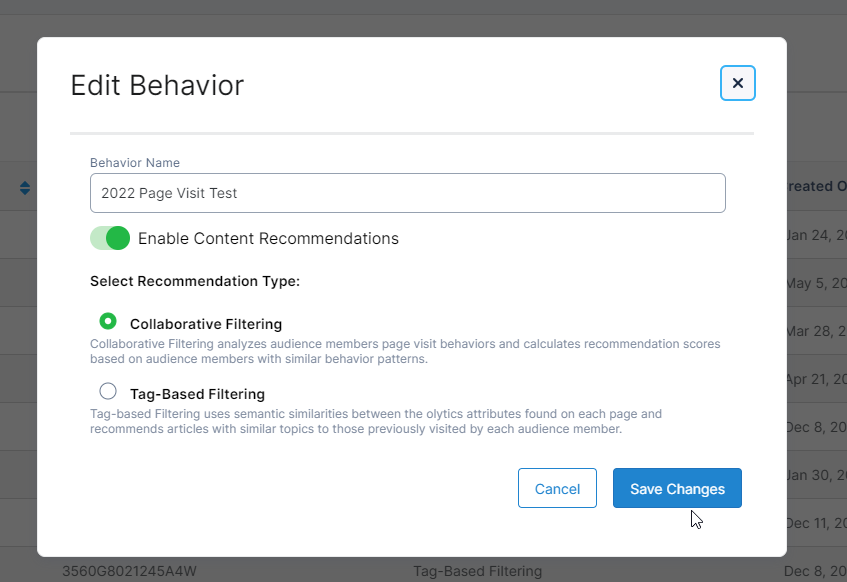
In the Domains and Behaviors tab, click the edit link for a behavior in the Content Recommendations column. A modal will appear to enable Content Recommendations and select your algorithm.
After Content Recommendations are enabled, the recommendations will be generated in the nightly Content Recommendations job later that night.
Restricting Pages from Content Recommendations
By default, all pages visited by your audience in the last 90 days will be pulled into the Content Recommendations nightly job. However, you may want the recommender to include only certain pages, so only pages with “article” in the url are recommended, or exclude certain pages, so your homepage or author descriptions aren’t recommend. You can do this via three different methods after first selecting your behavior from the drop down.
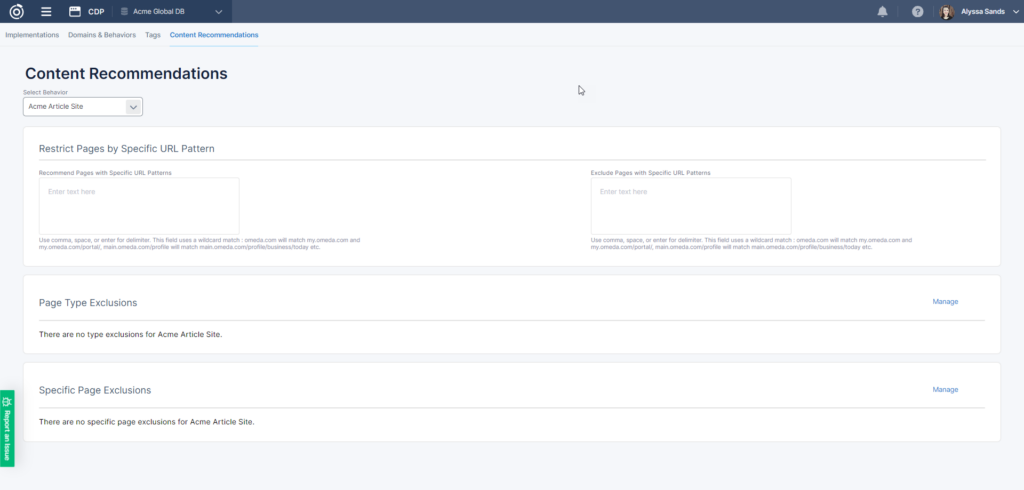
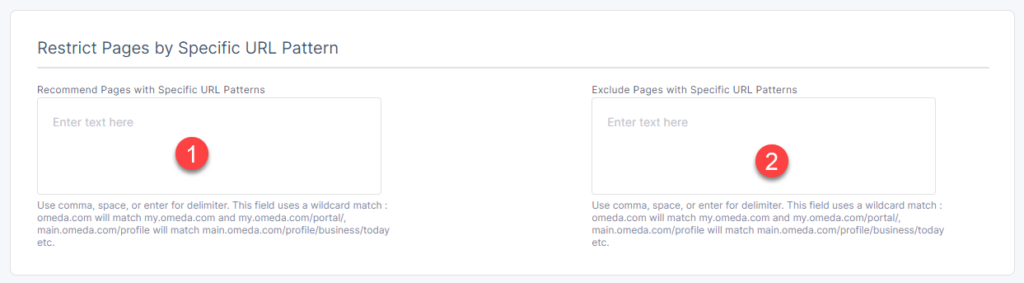
Restricting by URL Pattern
In this section you can set your recommender to only include certain pages that contain specific URL patterns and/or exclude pages that contain specific URL patterns.
- To include only pages that contain “article” for example you would enter article into the box on the left and use comma, space, or enter to submit. You can enter multiple strings if necessary. If no inclusion strings are present, all pages within the domain will be able to be recommended unless excluded.
- To exclude pages based on a url pattern, simply list the strings that, if found within the url, should exclude that url from recommendation. You can use comma, space, or enter to submit. You can enter multiple strings if necessary.
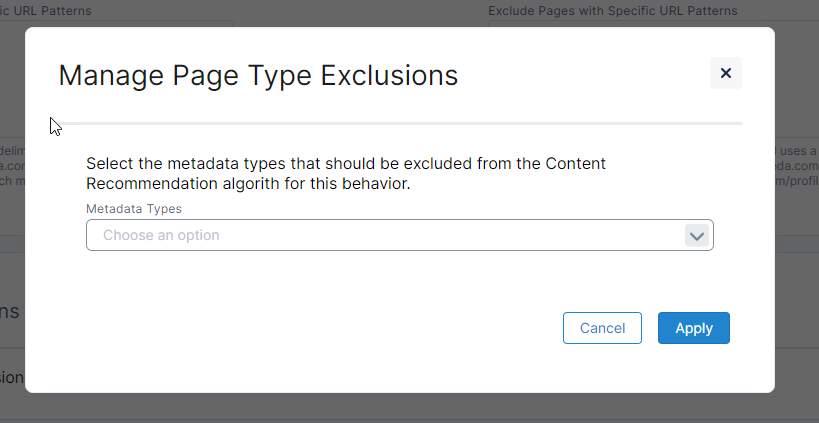
Excluding by Page Type
In the Page Type Exclusions section, click Manage to select the Page Types you want to exclude. The Page Type for each page will be populated from the “og: type” metadata present on the page and the options are Article, Profile, Book, and Video. In the Manage Page Type Exclusions modal you can select the types you’d like to exclude. Once you’ve made your selection, click Apply and pages with this type will no longer be pulled into the Content Recommendations program.
Excluding Specific Pages
To exclude specific pages where it is difficult to exclude by string, for example your domain’s homepage, click the Manage link in the Specific Page Exclusions section. In this modal, you can search for a specific page using exact match or wildcards (*) and then add the desired pages to the list of page exclusions by clicking the Arrow icon or selecting multiple pages and Add all at once.
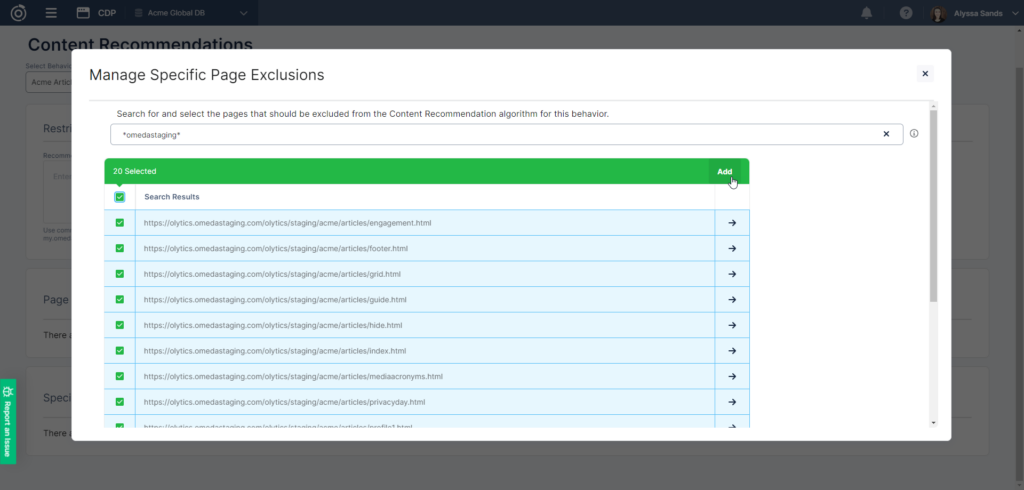
When you’ve finished adding pages, click Apply, and those pages will no longer be recommended or included in the Content Recommendations program.
Creating your Content Recommendations Personalization
To display the Content Recommendations on your site, you will need to create a Content Recommendations Personalization.
- Navigate to Personalization and Create New.
- Select the Personalization Type you’d like to use to display the Recommendations. Most users will select Standard, to display a pop up, or Inline, to display the recommendations in the context of each page.
- Select the Audience you’d like to target in the ‘Audience’ step and the pages you’d like to display your personalization in the ‘Restrictions’ step.
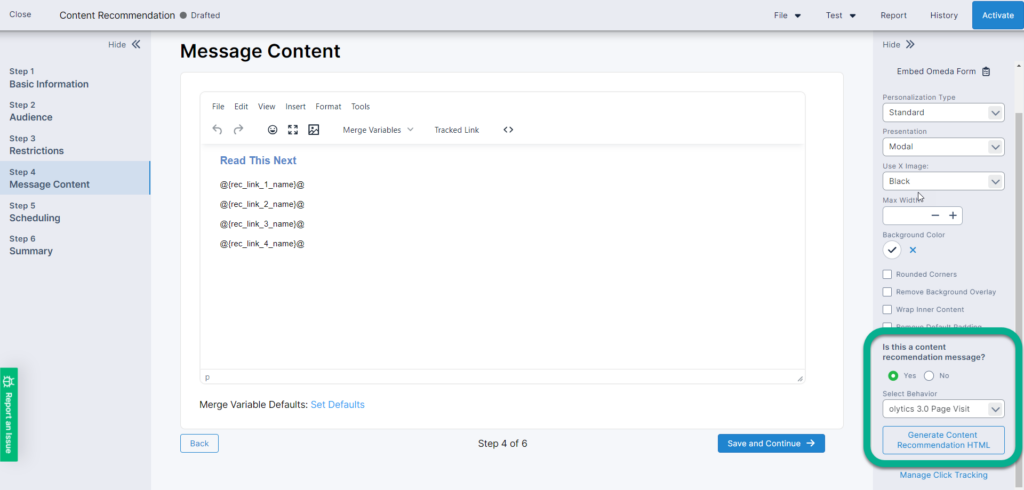
- In the ‘Message Content’ step, on the left hand side, select Yes in the “Is this a content recommendation message?” message. When selected, you can choos the Behavior whose recommendations you’d like to display and then click Generate Content Recommendation HTML. This will allow you to set the number of recommendations they’d like to display, the header text, and the header color. When finished, click Generate HTML.
- The HTML will populate in the content with the recommendation values populated as merge variables. The HTML can be changed like with any other personalization but be aware that the merge variables are what will be used to populate the links and link name.
- Click Test and Test on My Site to view how the personalization will show on your page with the default recommendations populated.
- Activate.
After activating your Personalization, note that if the Content Recommendations program has not yet run, the personalization will not display.
Using Content Recommendations in Email Builder
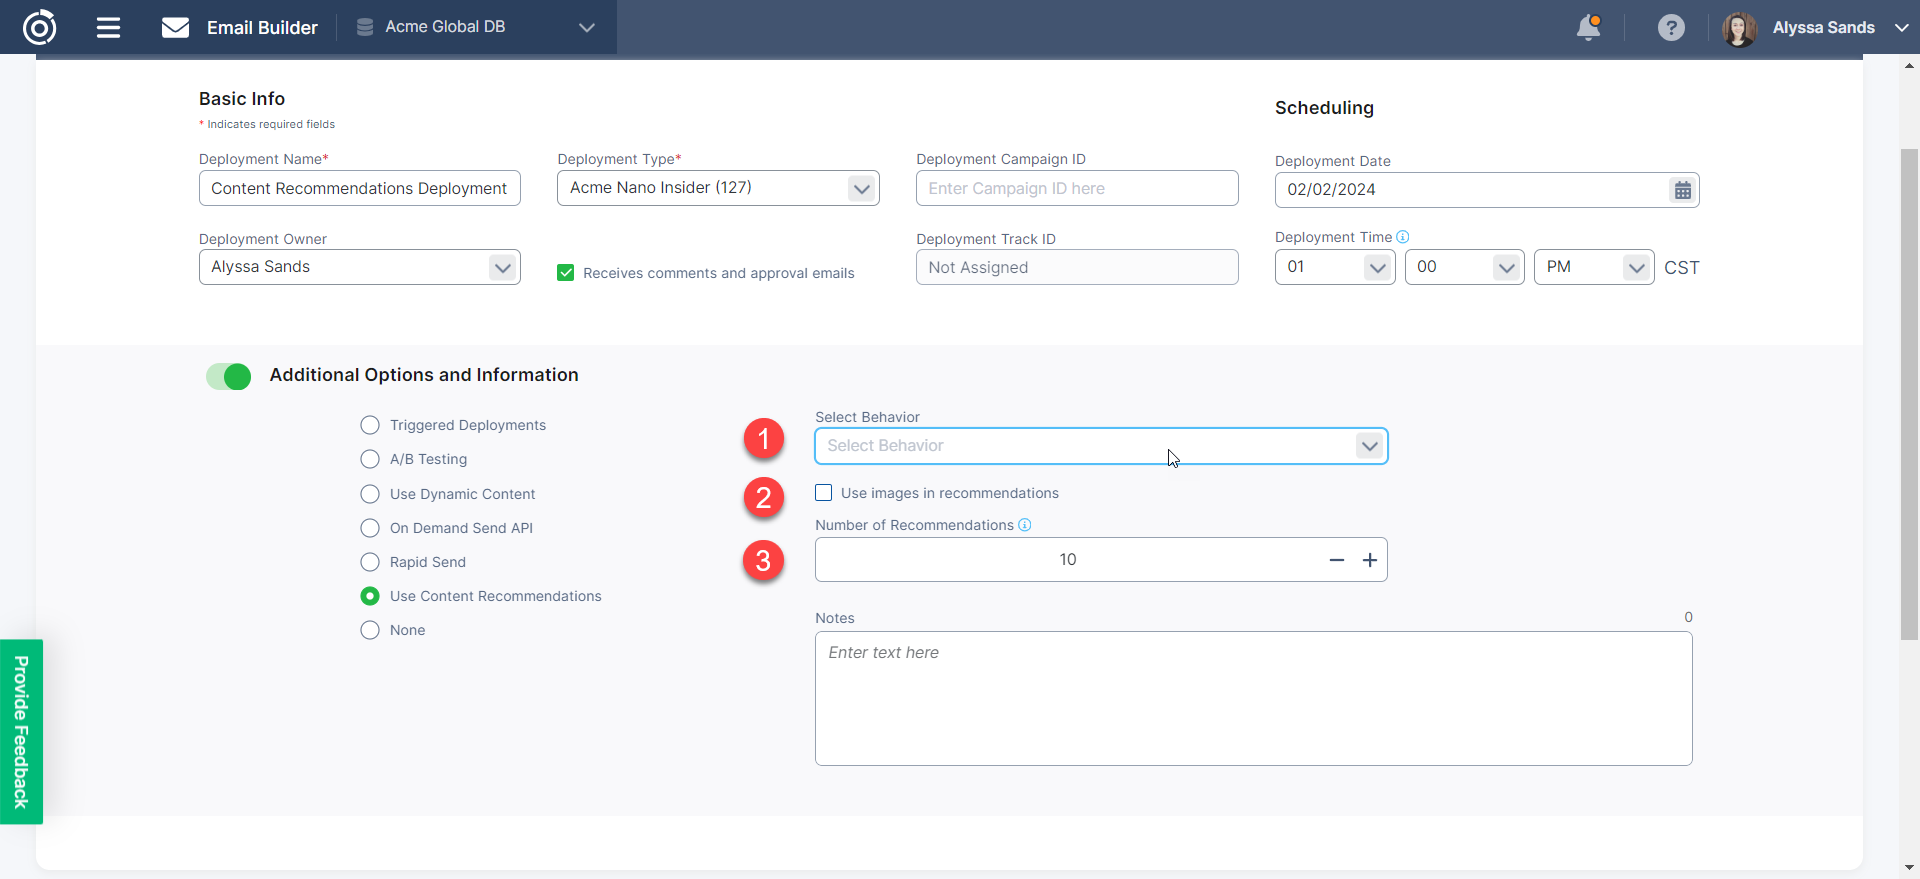
To add recommended content to an Email Builder deployment, a user and an organization must have access to Content Recommendations in Email Builder. Once the user has access, when a deployment is created or edited, a new option will be available in the Additional Options and Information section of the Deployment Summary pleat called, “Use Content Recommendations”.
After “Use Content Recommendations” is selected in a deployment:
- Select which Content Recommendations Behavior should be used to populate the recommendations.
- Select whether images will be used in the email for each recommended link. Selecting this option will ensure that links without images will not be recommended.
- Select the Number of Recommendations you will use in the email.
When the Content Recommendations settings are completed and the Deployment Summary pleat is saved, Content Recommendation merge variables can now be inserted into the message content.
In the WYSIWYG editor, several merge variables for each link can be inserted via the Insert Content Recommendations tool.
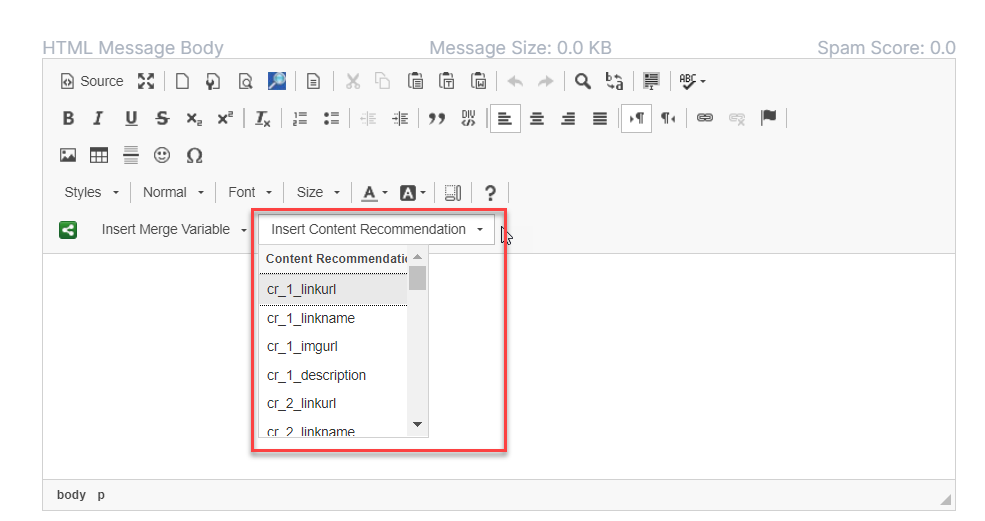
- cr_X_linkurl : this will be populated with the url for the recommended page.
- cr_X_linkname : this will be populated with the name of the recommended page. This value will equal the title value in the page’s metadata.
- cr_X_imgurl: this will be populated with the image for the recommended page. This value will equal the og:image value in the page’s metadata.
- cr_X_description : this will be populated with the description of the recommended page. This value will equal the description value in the page’s metadata.
In the Designer, these merge variables will available to insert into content via the Merge Tags selector.
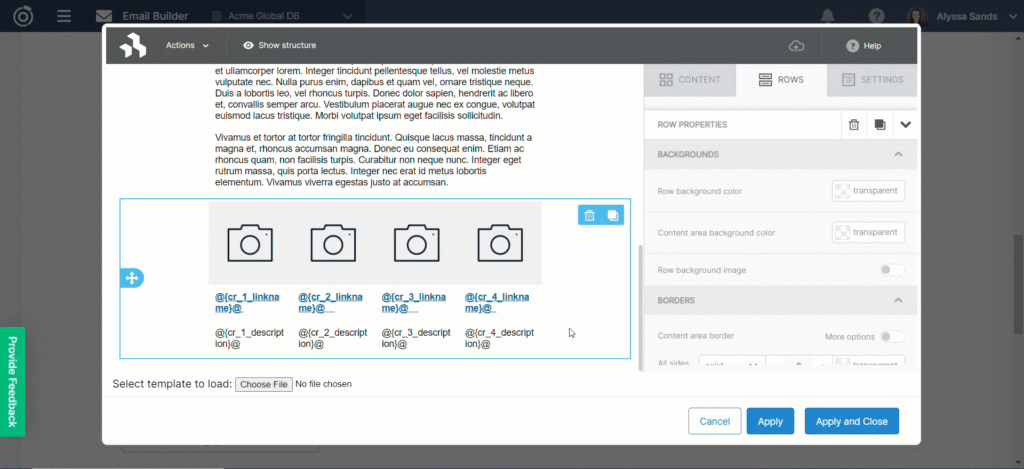
Note: the Image content element in the Designer is unable to render merge variables so values are cleared. Users can populate the content in the designer using a placeholder image and edit the html to contain the correct merge variables.
After Content Recommendations merge variables are entered into the content, users can set the default value for each merge variable. These values will only be used for recipients who don’t have individual recommended links AND where there are no available top link to recommend. These default values can be set at the deployment level or in Deployment Defaults
Frequently Asked Questions
What is Collaborative Filtering?
Collaborative Filtering is a technique for predicting the interests of an audience in order to make a recommendation. Generally, the audience is placed into cohorts based on previous similar behaviors, in this case, page visits, and then a new recommendation is made to members in those groups for a page that has not yet been visited. To put it very simply, if Audience Member A visited Page 1 and Audience Member B visited Page 1 and Page 2, we might recommend Page 2 to Audience Member A. This technique is frequently used across many different web applications, like Netflix’s Top Picks recommendations.
Will recommendations show in my Personalization or Email for a new page visitor?
Yes! If a visitor is new to your site, recommendations will be shown using the top recommended pages across all cohorts.
Will my recommendations exist for Anonymous visitors?
Yes, if an Anonymous visitor has visited your page before, they will be given recommendations based on their previous behaviors and the cohort they are in. If they have not, they will be shown the most recommended pages across all cohorts.