Search the Omeda Knowledge Base
-
The Omeda Experience
-
Documentation
-
-
- Brand Comprehensive Lookup Service
- Brand Promotions Quantity
- Brand Group Lookup
- Brand Promotions Content By Promo Code
- Brand Promotions By Promo Code
- Behavior Categories Lookup
- Behavior Actions Lookup
- Behavior Lookup Grouped By Product
- Behavior Lookup By Id
- Behavior Lookup
- Demographic Lookup by Brand API
- Deployment Type Lookup by Brand API
- Product Lookup by Brand API
-
- Customer Lookup By Email Address
- Subscription Lookup By Customer Id
- Order History Lookup by Customer Id
- Customer Lookup by Hashed Email Address
- Email Address Lookup By Customer Id
- Gift Lookup by Donor ID
- Behavior Lookup By Customer Id
- Subscription Lookup By Email
- Customer Merge History Lookup
- Customer Lookup By Name and Country
- External ID Lookup By Customer Id
- Demographic Lookup By Customer Id
- Phone Lookup By Customer Id
- Postal Address Lookup By Customer Id
- Customer Change Lookup
- Customer Comprehensive Lookup By Customer Id
- Customer Lookup By EncryptedCustomerId
- Customer Lookup By External ID
- Customer Lookup By PostalAddressId
- Customer Lookup By Customer Id
- Email Validity Lookup API
- Behavior Attribute Lookup by Customer Id
- Order Issue History Lookup by Customer Id
- Show all articles (8) Collapse Articles
-
- Email On Demand Send
- Email Deployment
- Email Deployment Clone
- Email Deployment Remove Audience
- Email Audience Assignment Status
- Email Deployment Content
- Email Deployment Approval Lookup
- Email Deployment Schedule
- Email Deployment Cancel
- Email Deployment Search
- Email Flag Email As Invalid
- Email Clicks
- Email - Checklist for Sends Created via API Calls
- Email Deployment Content Lookup
- Email Deployment Unschedule
- Email Deployment Lookup
- Email Deployment Test
- Email Deployment Add Audience
- Email Opt In/Out Lookup
- Email Optout Queue
- Email Optin Queue
- Email Deployment Audience List FTP
- Show all articles (7) Collapse Articles
-
-
- Release Notes for Feb. 2 | V24.2
- Release Notes for Feb. 23 | V24.3
- Release Notes for Mar. 15 | V24.4
- Release Notes for Apr. 5 | V24.5
- Release Notes for Apr. 26 | V24.6
- Release Notes for May 24 | V24.7
- Release Notes for June 7 | V24.8
- Release Notes for June 28 | V24.9
- Release Notes for July 19 | V24.10
- Release Notes for Aug. 9 | V24.11
-
- Release Notes for Jan 27 | V23.2
- Release Notes for Feb 17 | V23.3
- Release Notes for Mar 10 | V23.4
- Release Notes for Mar 31 | V23.5
- Release Notes for Apr 21 | V23.6
- Release Notes for May 19 | V23.7
- Release Notes for June 2 | V23.8
- Release Notes for June 23 | V23.9
- Release Notes for July 14 | V23.10
- Release Notes for Aug 4 | V23.11
- Release Notes for Aug 25 | V23.12
- Release Notes for Sep 15 | V23.13
- Release Notes for Oct 6 | V23.14
- Release Notes for Oct 27 | V23.15
- Release Notes for Nov 16 | V23.16
- Release Notes for V23.17
- Show all articles (1) Collapse Articles
-
- Release Notes for Jan 14 | V22.1
- Release Notes for Feb 4 | V22.2
- Release Notes for Feb 25 | V22.3
- Release Notes for Mar 18 | V22.4
- Release Notes for Apr 8 | V22.5
- Release Notes for Apr 29 | V22.6
- Release Notes for May 20 | V22.7
- Release Notes for June 10 | V22.8
- Release Notes for July 1 | V22.9
- Release Notes for July 22 | V22.10
- Release notes for Aug 12 | V22.11
- Release Notes for Sep 2 | V22.12
- Release Notes for Sep 23 | V22.13
- Release Notes for Oct 14 | V22.14
- Release Notes for Nov 4 | V22.15
- Release Notes for Dec 2 | V22.16
- Show all articles (1) Collapse Articles
-
- Release Notes for V21.1
- Release Notes for V21.2
- Release Notes for V21.3
- Release Notes for V21.4
- Release Notes for V21.5
- Release Notes for V21.6
- Release Notes for V21.7
- Release Notes for V21.8
- Release Notes for V21.9
- Release Notes for V21.10
- Release Notes for V21.11
- Release Notes for V21.12
- Release Notes for V21.13
- Release Notes for V21.14
- Release Notes for V21.15
- Release Notes for V21.16
- Release Notes for V21.17
- Show all articles (2) Collapse Articles
-
- Release Notes for V20.1
- Release Notes for V20.2
- Release Notes for V20.3
- Release Notes for V20.4
- Release Notes for V20.5
- Release Notes for V20.6
- Release Notes for V20.7
- Release Notes for V20.8
- Release Notes for V20.9
- Release Notes for V20.10
- Release Notes for V20.11
- Release Notes for V20.12
- Release Notes for V20.13
- Release Notes for V20.14
- Release Notes for V20.15
- Release Notes for V20.16
- Release Notes for V20.17
- Show all articles (2) Collapse Articles
-
- Release Notes for V19.1
- Release Notes for V19.2
- Release Notes for V19.3
- Release Notes for V19.4
- Release Notes for V19.5
- Release Notes for V19.6
- Release Notes for V19.7
- Release Notes for V19.8
- Release Notes for V19.9
- Release Notes for V19.10
- Release Notes for V19.11
- Release Notes for V19.12
- Release Notes for V19.13
- Release Notes for V19.14
- Release Notes for V19.15
- Release Notes for V19.16
- Release Notes for V19.17
- Show all articles (2) Collapse Articles
-
-
-
CDP – Customer Data Platform
-
-
- Personalization Overview
- Personalization - FAQs
- Personalization - Reporting
- Personalization - Archiving & Restoring
- Personalization - HTML Templates
- Personalization - Scroll Trigger and Infinite Scroll Pages
- Personalization - Merge Variables
- Personalization - 'Generate Personalization' Option
- Personalization & Metering - Click Tracking
- GDPR Consent Management
- Personalization - A/B Testing
-
-
Integrations
-
-
- Integration with Zapier
- Bring Customer Data in via Webhooks by Zapier Action - POST Event
- Bring Customer Data in using Zapier
- Omeda's Add Customer Action in Zapier
- Send Form Submission Data via Zapier
- Bring Customer Data in via Webhooks by Zapier Action – Custom Request Event
- Formatter by Zapier Action
-
-
-
Analytics & Reporting
-
- Odyssey - Reporting
- Personalization - Reporting
- Reports - Email Device and Client Type Reporting
- Email - Clickbot Reporting
- Reports - Email Reporting
- Metering - Reporting
- Reports - Audience Overlap Report
- Reports - Engaged Companies Report
- Reports-AutoRenewals Analysis Report
- Reports - Audience Report
- Reports - Issue Activity Reporting
- Reports - Overview
- Reports - Web Behavior Reporting
- Reports- FAQs
- Reports - Data Tracker Reporting
- Reports - Audience Builder Reporting
- Form Submit Report
- Behavior Promo Code Report
- Reporting Library
- Show all articles (4) Collapse Articles
-
Marketing Automation & Email Builder
-
-
- Email On Demand Send
- Email Deployment
- Email Deployment Clone
- Email Deployment Remove Audience
- Email Audience Assignment Status
- Email Deployment Content
- Email Deployment Approval Lookup
- Email Deployment Schedule
- Email Deployment Cancel
- Email Deployment Search
- Email Flag Email As Invalid
- Email Clicks
- Email - Checklist for Sends Created via API Calls
- Email Deployment Lookup
- Email Deployment Test
- Email Deployment Add Audience
- Email Opt In/Out Lookup
- Email Optout Queue
- Email Optin Queue
- Email Deployment Audience List FTP
- Show all articles (5) Collapse Articles
- Email Builder - User Guide
- Email - Clickbot Reporting
- Reports - Email Reporting
- Email - Link Tracking Errors
- Email - Deployment Defaults
- Omeda - Getting Support
- Email - Checklist for Sends Created via API Calls
- Email - Assigning Link Tracking Categories
- Email - Deliverability
- Email - Opt-Out Footer Merge Variable
- Email - Stealth Link
- Email - Behavioral Data
- Email - Automation for Email Sending
- Email - Deployment Type Creation
- Email – Training Schedules for New Clients
- Email - Request a New Deployment Type
- Email - Adding Domains to Safe Sender List
- Email - Deployment Checklist & Best Practices
- Email Deployment Unschedule
- Email Builder - Getting Started
- Campaign Tool - Overview
- Email - Automated ACS Notifications
- Email - Dynamic Content
- Email - Recurring Deployments
- Email - FAQs
- Email - Web Tracking
- Email - Validation Services
- Email Services - Overview & Capabilities
- Email - Web Tracking String Parameter Definitions
- Email - Appending Lists On Triggered Deployments
- Email - Preference Page
- Email - A/B Testing
- Email - Triggered Deployments
- Email - Merge Variables
- Email - User Set-up
- Email - Advanced Features
- Email - Glossary
- Email – Checklist for New Clients
- Show all articles (23) Collapse Articles
-
-
-
- Odyssey - Audience Element
- Odyssey - Timing Elements
- Odyssey - Adroll Elements
- Odyssey - Facebook Elements
- Odyssey - Filter Element
- Odyssey - Form Submit Element
- Odyssey - Pathfinder Element
- Odyssey - Export Element
- Odyssey - Split Element
- Odyssey - Personalization Element
- Odyssey - Metering Element
- Odyssey - Email Element
- Odyssey - Goal Element
- Odyssey - A/B Test Element
- Odyssey - Google Ad Manager Element
- Odyssey Fatigue Filter Element
- Show all articles (1) Collapse Articles
- Odyssey Overview
- Odyssey - FAQs
- Odyssey - Editing an In Progress Voyage
- Odyssey - Reporting
- Odyssey - Querying Element Visitors in Audience Builder
- Odyssey - Using Profiles
- Odyssey - Creating Custom Templates
- Odyssey - Global Settings
- Odyssey - Email Conditions
- Odyssey - Omeda's Email Designer
- Odyssey - Email Designer Templates
- Odyssey - Voyage Templates
- Odyssey - Merging Paths
- Odyssey - Email Merge Variables
- Odyssey - Error Troubleshooting
- Odyssey - Dynamic Content
- Show all articles (1) Collapse Articles
-
-
-
Data Management & Governance
-
- Odyssey - Querying Element Visitors in Audience Builder
- Audience Builder - Product Field Library
- Examples of Audience Builder Queries Using Paid Fields
- Querying Your Olytics Data
- Data Loader - Querying in Audience Builder
- Email - Behavioral Data
- Audience Builder (OnQ) - Date Field Definitions
- Audience Builder - How To Query Customers
- Audience Builder (OnQ) - Query Result Outputs
- Audience Builder - Overview
- Reports - Audience Builder Reporting
- Audience Builder - Admin User Guide
- Audience Builder (OnQ) - Advanced Features
- Audience Builder (OnQ) - Match Evaluation
-
- Client Empowerment: Message Types
- Client Empowerment: Profiles
- Client Empowerment: API Keys
- Client Empowerment: Alternate IDs
- Client Empowerment: Logos
- Client Empowerment: Demographics
- Client Empowerment: Database Settings
- Client Empowerment: Behaviors
- Client Empowerment: Deployment Products
- Client Empowerment: Deployment Types
- Client Empowerment : Managing Your Database
-
- Data Loader - Webhooks
- Data Loader - Loading Data
- Data Loader FAQs
- Data Loader Introduction
- Data Loader - Basic Navigation
- Data Loader - Querying in Audience Builder
- Data Loader - Templates
- Data Loader - Validation Rules by Use Case
- Data Loader - FTP Sites
- Data Loader - S3 Buckets
- Data Loader - Controlled Magazine Data
-
-
Subscription & Fulfillment Management
-
Forms & Landing Pages
-
- Form Builder Overview
- Form Builder - Form Dashboard
- Form Builder - Content
- Form Builder - Integrations
- Form Builder - Expressions
- Form Builder - Create a Form
- Form Builder - Settings
- Form Builder - Form Categories and Form Types
- Form Builder - Builder
- Form Builder - Error Log
- Form Builder - Payment Gateways
- Form Builder ADA Compliance
-
- How to send a user back to your website after form submission (redirect to a return URL)
- Form Builder - Adding a This Is Not Me Widget
- Form Builder - Embedding Webforms via iFrame or Javascript
- How To Use Progressive Profiling
- Form Builder - Using the PayPal Payment Method
- Form Builder - Using Campaign Promo Codes
- Using Form Builder to capture a Behavior Subscription Attribute
- Form Builder - reCAPTCHA v3 Implementation
- How To Use A/B Testing on your Form Builder Webform (video)
- Styling Your Form Builder Forms
- Best Practices for Testing Forms
- Form Builder Forms URL Structure and Appending Parameters
- Using a Custom Domain for your Form Builder Webform
-
-
Success Use Cases
-
Professional Services
-
Video Library
-
FAQs
Audience Search – Group Subscription Management
Group Subscription Management
A group subscription provides access to a set number of authorized members, and allows a group administrator to manage the list of members. To manage group subscriptions, a group has to be set up in settings. There are two types of group that can be set up namely Admin Earns all and Earns across members.
- Admin earns all: In this type of group, admin earns all the money and the members have $0 attached to them.
- Earns across members: In this type of group, the admin and the members earn the money individually.
Creating a Group
- Ensure the Group has already been setup in Settings. Only certain administrators have the privilege to setup groups. If you need to create a group and the group administrator already exists in the database, ensure you know his/her Customer Id.
- Click on Settings, select your organization in the dropdown at the top, then select the brand (on the left) this group belongs to.
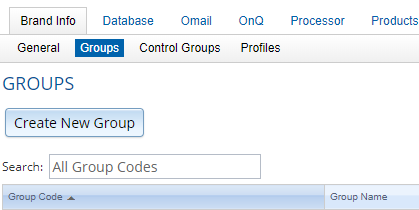
- Click on Groups. This is where you can see all existing groups for your products. If your group doesn’t exist, then click the Create New Group button.

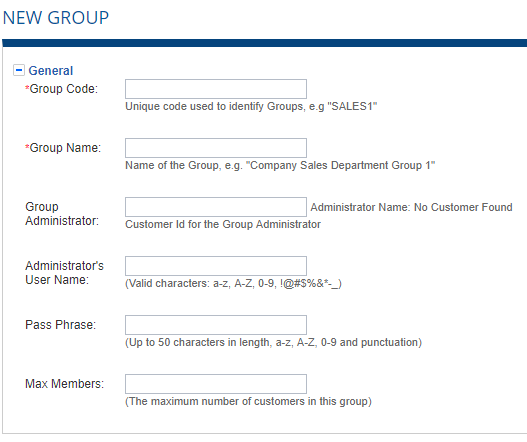
- Enter a unique Group code and a unique group name. You will need to add in the customer id in the group administrator field for the group administrator.
- The administrator’s username and the Pass Phrase can be used by the group member to log into a group membership page.
- Max Members indicates how many group members are allowed in a group. Once the group membership reaches that limit, no more members may be added to that group. All these fields except the group code and group name is optional and are designed to work with Admin Earns All type of group.

- Click on “Add Product”. Choose the product from the drop down. Enter the group price per member/Year. Choose the common expiration Issue from the drop down which has to be a future date. The earning code could either be Admin Earns All or Earns across Members. The admin earns all group works as follows: If the admin’s subscription is suspended, cancelled or expired all the group members subscriptions will be suspended, cancelled or expired. If the group admin gets re-activated upon payment, the rest of the group will be reactivated as well. For Earns across members, any cancellation, suspense or expire of the admin’s subscription will not affect the members’ subscriptions.

- Click on the “Create” button. The group is created successfully.
- Once the group is created, if you need to edit it, enter the group code in the search text box and press “Enter”. Click on the group to make any changes and hit save.

Adding a Group Subscription (Same steps for AEA/ EAM groups)
Once a group has been created, ensure the Group Admin and the Group Members have already been setup as a customers. In Customer View, search for the customer which will be the admin of the group. To add a new product click “Enter New Product” button
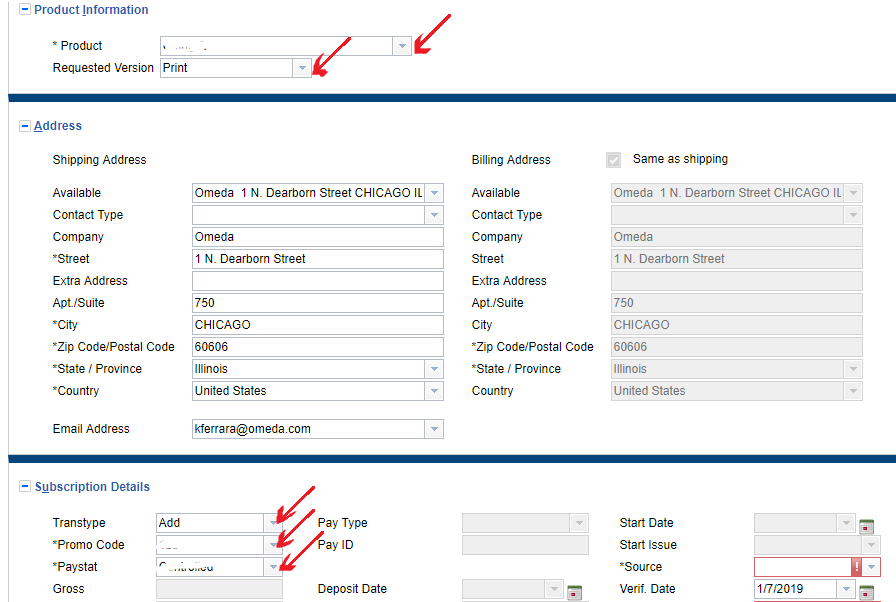
- Choose a product for which the group is set up in settings from the Product drop down
- Choose the requested version from the drop down
- Choose the Transtype = Add or Renewal if the product subscription already exists
- Choose the promo code from the drop down
- Choose the paystat either paid with order or credit from the drop down.

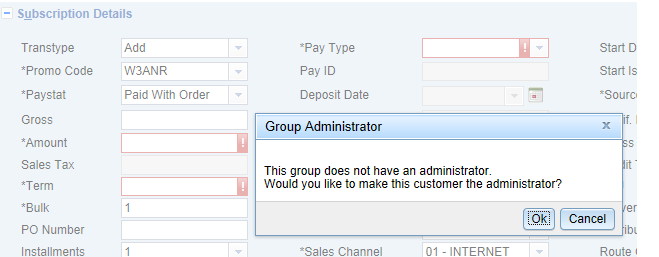
- Choose the group code from the drop down. A pop up appears asking if this customer could be made the group admin. Click OK. The customer is made the admin and the customer ID would be populated in the Group administrator field in the settings section where the groups was created.

- Term is auto populated based on the expire date chosen for this group in the settings section.
- Enter the amount, Pay type, Pay ID and the Deposit date. You can select class 1 (active qualified) or select the group specific class 26/27 (non-receiving group admin). 26 is used on earn across members type of group where the admin does not receive an issue and doesn’t have any money tied to him/her. 27 is used on admin earns all type of group where the admin has all the groups money but does not want to receive the magazine.
- Choose the source and audit type from the drop down. The admin creation is successful and is shown below.

- Click on “Add another member” link in the lower left corner of the Groups section.
- Enter the customer ID of the member in the text box and press Tab key.
- The member is added as shown below. Repeat the above two steps to add more members if necessary. Click on the “X” to remove the member added. Also, you can add each member individually by adding a group code to the order window, which will tie the member to the group and group admin.

- Click on demographics if demographics need to be added to the group admin’s record. Select or enter any appropriate values. (This is only updating the group admin’s demographics) **Please note-updating demographics for each member will need to be done on each member’s account.**
- Click on “Save to pending” button.

- Click Save Customer Updates.

- An alert will appear saying “Saving ALL pending updates cannot be undone.” Click OK and then OK again.
Renewing a Group Subscription
- Search for the admin customer ID
- Click on the existing group subscription order.
- Click on the “New Group order.”

- Choose the requested version, Transtype = Renewal, Promo code and Paystat. Enter the amount and term. Choose the other mandatory fields. Under the groups section, list of existing members along with the admin is displayed. The user can add new members here by clicking on the “Add another Member” link. The user also has the option of pick and choose the members by appropriately checking the check box.
- Click on demographics if demographics need to be added to the group admin’s record. Select or enter any appropriate values. (This is only updating the group admin’s demographics) **Please note-updating demographics for each member will need to be done on each member’s account.**
- Click Save to pending.
- Click on ”Save Customer Updates”
Adjusting a Group Subscription
Follow the same instructions in Adjusting a Subscription and adjust each group member’s subscription.
Suspending a Group Subscription
Follow the same instructions in Suspending a Subscription and suspend each group member’s subscription.
Reinstating a Group Subscription
Follow the same instructions in Reinstating a Subscription and reinstate each group member’s subscription.
Cancelling and Refunding a Group Subscription
Follow the same instructions in Cancelling and Refunding a Subscription and cancel and refund each group member’s subscription.